Controls: Difference between revisions
mNo edit summary |
(Made the button for 2's "Camera ground-level angle" on the Switch version correct.) |
||
| (113 intermediate revisions by 23 users not shown) | |||
| Line 1: | Line 1: | ||
{{game icons|p=y|p2=y|p3=y|hp=y}} | {{game icons|p=y|p2=y|p3=y|p4=y|hp=y|pa=y}} | ||
{{stub|Needs more ''Pikmin 3'' info, full ''Nintendo Land'' info, and missing ''New Play Control!'' info.}} | {{stub|Needs more ''Pikmin 3'' info, full ''Nintendo Land'' info, and missing ''New Play Control!'' info.}} | ||
{{otheruses|controls of the ''Pikmin'' games|the [[data file]] category|Controls (Exploration Notes)}} | {{otheruses|controls of the ''Pikmin'' games|the [[data file]] category|Controls (Exploration Notes)}} | ||
The [[Pikmin series|''Pikmin'' games]] have a variety of '''controls''' used to control the game's [[menu]]s, [[leader]]s, [[camera]] and gameplay mechanics. These controls come in the form of button presses and releases, analog stick tilts, [[Wii]] Remote pointer movements and touchscreen touches. | The [[Pikmin series|''Pikmin'' games]] have a variety of '''controls''' used to control the game's [[menu]]s, [[leader]]s, [[camera]] and gameplay mechanics. These controls come in the form of button presses and releases, analog stick tilts, [[Wii]] Remote pointer movements and touchscreen touches. | ||
==In-game controls== | ==In-game controls== | ||
| Line 21: | Line 8: | ||
===''Pikmin''=== | ===''Pikmin''=== | ||
The first title in the franchise is played on the [[GameCube]], and hence, with the GameCube controller. The ''[[New Play Control! Pikmin]]'' version is played using the [[Wii]] Remote and the Nunchuk. | The first title in the franchise is played on the [[GameCube]], and hence, with the GameCube controller. The ''[[New Play Control! Pikmin]]'' version is played using the [[Wii]] Remote and the Nunchuk, and most button inputs are edited accordingly. In the [[Pikmin 1 (Nintendo Switch)|Nintendo Switch port]], the controls are more faithful to the GameCube version than ''New Play Control! Pikmin'', though the inputs themselves are very similar to {{p3d}}. | ||
{| class = "wikitable" style="width: 80%" | {| class = "wikitable" style="width: 80%" | ||
! Action | |||
! style="width:12%" | GameCube | ! style="width:12%" | GameCube | ||
! style="width:12%" | Wii | ! style="width:12%" | Wii | ||
! | ! style="width:12%" | Switch | ||
! Notes | |||
|- | |||
| Move | |||
| align="center"|{{button|gc|stick|size=x24px}}<br>fully held | |||
| align="center"|{{button|wii|stick|size=x24px}} | |||
| align="center"|{{button|switch|lstick|size=x24px}}<br>fully held | |||
| | |||
|- | |||
| Move [[cursor]] – main | |||
| align="center"|{{button|gc|stick|size=x24px}}<br>lightly or fully held | |||
| align="center"|{{button|wii|remote|size=x24px}} | |||
| align="center"|{{button|switch|lstick|size=x24px}}<br>lightly or fully held | |||
| | |||
|- | |||
| Move cursor – alternate | |||
| align="center"| N/A | |||
| align="center"| N/A | |||
| align="center"| Move the right Joy-Con / Move the Pro Controller | |||
| | |||
|- | |- | ||
|align="center"| | | Reset cursor | ||
|align="center"|{{button| | | align="center"| N/A | ||
| align="center"| N/A | |||
| align="center"| {{button|switch|lstickclick|size=x24px}} | |||
| | | | ||
|- | |||
| Hold and [[throw]] Pikmin | |||
| align="center"|{{button|gc|a|size=x24px}} | |||
| align="center"|{{button|wii|a|size=x24px}} | |||
| align="center"|{{button|switch|a|size=x24px}} | |||
| Pressing holds a Pikmin, releasing throws it. | |||
|- | |- | ||
|align="center"|{{button| | | Release held Pikmin | ||
| align="center"| N/A | |||
| | | align="center"| N/A | ||
| align="center"| {{button|switch|a|size=x24px}} + {{button|switch|b|size=x24px}} | |||
| | |||
|- | |- | ||
|align="center"|{{button|gc| | | [[Whistle]] | ||
|align="center"|{{button|wii| | | align="center"|{{button|gc|b|size=x24px}} | ||
| | | align="center"|{{button|wii|b|size=x24px}} | ||
| align="center"|{{button|switch|b|size=x24px}} | |||
| Holding it down longer increases the range. | |||
|- | |- | ||
|align="center"|{{button|gc| | | [[Swarm]] | ||
|align="center"|{{button|wii| | | align="center"|{{button|gc|c|size=x24px}} | ||
| | | align="center"|{{button|wii|padd|size=x24px}} | ||
| align="center"|{{button|switch|l|size=x24px}} + {{button|switch|rstick|size=x24px}} | |||
| On the GameCube and Nintendo Switch, the stick determines swarm direction and distance. On the Wii, Pikmin go in the direction and distance of the cursor when the button is held. | |||
|- | |||
| [[Dismiss]] | |||
| align="center"|{{button|gc|x|size=x24px}} | |||
| align="center"|{{button|wii|c|size=x24px}} | |||
| align="center"|{{button|switch|x|size=x24px}} | |||
| | |||
|- | |||
| Swap Pikmin type | |||
| align="center"|N/A | |||
| align="center"|{{button|wii|b|size=x24px}} | |||
| align="center"|{{button|switch|r|size=x24px}} | |||
| While holding a Pikmin, swaps it for one of a different type. | |||
|- | |- | ||
|align="center"|{{button| | | Swap Pikmin [[maturity]] | ||
|align="center"|{{button| | | align="center"|N/A | ||
|[[ | | align="center"|{{button|wii|padd|size=x24px}} | ||
| align="center"|{{button|switch|x|size=x24px}} | |||
| When holding a Pikmin, swap it for one of a different maturity in the same type. Also causes the [[swarm]] effect on the cursor, but the group does not move. | |||
|- | |- | ||
|align="center"|{{button|gc| | | [[Pluck]] sprout | ||
|align="center"|{{button|wii| | | align="center"|{{button|gc|a|size=x24px}} | ||
| | | align="center"|{{button|wii|a|size=x24px}} | ||
| align="center"|{{button|switch|a|size=x24px}} | |||
| | |||
|- | |- | ||
|align="center"|{{button|gc| | | [[Punch]] | ||
|align="center"|{{button|wii| | | align="center"|{{button|gc|a|size=x24px}} | ||
| | | align="center"|{{button|wii|a|size=x24px}} | ||
| align="center"|{{button|switch|a|size=x24px}} | |||
| Only when not commanding Pikmin. | |||
|- | |- | ||
|align="center"|{{button|gc|padd|size=x24px}} | | [[Lie down]] | ||
|align="center"|{{button|wii|2|size=x24px}} | | align="center"|{{button|gc|padd|size=x24px}} | ||
|[[ | | align="center"|{{button|wii|2|size=x24px}} | ||
| align="center"|{{button|switch|rstickclick|size=x24px}} | |||
| Only after [[day]] 1. | |||
|- | |- | ||
|align="center"| | | Face [[camera]] forward | ||
|align="center"|{{button|wii| | | align="center"|{{button|gc|l|size=x24px}}<br>tapped | ||
| | | align="center"|{{button|wii|z|size=x24px}}<br>tapped | ||
| align="center"|{{button|switch|zl|size=x24px}} | |||
| Tapping the button makes the [[camera]] face towards the cursor on the GameCube, but towards where the leader is facing on the Wii and Nintendo Switch. | |||
|- | |- | ||
|align="center"| | | Rotate camera | ||
|align="center"|{{button|wii| | | align="center"|{{button|gc|l|size=x24px}}<br>lightly or fully held | ||
| | | align="center"|{{button|wii|z|size=x24px}}<br>held | ||
| align="center"|{{button|switch|rsticklr|size=x24px}} | |||
| On the GameCube and Wii, the player can press the button and use {{button|gc|stick|wii|stick}} to rotate the camera sideways. | |||
|- | |- | ||
|align="center"|{{button|gc| | | Change camera's distance | ||
|align="center"|{{button|wii|z|size=x24px}} | | align="center"|{{button|gc|r|size=x24px}} | ||
| align="center"|{{button|wii|padlr|size=x24px}} | |||
| align="center"|{{button|switch|zr|size=x24px}} | |||
| | |||
|- | |||
| Change camera's vertical angle | |||
| align="center"|{{button|gc|z|size=x24px}} | |||
| align="center"|{{button|wii|padu|size=x24px}} | |||
| align="center"|{{button|switch|rstickud|size=x24px}} | |||
| | | | ||
|- | |- | ||
|align="center"|{{button|gc| | | Open [[Onion menu]] | ||
|align="center"|{{button|wii| | | align="center"|{{button|gc|a|size=x24px}} | ||
| | | align="center"|{{button|wii|a|size=x24px}} | ||
| align="center"|{{button|switch|a|size=x24px}} | |||
| When below an [[Onion]]'s beam. | |||
|- | |- | ||
|align="center"|{{button|gc| | | [[Olimar's monitor]] | ||
|align="center"|{{button|wii| | | align="center"|{{button|gc|y|size=x24px}} | ||
| | | align="center"|{{button|wii|+|size=x24px}} | ||
| align="center"|{{button|switch|+|size=x24px}} | |||
| | |||
|- | |- | ||
|align="center"|{{button|gc|start|size=x24px}} | | [[Pause]]/resume | ||
|align="center"|{{button|wii|-|size=x24px}} | | align="center"|{{button|gc|start|size=x24px}} | ||
| | | align="center"|{{button|wii|-|size=x24px}} | ||
| align="center"|{{button|switch|-|size=x24px}} | |||
| | |||
|} | |} | ||
===''Pikmin 2''=== | ===''Pikmin 2''=== | ||
The sequel retains many of the controls from the first game, but with some additions and changes. Like the first game, the original GameCube version is played using a GameCube controller, | The sequel retains many of the controls from the first game, but with some additions and changes. Like the first game, the original GameCube version is played using a GameCube controller, the ''[[New Play Control! Pikmin 2]]'' version is played with the Wii Remote and the Nunchuk, and the [[Pikmin 2 (Nintendo Switch)|Nintendo Switch version]] uses a control scheme similar to {{p3d}}. | ||
{| class = "wikitable" style="width: 80%" | {| class = "wikitable" style="width: 80%" | ||
! Action | |||
! style="width:12%" | GameCube | ! style="width:12%" | GameCube | ||
! style="width:12%" | Wii | ! style="width:12%" | Wii | ||
! | ! style="width:12%" | Switch | ||
! Notes | |||
|- | |||
| Move | |||
| align="center"|{{button|gc|stick|size=x24px}}<br>fully held | |||
| align="center"|{{button|wii|stick|size=x24px}} | |||
| align="center"|{{button|switch|lstick|size=x24px}}<br>fully held | |||
| | |||
|- | |||
| Move [[cursor]] – main | |||
| align="center"|{{button|gc|stick|size=x24px}}<br>lightly or fully held | |||
| align="center"|{{button|wii|remote|size=x24px}} | |||
| align="center"|{{button|switch|lstick|size=x24px}}<br>lightly or fully held | |||
| | |||
|- | |||
| Move cursor – alternate | |||
| align="center"| N/A | |||
| align="center"| N/A | |||
| align="center"| Move the right Joy-Con / Move the Pro Controller | |||
| | |||
|- | |||
| Reset cursor | |||
| align="center"| N/A | |||
| align="center"| N/A | |||
| align="center"| {{button|switch|rstickclick|size=x24px}} | |||
| | |||
|- | |||
| Hold and [[throw]] Pikmin | |||
| align="center"|{{button|gc|a|size=x24px}} | |||
| align="center"|{{button|wii|a|size=x24px}} | |||
| align="center"|{{button|switch|a|size=x24px}} | |||
| Pressing holds a Pikmin, releasing throws it. | |||
|- | |- | ||
|align="center"|{{button| | | Release held Pikmin | ||
| align="center"| N/A | |||
| align="center"| N/A | |||
| align="center"| {{button|switch|a|size=x24px}} + {{button|switch|b|size=x24px}} | |||
| | | | ||
|- | |- | ||
|align="center"|{{button|gc|b|size=x24px}} | | [[Whistle]] | ||
|align="center"|{{button|wii|b|size=x24px}} | | align="center"|{{button|gc|b|size=x24px}} | ||
| | | align="center"|{{button|wii|b|size=x24px}} | ||
| align="center"|{{button|switch|b|size=x24px}} | |||
| Holding it down longer increases the range. | |||
|- | |||
| [[Swarm]] | |||
| align="center"|{{button|gc|c|size=x24px}} | |||
| align="center"|{{button|wii|padd|size=x24px}} | |||
| align="center"|{{button|switch|l|size=x24px}} + {{button|switch|rstick|size=x24px}} | |||
| On the GameCube and Nintendo Switch, the stick determines swarm direction and distance. On the Wii, Pikmin go in the direction and distance of the cursor when the button is held. | |||
|- | |||
| [[Dismiss]] | |||
| align="center"|{{button|gc|x|size=x24px}}<br>tapped | |||
| align="center"|{{button|wii|c|size=x24px}}<br>tapped | |||
| align="center"|{{button|switch|x|size=x24px}} | |||
| | |||
|- | |||
| Swap Pikmin type | |||
| align="center"|{{button|gc|padlr|size=x24px}} | |||
| align="center"|{{button|wii|b|size=x24px}} | |||
| align="center"|{{button|switch|r|size=x24px}} | |||
| While holding a Pikmin, swaps it for one of a different type. | |||
|- | |||
| Swap Pikmin [[maturity]] | |||
| align="center"|{{button|gc|padud|size=x24px}} | |||
| align="center"|{{button|wii|padd|size=x24px}} | |||
| align="center"|{{button|switch|x|size=x24px}} | |||
| When holding a Pikmin, swap it for one of a different maturity in the same type. | |||
|- | |- | ||
|align="center"|{{button|gc| | | Switch [[leader]]s | ||
|align="center"|{{button|wii| | | align="center"|{{button|gc|y|size=x24px}} | ||
| | | align="center"|{{button|wii|-|size=x24px}} | ||
| align="center"|{{button|switch|y|size=x24px}} | |||
| Only if the other leader is not in the active one's group. | |||
|- | |- | ||
|align="center"|{{button|gc| | | [[Pluck]] sprout | ||
|align="center"|{{button|wii| | | align="center"|{{button|gc|a|size=x24px}} | ||
| | | align="center"|{{button|wii|a|size=x24px}} | ||
| align="center"|{{button|switch|a|size=x24px}} | |||
| | |||
|- | |- | ||
|align="center"|{{button|gc| | | [[Punch]] | ||
|align="center"|{{button|wii| | | align="center"|{{button|gc|a|size=x24px}} | ||
| | | align="center"|{{button|wii|a|size=x24px}} | ||
| align="center"|{{button|switch|a|size=x24px}} | |||
| Only when not commanding Pikmin. | |||
|- | |- | ||
|align="center"|{{button|gc| | | [[Lie down]] | ||
|align="center"|{{button|wii| | | align="center"|{{button|gc|x|size=x24px}}<br>held | ||
| | | align="center"|{{button|wii|c|size=x24px}}<br>held | ||
| align="center"|{{button|switch|rstickclick|size=x24px}} | |||
| Only if the [[Napsack]] has been obtained. | |||
|- | |- | ||
|align="center"|{{button|gc| | | Use [[ultra-bitter spray]] | ||
|align="center"|{{button|wii| | | align="center"|{{button|gc|padu|size=x24px}} | ||
| | | align="center"|{{button|wii|1|size=x24px}} | ||
| align="center"|{{button|switch|padu|size=x24px}} | |||
| Not possible when holding a Pikmin. | |||
|- | |- | ||
|align="center"|{{button|gc| | | Use [[ultra-spicy spray]] | ||
|align="center"|{{button|wii| | | align="center"|{{button|gc|padd|size=x24px}} | ||
| | | align="center"|{{button|wii|2|size=x24px}} | ||
| align="center"|{{button|switch|padd|size=x24px}} | |||
| Not possible when holding a Pikmin. | |||
|- | |- | ||
|align="center"|{{button|gc| | | Face [[camera]] forward | ||
|align="center"|{{button|wii| | | align="center"|{{button|gc|l|size=x24px}}<br>tapped | ||
| | | align="center"|{{button|wii|z|size=x24px}}<br>tapped | ||
| align="center"|{{button|switch|zl|size=x24px}} | |||
| Tapping the button makes the [[camera]] face towards the cursor on the GameCube, but towards where the leader is facing on the Wii. | |||
|- | |- | ||
|align="center"|{{button|gc| | | Rotate camera | ||
|align="center"|{{button|wii| | | align="center"|{{button|gc|l|size=x24px}}<br>lightly or fully held | ||
| | | align="center"|{{button|wii|z|size=x24px}}<br>held | ||
| align="center"|{{button|switch|rsticklr|size=x24px}} | |||
| On the GameCube and Wii, the player can press the button and use {{button|gc|stick|wii|stick}} to rotate the camera sideways. | |||
|- | |- | ||
|align="center"|{{button|gc|padlr|size=x24px}} | | Change camera's distance | ||
|align="center"|{{button| | | align="center"|{{button|gc|r|size=x24px}}<br>tapped | ||
| | | align="center"|{{button|wii|padlr|size=x24px}}<br>tapped | ||
| align="center"|{{button|switch|zr|size=x24px}} | |||
| | |||
|- | |- | ||
|align="center"|{{button|gc| | | Camera ground-level angle | ||
|align="center"|{{button|wii| | | align="center"|{{button|gc|r|size=x24px}}<br>held | ||
| align="center"|{{button|wii|padlr|size=x24px}}<br>held | |||
| align="center"|{{button|switch|zr|size=x24px}}<br>held | |||
| | | | ||
|- | |- | ||
|align="center"|{{button|gc| | | Change camera's vertical angle | ||
|align="center"|{{button|wii| | | align="center"|{{button|gc|z|size=x24px}} | ||
| align="center"|{{button|wii|padu|size=x24px}} | |||
| align="center"|{{button|switch|rstickud|size=x24px}} | |||
| | | | ||
|- | |- | ||
|align="center"|{{button|gc| | | Open [[Onion menu]] | ||
|align="center"|{{button|wii| | | align="center"|{{button|gc|a|size=x24px}} | ||
| | | align="center"|{{button|wii|a|size=x24px}} | ||
| align="center"|{{button|switch|a|size=x24px}} | |||
| When below an [[Onion]]'s beam or the [[Hocotate ship]]'s beam. | |||
|- | |- | ||
|align="center"|{{button|gc|start|size=x24px}} | | [[Pause]]/resume | ||
|align="center"|{{button|wii| | | align="center"|{{button|gc|start|size=x24px}} | ||
| | | align="center"|{{button|wii|-|size=x24px}} | ||
| align="center"|{{button|switch|+|size=x24px}} | |||
| | |||
|- | |||
| Check controls | |||
| N/A | |||
| N/A | |||
| align="center"|{{button|switch|-|size=x24px}} | |||
| | |||
|} | |} | ||
| Line 177: | Line 314: | ||
====Controllers==== | ====Controllers==== | ||
{| class = "wikitable" style="width: 80%" | {| class = "wikitable" style="width: 80%" | ||
! Action | |||
! style="width:12%" | GamePad | ! style="width:12%" | GamePad | ||
! style="width:12%" | Wii Remote | ! style="width:12%" | Wii Remote | ||
! style="width:12%" | Pro Controller | ! style="width:12%" | Pro Controller | ||
! | ! Notes | ||
|- | |||
| Move | |||
| align="center"|{{button|wiiu|lstick|size=x24px}}<br>fully held | |||
| align="center"|{{button|wii|stick|size=x24px}} | |||
| align="center"|{{button|wiiu|pclstick|size=x24px}}<br>fully held | |||
| When playing with the Wii Remote, the camera will automatically rotate to make it easier to navigate. | |||
|- | |||
| Move [[cursor]] | |||
| align="center"|{{button|wiiu|lstick|size=x24px}}<br>lightly or fully held | |||
| align="center"|{{button|wii|remote|size=x24px}} | |||
| align="center"|{{button|wiiu|pclstick|size=x24px}}<br>lightly or fully held | |||
| | |||
|- | |- | ||
| Hold and [[throw]] Pikmin/[[leader]] | |||
| align="center"|{{button|wiiu|a|wiiu|x|size=x24px}} | | align="center"|{{button|wiiu|a|wiiu|x|size=x24px}} | ||
| align="center"|{{button|wii|a|size=x24px}} | | align="center"|{{button|wii|a|size=x24px}} | ||
| align="center"|{{button|wiiu|pca|size=x24px}} | | align="center"|{{button|wiiu|pca|wiiu|pcx|size=x24px}} | ||
| | | Pressing holds a Pikmin, releasing throws it. | ||
|- | |- | ||
| [[Whistle]] | |||
| align="center"|{{button|wiiu|zr|size=x24px}} | | align="center"|{{button|wiiu|zr|size=x24px}} | ||
| align="center"|{{button|wii|b|size=x24px}} | | align="center"|{{button|wii|b|size=x24px}} | ||
| align="center"|{{button|wiiu|pczr|size=x24px}} | | align="center"|{{button|wiiu|pczr|size=x24px}} | ||
| | | Holding it down longer increases the range. | ||
|- | |- | ||
| align="center"|{{button|wiiu| | | [[Lock-on]] | ||
| align="center"|{{button|wii| | | align="center"|{{button|wiiu|zl|size=x24px}}<br>held for a bit | ||
| align="center"|{{button|wiiu| | | align="center"|{{button|wii|z|size=x24px}}<br>held for a bit | ||
| | | align="center"|{{button|wiiu|pczl|size=x24px}}<br>held for a bit | ||
| Only if the cursor is on a target. The player only needs to hold on for the time it takes the lock-on to activate. | |||
|- | |- | ||
| | | [[Charge]]/[[dismiss]] | ||
| align="center"|{{button|wiiu|b|wiiu|shake|size=x24px}} | |||
| align="center"|{{button|wii|nunchukshake|size=x24px}} | |||
| align="center"|{{button|wiiu|pcb|size=x24px}} | |||
| While locked-on, charges, otherwise dismisses. | |||
| align="center"|{{button|wiiu| | |||
| align="center"|{{button|wii| | |||
| align="center"|{{button|wiiu| | |||
| | |||
|- | |- | ||
| Change next Pikmin type | |||
| align="center"|{{button|wiiu|l|size=x24px}} | | align="center"|{{button|wiiu|l|size=x24px}} | ||
| align="center"|{{button|wii|c|size=x24px}} | | align="center"|{{button|wii|c|size=x24px}} | ||
| align="center"|{{button|wiiu|pcl|size=x24px}} | | align="center"|{{button|wiiu|pcl|size=x24px}} | ||
| | | | ||
|- | |- | ||
| align="center"|{{button|wiiu| | | Switch leader | ||
| align="center"|{{button|wiiu|y|size=x24px}} | |||
| align="center"|{{button|wii|-|size=x24px}} | |||
| align="center"|{{button|wiiu|pcy|size=x24px}} | |||
| Only if the other leader is not in the active one's group. | |||
|- | |||
| [[Pluck]] sprout | |||
| align="center"|{{button|wiiu|a|wiiu|x|size=x24px}} | |||
| align="center"|{{button|wii|a|size=x24px}} | |||
| align="center"|{{button|wiiu|pca|wiiu|pcx|size=x24px}} | |||
| | |||
|- | |||
| [[Punch]] | |||
| align="center"|{{button|wiiu|a|wiiu|x|size=x24px}} | |||
| align="center"|{{button|wii|a|size=x24px}} | |||
| align="center"|{{button|wiiu|pca|wiiu|pcx|size=x24px}} | |||
| Only when not commanding Pikmin and near a punchable target. | |||
|- | |||
| Use [[ultra-spicy spray]] | |||
| align="center"|{{button|wiiu|padu|size=x24px}} | |||
| align="center"|{{button|wii|padu|size=x24px}} | |||
| align="center"|{{button|wiiu|pcpadu|size=x24px}} | |||
| | |||
|- | |||
| [[Dodge]] | |||
| align="center"|{{button|wiiu|padlr|size=x24px}} | |||
| align="center"|{{button|wii|padlr|size=x24px}} | |||
| align="center"|{{button|wiiu|pcpadlr|size=x24px}} | |||
| Only if the [[Dodge Whistle]] has been obtained. | |||
|- | |||
| Face [[camera]] towards cursor | |||
| align="center"|{{button|wiiu|zl|size=x24px}}<br>tapped | |||
| align="center"|{{button|wii|z|size=x24px}}<br>tapped | |||
| align="center"|{{button|wiiu|pczl|size=x24px}}<br>tapped | |||
| Only if the cursor is not on a target. | |||
|- | |||
| Rotate camera | |||
| align="center"|{{button|wiiu|rstick|size=x24px}} | |||
| align="center"|N/A | | align="center"|N/A | ||
| align="center"|{{button|wiiu| | | align="center"|{{button|wiiu|pcrstick|size=x24px}} | ||
| | | | ||
|- | |- | ||
| Hold cursor | |||
| align="center"|{{button|wiiu|zl|size=x24px}}<br>held | |||
| align="center"|N/A | |||
| align="center"|{{button|wiiu|pczl|size=x24px}}<br>held | |||
| Allows moving the leader without moving the cursor. If locked-on, places the cursor on the object and keeps it there, otherwise fixes the cursor on the spot. | |||
|- | |||
| Reset cursor on top of leader | |||
| align="center"|{{button|wiiu|lstickclick|size=x24px}} | | align="center"|{{button|wiiu|lstickclick|size=x24px}} | ||
| align="center"|N/A | | align="center"|N/A | ||
| align="center"|{{button|wiiu|pclstickclick|size=x24px}} | | align="center"|{{button|wiiu|pclstickclick|size=x24px}} | ||
| | | | ||
|- | |- | ||
| align="center"|{{button|wiiu| | | Open [[Onion menu]] | ||
| align="center"|{{button|wii| | | align="center"|{{button|wiiu|a|wiiu|x|size=x24px}} | ||
| align="center"|{{button|wiiu| | | align="center"|{{button|wii|a|size=x24px}} | ||
| | | align="center"|{{button|wiiu|pca|wiiu|pcx|size=x24px}} | ||
| When below an [[Onion]]'s beam. | |||
|- | |||
| Cancel pluck/[[Go Here!]] | |||
| align="center"|{{button|wiiu|zr|size=x24px}} | |||
| align="center"|{{button|wii|b|size=x24px}} | |||
| align="center"|{{button|wiiu|pczr|size=x24px}} | |||
| | |||
|- | |- | ||
| align="center"|{{button|wiiu| | | Toggle [[radar]] | ||
| align="center"|{{button|wii| | | align="center"|{{button|wiiu|padd|size=x24px}} | ||
| align="center"|{{button|wiiu| | | align="center"|{{button|wii|padd|size=x24px}} | ||
| | | align="center"|{{button|wiiu|pcpadd|size=x24px}} | ||
| Only if Off-TV Play is on. The gameplay is instantly paused when switching to the radar. | |||
|- | |- | ||
| align="center"|{{button|wiiu| | | [[Pause]]/resume | ||
| align="center"| | | align="center"|{{button|wiiu|+|size=x24px}} | ||
| align="center"|{{button|wiiu| | | align="center"|{{button|wii|+|size=x24px}} | ||
| | | align="center"|{{button|wiiu|pc+|size=x24px}} | ||
| | |||
|- | |- | ||
| Skip [[cutscene]] | |||
| align="center"|{{button|wiiu|+|size=x24px}} | | align="center"|{{button|wiiu|+|size=x24px}} | ||
| align="center"|{{button|wii|+|size=x24px}} | | align="center"|{{button|wii|+|size=x24px}} | ||
| align="center"|{{button|wiiu|pc+|size=x24px}} | | align="center"|{{button|wiiu|pc+|size=x24px}} | ||
| | | Certain cutscenes cannot be skipped. | ||
|- | |||
| Use [[Bingo Battle]] item | |||
| align="center"|{{button|wiiu|padd|size=x24px}} | |||
| align="center"|{{button|wii|padd|size=x24px}} | |||
| align="center"|{{button|wiiu|pcpadd|size=x24px}} | |||
| | |||
|- | |- | ||
| Toggle [[Off-TV Play]] | |||
| align="center"|{{button|wiiu|-|size=x24px}} | | align="center"|{{button|wiiu|-|size=x24px}} | ||
| align="center"|N/A | | align="center"|N/A | ||
| align="center"|N/A | | align="center"|N/A | ||
| | | | ||
|} | |||
====Stylus Mode==== | |||
With Stylus Mode, the player does the majority of the important actions by pressing on the touchscreen. In this mode, the controls are exactly the same whether Off-TV Play is on or off, and the same touchscreen spot maps to exactly the same game world location in both cases. To use an [[ultra-spicy spray]], [[dismiss]]/[[charge]], open the [[KopPad]]'s apps, or switch leaders, the corresponding buttons on the left side of the touchscreen must be tapped. | |||
{| class = "wikitable" style="width: 80%" | |||
! Action | |||
! style="width:12%" | GamePad | |||
! Notes | |||
|- | |||
| Move | |||
| align="center"|{{button|wiiu|lstick|size=x24px}} | |||
| The camera will automatically rotate to make it easier to navigate. | |||
|- | |||
| Move [[cursor]] | |||
| align="center"|{{button|wiiu|stylus|size=x24px}}<br>tapped or held | |||
| | |||
|- | |||
| Hold and [[throw]] Pikmin/[[leader]] | |||
| align="center"|{{button|wiiu|stylus|size=x24px}} | |||
| Pressing holds a Pikmin, releasing throws it. | |||
|- | |||
| [[Whistle]] | |||
| align="center"|{{button|wiiu|l|size=x24px}} + {{button|wiiu|stylus|size=x24px}}<br>both held | |||
| Holding it down longer increases the range. | |||
|- | |||
| [[Lock-on]] | |||
| align="center"|{{button|wiiu|zl|size=x24px}}<br>held | |||
| Only if the cursor is on a target. The player only needs to hold on for the time it takes the lock-on to activate. | |||
|- | |||
| [[Charge]]/[[dismiss]] | |||
| align="center"|{{button|wiiu|stylus|size=x24px}}<br>tapped on icon | |||
| While locked-on, charges, otherwise dismisses. | |||
|- | |||
| Change next Pikmin type | |||
| align="center"|{{button|wiiu|l|wiiu|padu|size=x24px}}<br>tapped | |||
| Won't take effect if the player whistled after pressing. | |||
|- | |||
| Switch leader | |||
| align="center"|{{button|wiiu|stylus|size=x24px}} tapped on icon / {{button|wiiu|padd|size=x24px}} | |||
| | |||
|- | |- | ||
| align="center"|{{button|wiiu| | | [[Pluck]] sprout | ||
| align="center"|{{button| | | align="center"|{{button|wiiu|l|size=x24px}}<br>released | ||
| align="center"|{{button|wiiu| | | Won't take effect if the player whistled after pressing. | ||
| | |- | ||
| [[Punch]] | |||
| align="center"|{{button|wiiu|l|size=x24px}}<br>released | |||
| Only when not commanding Pikmin and near a punchable target. Won't take effect if the player whistled after pressing. | |||
|- | |||
| Use [[ultra-spicy spray]] | |||
| align="center"|{{button|wiiu|stylus|size=x24px}}<br>tapped on icon | |||
| | |||
|- | |- | ||
| [[Dodge]] | |||
| align="center"|{{button|wiiu|padlr|size=x24px}} | | align="center"|{{button|wiiu|padlr|size=x24px}} | ||
| align="center"|{{button| | | Only if the [[Dodge Whistle]] has been obtained. | ||
| align="center"|{{button|wiiu| | |- | ||
| [[ | | Face [[camera]] towards leader's direction | ||
| align="center"|{{button|wiiu|zl|size=x24px}}<br>tapped | |||
| | |||
|- | |||
| Rotate camera | |||
| align="center"|{{button|wiiu|stylus|size=x24px}} held on border / {{button|wiiu|rstick|size=x24px}} | |||
| | |||
|- | |||
| Open [[Onion menu]] | |||
| align="center"|{{button|wiiu|l|size=x24px}}<br>released | |||
| Won't take effect if the player whistled after pressing. | |||
|- | |||
| Cancel pluck/[[Go Here!]] | |||
| align="center"|{{button|wiiu|zl|size=x24px}} | |||
| | |||
|- | |||
| [[Pause]]/resume | |||
| align="center"|{{button|wiiu|+|size=x24px}} | |||
| | |||
|- | |||
| Skip [[cutscene]] | |||
| align="center"|{{button|wiiu|+|size=x24px}} | |||
| Certain cutscenes cannot be skipped. | |||
|- | |||
| Toggle [[Off-TV Play]] | |||
| align="center"|{{button|wiiu|-|size=x24px}} | |||
| | |||
|} | |||
===''Pikmin 3 Deluxe''=== | |||
{{p3d}} changes many of the controls from ''Pikmin 3'' due to factors like the differences between the [[Wii U]] and [[Nintendo Switch]] (such as the lack of a second screen), changes to mechanics such as [[charging]], and utilization of the Switch's gyroscope. | |||
The available control schemes depend on the amount of players. | |||
* In single-player, the player can use one of the following: 2 combined Joy-Con attached to the console, 2 combined Joy-Con detached from the console, or a Pro Controller. | |||
* In 2-player, each player can use one of the following: 2 combined Joy-Con detached from the console, a Pro Controller, or a single Joy-Con sideways. | |||
The game features three cursor control styles: stick-only, gyro-stick, and gyro-pointer. These control modes are set in the [[pause menu]]. | |||
* With stick-only controls, moving {{button|switch|lstick}} lightly controls the cursor, and moving fully controls both the leader and cursor. By tilting the stick lightly, the cursor can go past its standard range; when it does, it turns cyan. Pikmin can be thrown farther than normal this way, but only roughly until the midway point between the maximum standard range and the maximum "light tilt" range. The whistle always comes from where the cursor is. Moving the stick fully if the cursor was past the standard range will return it to standard range. In this mode, rotating the camera will keep the cursor in place. Unlike ''Pikmin 3'', the cursor is based on the area's geometry. For instance, if the player is overlooking a cliff and has the cursor on the edge, holding up will make the cursor move forward in the area and dip down the edge, despite the fact that doing this moved the cursor ''down'' on the screen. | |||
* With gyro-stick controls, {{button|switch|lstick}} controls the leader when fully held, but also controls the cursor regardless of how much it is tilted. Tilting the controller will also move the cursor. In reality, there is an imaginary "anchor" that is controlled by {{button|switch|lstick}}, and tilting the controller allows the cursor to offset around this point, up to a fixed radius around the point. For unknown reasons, in certain scenarios the cursor will behave erratically – if the gyro offset is at a given angle, and the anchor moves to that same side compared to the leader, the offset will cause the cursor to very quickly jump to the leader.{{cite web|https://twitter.com/EspyoPT/status/1317587774279544838|Twitter video|Twitter|published={{date|17|October|2020}}|retrieved={{date|1|December|2020}}}} {{button|switch|zl}} and {{button|switch|zr}} both reset the cursor's position and gyro offset. With this mode, locking-on will place the cursor on the target, but it can then be offset by tilting the controller. In this mode, rotating the camera will keep the cursor in place, but any gyro offset will change to match the camera's orientation, albeit with erratic results as the camera rotates.{{cite web|https://twitter.com/EspyoPT/status/1317589404676861952|Twitter video|Twitter|published={{date|17|October|2020}}|retrieved={{date|1|December|2020}}}} Moving the cursor, regardless of input, will make it move around the screen, like with gyro-pointer controls, and not around the area, like the stick-only controls. | |||
* With gyro-pointer controls, {{button|switch|lstick}} only controls the leader, and only when fully held. Instead, tilting the controller moves the cursor around the screen. It can move to any position on-screen, and cannot go past it. Pressing {{button|switch|r}} in this mode changes it to centering the cursor instead of changing the standby Pikmin to the next one; {{button|switch|l}} now changes to the next standby Pikmin. In this mode, rotating the camera will keep the cursor in the same screen location. | |||
There is only one cursor control style option in the [[options menu]], so in 2-player mode, it influences both players. Gyro-pointer cursor mode cannot be used with a sideways Joy-Con – the game will act as if gyro-cursor is on instead for any player that tries, despite the option still being recorded as gyro-pointer behind the scenes until players purposely change that. | |||
This means that if the option is set to gyro-pointer, one player is using combined Joy-Cons or a Pro Controller, and the other player is using a single sideways Joy-Con, one can play with gyro-pointer while the other plays with gyro-cursor, which is not something that is otherwise possible. Any player with a sideways Joy-Con will only have the stick-only and gyro-stick options available in the pause menu, but oddly this means that if player 1 is using two combined Joy-Cons or a Pro Controller, and player 2 is using a sideways Joy-Con, player 1 will be able to set the global cursor style option to any mode, while player 2 will be limited to stick-only or gyro-stick, despite the option affecting both players as stated previously. | |||
{| class = "wikitable" style="width: 80%" | |||
! Action | |||
! style="width:12%" | Combined Joy-Cons or Pro Controller | |||
! style="width:12%" | Sideways Joy-Con | |||
! Notes | |||
|- | |||
| Move | |||
| align="center"|{{button|switch|lstick|size=x24px}}<br>fully held | |||
| align="center"|{{button|switch|stick|size=x24px}}<br>fully held | |||
| | |||
|- | |||
| Move [[cursor]] – stick | |||
| align="center"|{{button|switch|lstick|size=x24px}}<br>lightly or fully held | |||
| align="center"|{{button|switch|stick|size=x24px}}<br>lightly or fully held | |||
| | |||
* With stick-only cursor controls: Moves the cursor. | |||
* With gyro-stick cursor controls: Moves the cursor's main location. | |||
* With gyro-pointer cursor controls: No effect. | |||
|- | |||
| Move cursor – gyro | |||
| align="center"|Move the right Joy-Con / Move the Pro Controller | |||
| align="center"|Move the Joy-Con | |||
| | |||
* With stick-only cursor controls: No effect. | |||
* With gyro-stick cursor controls: Moves the [[cursor]] around its main location. | |||
* With gyro-pointer cursor controls: Moves the [[cursor]]. | |||
|- | |||
| Hold and [[throw]] Pikmin/[[leader]] | |||
| align="center"|{{button|switch|a|size=x24px}} | |||
| align="center"|{{button|switch|facer|size=x24px}} | |||
| Pressing holds a Pikmin, releasing throws it. | |||
|- | |||
| [[Whistle]] | |||
| align="center"|{{button|switch|b|size=x24px}} | |||
| align="center"|{{button|switch|faced|size=x24px}} | |||
| Holding it down longer increases the range. | |||
|- | |||
| [[Lock-on]] only | |||
| align="center"|{{button|switch|zr|size=x24px}} | |||
| align="center"|{{button|switch|sr|size=x24px}} | |||
| Only in stick-only cursor controls or gyro-only cursor controls, and only if a lock-on target is available. | |||
|- | |||
| [[Lock-on]] + reset gyro | |||
| align="center"|{{button|switch|zr|size=x24px}} | |||
| align="center"|{{button|switch|sr|size=x24px}} | |||
| Only in gyro-stick cursor controls, and only if a lock-on target is available. | |||
|- | |||
| Cancel lock-on – no more available | |||
| align="center"|{{button|switch|zr|size=x24px}} | |||
| align="center"|{{button|switch|sr|size=x24px}} | |||
| Only if locked-on with no more targets available. | |||
|- | |||
| Cancel lock-on – always | |||
| align="center"|{{button|switch|b|size=x24px}} | |||
| align="center"|{{button|switch|faced|size=x24px}} | |||
| | |||
|- | |||
| [[Charge]] | |||
| align="center"|{{button|switch|x||size=x24px}} | |||
| align="center"|{{button|switch|faceu|size=x24px}} | |||
| | |||
|- | |||
| Change next Pikmin type – right | |||
| align="center"|{{button|switch|l|size=x24px}} | |||
| align="center"|{{button|switch|sl|size=x24px}} | |||
| | |||
|- | |||
| Change next Pikmin type – left | |||
| align="center"|{{button|switch|r|size=x24px}} | |||
| align="center"|N/A | |||
| Only in stick-only cursor controls, or gyro-stick cursor controls. | |||
|- | |||
| Use [[action menu]] | |||
| align="center"|{{button|switch|y|size=x24px}} held + {{button|switch|lstick|size=x24px}} | |||
| align="center"|{{button|switch|facel|size=x24px}} held + {{button|switch|stick|size=x24px}} | |||
| Allows the player to use an [[ultra-spicy spray]], change [[leader]], bring the other player's leader to the group, [[dismiss]], or use the current [[Bingo Battle]] item. | |||
|- | |||
| Throw Pikmin automatically | |||
| align="center"|{{button|switch|a|size=x24px}}<br>held | |||
| align="center"|{{button|switch|facer|size=x24px}}<br>held | |||
| Only while [[lock-on|locked-on]]. | |||
|- | |||
| [[Pluck]] sprout | |||
| align="center"|{{button|switch|a|size=x24px}} | |||
| align="center"|{{button|switch|facer|size=x24px}} | |||
| | |||
|- | |||
| [[Punch]] | |||
| align="center"|{{button|switch|a|size=x24px}} | |||
| align="center"|{{button|switch|facer|size=x24px}} | |||
| Only when not commanding Pikmin and near a punchable target. | |||
|- | |||
| [[Dodge]] | |||
| align="center"|{{button|switch|padl|switch|padr|size=x24px}} | |||
| align="center"|N/A | |||
| Only if the [[Dodge Whistle]] has been obtained. | |||
|- | |||
| Rotate camera | |||
| align="center"|{{button|switch|rsticklr|size=x24px}} | |||
| align="center"|N/A | |||
| | |||
|- | |||
| Face [[camera]] towards leader's direction only | |||
| align="center"|{{button|switch|zl|size=x24px}} | |||
| align="center"|N/A | |||
| Only in gyro-only cursor controls. | |||
|- | |||
| Face camera towards leader's direction + extend cursor | |||
| align="center"|{{button|switch|zl|size=x24px}} | |||
| align="center"|{{button|switch|stickclick|size=x24px}} | |||
| Only in stick-only cursor controls. | |||
|- | |||
| Face camera towards leader's direction + reset gyro + reset cursor | |||
| align="center"|{{button|switch|zl|size=x24px}} | |||
| align="center"|{{button|switch|stickclick|size=x24px}} | |||
| Only in gyro-stick cursor controls. | |||
|- | |||
| Reset gyro – gyro-stick | |||
| align="center"|{{button|switch|lstickclick|size=x24px}} | |||
| align="center"|N/A | |||
| Only in gyro-stick cursor controls. | |||
|- | |||
| Reset gyro – gyro-pointer | |||
| align="center"|{{button|switch|r|size=x24px}} | |||
| align="center"|N/A | |||
| Only in gyro-pointer cursor controls. | |||
|- | |||
| Face camera North + point to Onion | |||
| align="center"|{{button|switch|rstickclick|size=x24px}} | |||
| align="center"|{{button|switch|l|switch|r|size=x24px}} | |||
| Only in [[Bingo Battle]]. If the player is rotating the camera manually as they do this, then the camera will not face North. | |||
|- | |||
| Open [[Onion menu]]/[[Assemble All]] | |||
| align="center"|{{button|switch|a|size=x24px}} | |||
| align="center"|{{button|switch|facer|size=x24px}} | |||
| When below an [[Onion]]'s beam/when next to the [[S.S. Drake]]. | |||
|- | |||
| Cancel pluck/[[Go Here!]] | |||
| align="center"|{{button|switch|b|size=x24px}} | |||
| align="center"|{{button|switch|faced|size=x24px}} | |||
| | |||
|- | |||
| Zoom [[mini radar]] in/out | |||
| align="center"|{{button|switch|rstickud|size=x24px}} | |||
| align="center"|N/A | |||
| | |||
|- | |||
| Show [[hint]] | |||
| align="center"|{{button|switch|padu|size=x24px}} | |||
| align="center"|N/A | |||
| | |||
|- | |||
| [[Radar]] | |||
| align="center"|{{button|switch|-|size=x24px}} | |||
| align="center"|{{button|switch|-|switch|+|size=x24px}}<br>(Player 1 only) | |||
| If player 2 uses a solo Joy-Con, they cannot open the radar. | |||
|- | |||
| [[Pause]]/resume | |||
| align="center"|{{button|switch|+|size=x24px}} | |||
| align="center"|{{button|switch|-|switch|+|size=x24px}}<br>(Player 2 only) | |||
| If player 1 uses a solo Joy-Con, they cannot pause the game. | |||
|- | |- | ||
| align="center"|{{button| | | Skip [[cutscene]] | ||
| align="center"|{{button| | | align="center"|{{button|switch|+|size=x24px}} | ||
| align="center"|{{button|switch|-|switch|+|size=x24px}}<br>(Player 1 only) | |||
| If | | If player 2 uses a solo Joy-Con, they cannot skip cutscenes. Certain cutscenes cannot be skipped. | ||
|} | |} | ||
=== | ===''Pikmin 4''=== | ||
{{p4}} has a similar control scheme to ''Pikmin 3 Deluxe'', with some notable changes. Shigeru Miyamoto said in the game's announcement presentation that {{transcript|Nintendo Switch has made controlling the game simpler, meaning you can further concentrate on the core essence of Pikmin gameplay.}} | |||
The available control schemes depend on the amount of players. | |||
* In single-player, the player can use one of the following: 2 combined Joy-Cons attached to the console, 2 combined Joy-Cons detached from the console, or a Pro Controller. | |||
* In 2-player, either player can use 2 combined Joy-Cons detached from the console, a Pro Controller, or a single Joy-Con horizontally and vertically for P1 and P2 respectively. | |||
{| class = "wikitable" style="width: 80%" | {| class = "wikitable" style="width: 80%" | ||
! Action | ! Action | ||
! style="width:18%" | Combined Joy-Cons or Pro Controller | |||
! style="width:18%" | Single Joy-Con | |||
! Notes | |||
|- | |||
| Move | |||
| align="center"|{{button|switch|lstick|size=x24px}}<br>fully held | |||
| align="center"|{{button|switch|stick|size=x24px}}<br>fully held | |||
| | |||
|- | |||
| Move [[cursor]] – main | |||
| align="center"|{{button|switch|lstick|size=x24px}}<br>lightly or fully held | |||
| align="center"|{{button|switch|stick|size=x24px}}<br> lightly or fully held | |||
| | |||
|- | |||
| Move cursor – alternate | |||
| align="center"|Move the right Joy-Con / Move the Pro Controller | |||
| align="center"|Move the Joy-Con | |||
| Only while whistling or throwing. | |||
|- | |- | ||
| align="center"|{{button| | | Hold and [[throw]] Pikmin/Send [[Oatchi]] | ||
| align="center"|{{button|switch|a|size=x24px}} | |||
| align="center"|{{button|switch|facer|size=x24px}} | |||
| Pressing holds a Pikmin, releasing throws it. | |||
|- | |||
| [[Whistle]] | |||
| align="center"|{{button|switch|b|size=x24px}} | |||
| align="center"|{{button|switch|faced|size=x24px}} | |||
| Holding it down longer increases the range. | |||
|- | |||
| Manual lock-on | |||
| align="center"|{{button|switch|zr|size=x24px}} | |||
| align="center"|N/A | |||
| Only if a [[lock-on]] target is available. | |||
|- | |||
| Cancel manual lock-on | |||
| align="center"|{{button|switch|b|size=x24px}} | |||
| align="center"|N/A | |||
| | | | ||
|- | |- | ||
| align="center"|{{button| | | [[Charge]] | ||
| align="center"|{{button|switch|x||size=x24px}} | |||
| align="center"|{{button|switch|faceu|size=x24px}} | |||
| Only after buying the [[Charging Horn]], and when not riding Oatchi. | |||
|- | |||
| Ride/Dismount | |||
| align="center"|{{button|switch|y||size=x24px}} | |||
| align="center"|{{button|switch|facel|size=x24px}} | |||
| | | | ||
|- | |- | ||
| align="center"|{{button| | | Jump | ||
| | | align="center"|{{button|switch|x||size=x24px}} | ||
| align="center"|{{button|switch|faceu|size=x24px}} | |||
| Only when riding or playing as Oatchi. | |||
|- | |||
| Change next Pikmin type – right | |||
| align="center"|{{button|switch|r|size=x24px}} | |||
| align="center"|{{button|switch|sr|size=x24px}} | |||
| rowspan="2" | Pressing {{button|switch|l|size=x24px}} and {{button|switch|r|size=x24px}} at the same time sets the next Pikmin type to Oatchi. | |||
|- | |||
| Change next Pikmin type – left | |||
| align="center"|{{button|switch|l|size=x24px}} | |||
| align="center"|N/A | |||
|- | |||
| [[Swarm]] | |||
| align="center"|{{button|switch|zl|size=x24px}} + {{button|switch|rstick|size=x24px}} | |||
| align="center"|{{button|switch|sr|size=x24px}} + {{button|switch|stick|size=x24px}} | |||
| Only after obtaining the [[Lineup Trumpet]], and when not riding Oatchi. | |||
|- | |||
| Use [[action menu]] | |||
| align="center"|{{button|switch|y|size=x24px}} held | |||
| align="center"|{{button|switch|facel|size=x24px}} held | |||
| Allows the player to [[disband]], give a command to [[Oatchi]], open the [[Pack]], or either dismount Oatchi or switch between the player character and Oatchi. | |||
|- | |- | ||
| align="center"|{{button| | | [[Pluck]] sprout | ||
| | | align="center"|{{button|switch|a|size=x24px}} | ||
| align="center"|{{button|switch|facer|size=x24px}} | |||
| Only when near a Pikmin sprout. | |||
|- | |- | ||
| align="center"|{{button| | | [[Punch]] | ||
| | | align="center"|{{button|switch|a|size=x24px}} | ||
| align="center"|{{button|switch|facer|size=x24px}} | |||
| Only when not commanding Pikmin or Oatchi. | |||
|- | |- | ||
| align="center"|{{button| | | [[Rush]] | ||
| | | align="center"|{{button|switch|x||size=x24px}} held | ||
| align="center"|{{button|switch|faceu|size=x24px}} held | |||
| Only when Oatchi is the selected type, or when riding or playing as Oatchi. | |||
|- | |- | ||
| align="center"|{{button| | | Rotate camera | ||
| | | align="center"|{{button|switch|rsticklr|size=x24px}} | ||
| align="center"|N/A | |||
| | |||
|- | |- | ||
| align="center"|{{button| | | Rotate camera (alternate) | ||
| | | align="center"|{{button|switch|zl|size=x24px}} + {{button|switch|lsticklr|size=x24px}} | ||
| align="center"|N/A | |||
| | |||
|- | |- | ||
| align="center"|{{button| | | Adjust camera angle vertically | ||
| align="center"|{{button|switch|rstickud|size=x24px}} | |||
| align="center"|N/A | |||
| | | | ||
|- | |- | ||
| align="center"|{{button| | | Face [[camera]] towards leader's direction | ||
| | | align="center"|{{button|switch|zl|size=x24px}} | ||
| align="center"|{{button|switch|sl|size=x24px}} | |||
| | |||
|- | |||
| Reset the camera's vertical position | |||
| align="center"|{{button|switch|rstickclick|size=x24px}} | |||
| align="center"|N/A | |||
| | |||
|- | |||
| Cancel pluck/[[Go Here!]]/Rush | |||
| align="center"|{{button|switch|b|size=x24px}} | |||
| align="center"|{{button|switch|faced|size=x24px}} | |||
| | |||
|- | |||
| [[Pause]]/resume | |||
| align="center"|{{button|switch|-|size=x24px}} | |||
| align="center"|{{button|switch|-|switch|+|size=x24px}} | |||
| Single Joy-Con controls only when the Tablet is open and dependent on whether P1 is using the left or right Joy-Con. | |||
|- | |||
| Open [[Tablet]] | |||
| align="center"|{{button|switch|+|size=x24px}} | |||
| align="center"|{{button|switch|-|switch|+|size=x24px}} | |||
| rowspan="2" | Single Joy-Con controls dependent on whether P1 is using the left or right Joy-Con. | |||
|- | |||
| Skip [[cutscene]] | |||
| align="center"|{{button|switch|-|switch|+|size=x24px}} | |||
| align="center"|{{button|switch|-|switch|+|size=x24px}} | |||
|} | |} | ||
===''Hey! Pikmin''=== | ===''Hey! Pikmin''=== | ||
{{game | {{hp}} is primarily played with the [[3DS]]'s control stick and the touch screen, as almost all actions can be done with them. While most buttons are not required to play the game, they still have functions to provide an alternative to using the control stick. The buttons exclusive to the New Nintendo 3DS do not do anything. | ||
{| class = "wikitable" style="width: 80%" | {| class = "wikitable" style="width: 80%" | ||
! Action | ! Action | ||
! Button | |||
! Notes | |||
|- | |- | ||
| align="center"|{{button|3ds|stick}} left / {{button|3ds|pad}} left / {{button|3ds|y}} | | | Move left | ||
| align="center"|{{button|3ds|stick}} left / {{button|3ds|pad}} left / {{button|3ds|y}} | |||
| | |||
|- | |- | ||
| align="center"|{{button|3ds|stick}} right / {{button|3ds|pad}} right / {{button|3ds|a}} | | | Move right | ||
| align="center"|{{button|3ds|stick}} right / {{button|3ds|pad}} right / {{button|3ds|a}} | |||
| | |||
|- | |- | ||
| align="center"|{{button|3ds|stick}} up / {{button|3ds|pad}} up / {{button|3ds|x}} | | | Move up | ||
| align="center"|{{button|3ds|stick}} up / {{button|3ds|pad}} up / {{button|3ds|x}} | |||
| Only when [[Water|swimming]] or climbing a [[vine]]. | |||
|- | |- | ||
| align="center"|{{button|3ds|stick}} down / {{button|3ds|pad}} down / {{button|3ds|b}} | | | Move down | ||
| align="center"|{{button|3ds|stick}} down / {{button|3ds|pad}} down / {{button|3ds|b}} | |||
| Only when swimming or climbing a vine. | |||
|- | |- | ||
| align="center"|{{button|3ds| | | Hold and [[throw]] Pikmin | ||
| align="center"|{{button|3ds|stylus}} | |||
| Pressing holds a Pikmin, releasing throws it. | |||
|- | |- | ||
| align="center"|{{button|3ds| | | [[Whistle]] | ||
| align="center"|{{button|3ds|stylus}} tapped on icon | |||
| | |||
|- | |- | ||
| align="center"|{{button|3ds|stylus}} || | | Change next Pikmin type | ||
| align="center"|{{button|3ds|stylus}} tapped on icon | |||
| | |||
|- | |||
| Enter [[doorway]] | |||
| align="center"|{{button|3ds|stick}} up / {{button|3ds|pad}} up / {{button|3ds|x}} | |||
| | |||
|- | |||
| Open [[jetpack]] | |||
| align="center"|{{button|3ds|stylus}} tapped on icon | |||
| | |||
|- | |||
| Close jetpack | |||
| align="center"|{{button|3ds|stick}} down / {{button|3ds|pad}} down / {{button|3ds|b}} | |||
| | |||
|- | |||
| Bounce up | |||
| align="center"|{{button|3ds|stick}} up / {{button|3ds|pad}} up / {{button|3ds|x}} | |||
| Only when carried by [[Winged Pikmin]]. | |||
|- | |||
| Fall faster | |||
| align="center"|{{button|3ds|stick}} down / {{button|3ds|pad}} down / {{button|3ds|b}} | |||
| Only when carried by Winged Pikmin. | |||
|- | |||
| [[Radar]] | |||
| align="center"|{{button|3ds|l}} / {{button|3ds|r}} | |||
| | |||
|- | |||
| [[Pause]]/resume | |||
| align="center"|{{button|3ds|start}} / {{button|3ds|select}} | |||
| | |||
|} | |} | ||
| Line 350: | Line 947: | ||
===Onions=== | ===Onions=== | ||
In the first two games and the ''[[New Play Control!]]'' remakes, the [[ | In the first two games and the ''[[New Play Control!]]'' remakes, the [[Onion menu]] allows the player to withdraw or save Pikmin using a simple control interface. | ||
*Pressing up or down on the D-Pad or main Analog Stick of the controller allows the player to change the amount of [[Pikmin family|Pikmin]] of that type in the party. Missing or excessive Pikmin will be automatically withdrawn or stored accordingly. Up increases the amount of Pikmin in the Onion, while down increases the amount in the group. | *Pressing up or down on the D-Pad or main Analog Stick of the controller allows the player to change the amount of [[Pikmin family|Pikmin]] of that type in the party. Missing or excessive Pikmin will be automatically withdrawn or stored accordingly. Up increases the amount of Pikmin in the Onion, while down increases the amount in the group. | ||
| Line 357: | Line 954: | ||
===Area selection=== | ===Area selection=== | ||
The [[area]] | The [[area selection menu]] in the first two games has some specific options and controls. | ||
{| class = "wikitable" style="width: 80%" | {| class = "wikitable" style="width: 80%" | ||
! Action | |||
! style="width:12%" | GameCube | ! style="width:12%" | GameCube | ||
! style="width:12%" | Wii | ! style="width:12%" | Wii | ||
! | ! style="width:12%" | Switch | ||
! Notes | |||
|- | |- | ||
|align="center"|{{button|gc|stick|size=x24px}} | | Change selected [[area]] | ||
|align="center"|{{button|wii|stick|size=x24px}} | | align="center"|{{button|gc|stick|size=x24px}} | ||
| | | align="center"|{{button|wii|stick|size=x24px}} | ||
| align="center"|{{button|switch|lstick|size=x24px}} | |||
| Also changes the selected [[Olimar's voyage log|voyage log]] entry. In ''Pikmin 2'' for the GameCube, {{button|gc|pad}} can also be used. | |||
|- | |- | ||
|align="center"|{{button|gc|a|size=x24px}} | | Pick area/log | ||
|align="center"|{{button|wii|a|size=x24px}} | | align="center"|{{button|gc|a|size=x24px}} | ||
| | | align="center"|{{button|wii|a|size=x24px}} | ||
| align="center"|{{button|switch|a|size=x24px}} | |||
| Opens a menu asking if the player wishes to enter the area. On Olimar's voyage log, it opens the selected journal. | |||
|- | |- | ||
|align="center"|{{button|gc|b|size=x24px}} | | Close log | ||
|align="center"|{{button|wii|b|size=x24px}} | | align="center"|{{button|gc|b|size=x24px}} | ||
| | | align="center"|{{button|wii|b|size=x24px}} | ||
| align="center"|{{button|switch|b|size=x24px}} | |||
| Closes Olimar's voyage log in ''Pikmin''. This button also allows canceling the area choice, if the ship's animation hasn't been completed yet. | |||
|- | |- | ||
|align="center"|{{button|gc| | | Toggle Olimar's voyage log | ||
|align="center"|{{button|wii|+|size=x24px}} | | align="center"|{{button|gc|y|size=x24px}} | ||
| | | align="center"|{{button|wii|-|size=x24px}} | ||
| align="center"|{{button|switch|+|size=x24px}} | |||
| | |||
|- | |- | ||
|align="center"|{{button|gc| | | Open [[Piklopedia (Pikmin 2)|Piklopedia]] | ||
|align="center"|{{button|wii| | | align="center"|{{button|gc|l|size=x24px}} | ||
| | | align="center"|{{button|wii|padl|size=x24px}} | ||
| align="center"|{{button|switch|padl|size=x24px}} | |||
| | |||
|- | |- | ||
|align="center"|{{button|gc| | | Open [[Treasure Hoard]] | ||
|align="center"|{{button|wii| | | align="center"|{{button|gc|r|size=x24px}} | ||
| | | align="center"|{{button|wii|padr|size=x24px}} | ||
| align="center"|{{button|switch|padr|size=x24px}} | |||
| | |||
|- | |- | ||
|align="center"|{{button|gc| | | Quit | ||
|align="center"|{{button|wii| | | align="center"|{{button|gc|start|size=x24px}} | ||
| | | align="center"|{{button|wii|+|size=x24px}} | ||
| align="center"|{{button|switch|-|size=x24px}} | |||
| Opens a menu that allows the player to continue or return to the title screen. | |||
|- | |- | ||
|align="center"|N/A | | Play "boing" | ||
|align="center"|{{button|wii|-|size=x24px}} | | align="center"|N/A | ||
|In ''Pikmin 2'', it makes the [[Wii]] Remote's speaker sound a "boing" sound effect, the same that can be heard when an invalid Pikmin number is attempted on | | align="center"|{{button|wii|-|size=x24px}} | ||
| align="center"|N/A | |||
| In ''New Play Control! Pikmin 2'', it makes the [[Wii]] Remote's speaker sound a "boing" sound effect, the same that can be heard when an invalid Pikmin number is attempted on the [[Onion menu]]. | |||
|} | |} | ||
===Piklopedia and Treasure Hoard=== | ===Piklopedia and Treasure Hoard=== | ||
On the [[Piklopedia | On the [[Piklopedia and Treasure Hoard menu]], there are a few specific actions that can be performed. | ||
{| class = "wikitable" style="width: 80%" | {| class = "wikitable" style="width: 80%" | ||
! Action | |||
! style="width:12%" | GameCube | ! style="width:12%" | GameCube | ||
! style="width:12%" | Wii | ! style="width:12%" | Wii | ||
! | ! style="width:12%" | Switch | ||
! Notes | |||
|- | |||
| Change entry | |||
| align="center"|{{button|gc|stick|size=x24px}} | |||
| align="center"|{{button|wii|stick|size=x24px}} | |||
| align="center"|{{button|switch|lstick|size=x24px}} | |||
| Only when no entry is opened. | |||
|- | |||
| Open selected entry | |||
| align="center"|{{button|gc|a|size=x24px}} | |||
| align="center"|{{button|wii|a|size=x24px}} | |||
| align="center"|{{button|switch|a|size=x24px}} | |||
| Only when no entry is opened. | |||
|- | |||
| Close entry | |||
| align="center"|{{button|gc|b|gc|l|gc|r|size=x24px}} | |||
| align="center"|{{button|wii|b|wii|padl|wii|padr|size=x24px}} | |||
| align="center"|{{button|switch|b|switch|padl|switch|padr|size=x24px}} | |||
| Only when an entry is opened. | |||
|- | |||
| Move [[camera]] | |||
| align="center"|{{button|gc|stick|size=x24px}} | |||
| align="center"|{{button|wii|stick|size=x24px}} | |||
| align="center"|{{button|switch|lstick|size=x24px}} | |||
| Only when an entry is opened. | |||
|- | |||
| Zoom in/out | |||
| align="center"|{{button|gc|padud|size=x24px}} | |||
| align="center"|{{button|wii|padud|size=x24px}} | |||
| align="center"|{{button|switch|padu|switch|padd|size=x24px}} | |||
| | |||
|- | |||
| Rotate camera | |||
| align="center"|{{button|gc|c|size=x24px}} | |||
| align="center"|{{button|wii|z|size=x24px}} + {{button|wii|stick|size=x24px}} | |||
| align="center"|{{button|switch|zl|size=x24px}} + {{button|switch|lstick|size=x24px}} | |||
| | |||
|- | |||
| Throw [[pikpik carrot]] | |||
| align="center"|{{button|gc|a|size=x24px}} | |||
| align="center"|{{button|wii|a|size=x24px}} | |||
| align="center"|{{button|switch|a|size=x24px}} | |||
| Only on the Piklopedia, and only if an entry is opened. | |||
|- | |||
| Use [[ultra-bitter spray]] | |||
| align="center"|{{button|gc|z|size=x24px}} | |||
| align="center"|{{button|wii|1|size=x24px}} | |||
| align="center"|{{button|switch|rstickclick|size=x24px}} | |||
| Only on the Piklopedia. | |||
|- | |||
| Open [[Olimar's journal]]/[[Olimar's notes]] | |||
| align="center"|{{button|gc|x|size=x24px}} | |||
| align="center"|{{button|wii|+|size=x24px}} | |||
| align="center"|{{button|switch|+|size=x24px}} | |||
| | |||
|- | |||
| Open [[sales pitch]] or [[Louie's notes]] | |||
| align="center"|{{button|gc|y|size=x24px}} | |||
| align="center"|{{button|wii|-|size=x24px}} | |||
| align="center"|{{button|switch|-|size=x24px}} | |||
| | |||
|- | |- | ||
|align="center"|{{button|gc| | | Switch between Piklopedia and Treasure Hoard | ||
|align="center"|{{button|wii| | | align="center"|{{button|gc|l|gc|r|size=x24px}} | ||
| | | align="center"|{{button|wii|padlr|size=x24px}} | ||
| align="center"|{{button|switch|padl|switch|padr|size=x24px}} | |||
| Only when no entry is opened. | |||
|- | |- | ||
|align="center"|{{button|gc|b|size=x24px}} | | Quit | ||
|align="center"|{{button|wii|b|size=x24px}} | | align="center"|{{button|gc|b|size=x24px}} | ||
| | | align="center"|{{button|wii|b|size=x24px}} | ||
| align="center"|{{button|switch|b|size=x24px}} | |||
| Opens a menu asking if the player wishes to remain on the mode or if they went to return to the area selection screen, if no entry is opened. | |||
|} | |||
===Pebble Pitcher=== | |||
In {{p4}}, a second player can control the [[Pebble Pitcher]]. As a supportive cursor, it has unique controls. | |||
{| class = "wikitable" style="width: 40%" | |||
! style="width:20%" | Action | |||
! style="width:12%" | Combined Joy-Cons or Pro Controller | |||
! style="width:12%" | Single Joy-Con | |||
! Notes | |||
|- | |- | ||
|align="center"|{{button| | | Activate Pebble Pitcher/reset cursor | ||
|align="center"|{{button| | | align="center"|{{button|switch|x|size=x24px}} | ||
| | | align="center"|{{button|switch|faceu|size=x24px}} | ||
| | |||
|- | |- | ||
|align="center"|{{button| | | Move cursor — L Stick | ||
|align="center"| | | align="center"|{{button|switch|lstick|size=x24px}} | ||
| | | align="center"|N/A | ||
| Option only available when using Two-Hand Hold. | |||
|- | |- | ||
|align="center"| | | Move cursor — Motion Controls | ||
|align="center"| | | align="center"|Move the Joy-Cons or Pro Controller | ||
| | | align="center"|Move the Joy-Con | ||
| | |||
|- | |- | ||
|align="center"|{{button| | | Launch pebble | ||
|align="center"|{{button| | | align="center"|{{button|switch|a|size=x24px}} | ||
| | | align="center"|{{button|switch|facer|size=x24px}} | ||
| | |||
|- | |- | ||
|align="center"|{{button| | | Change item selection — right | ||
|align="center"|{{button| | | align="center"|{{button|switch|r|size=x24px}} | ||
| | | align="center"|{{button|switch|zl|switch|zr|size=x24px}} | ||
| rowspan="2" | Single Joy-Con controls dependent on whether P2 is using the left or right Joy-Con. | |||
|- | |- | ||
|align="center"|{{button| | | Change item selection — left | ||
|align="center"|{{button| | | align="center"|{{button|switch|l|size=x24px}} | ||
| align="center"|{{button|switch|l|switch|r|size=x24px}} | |||
|- | |- | ||
|align="center"|{{button| | | Launch item | ||
|align="center"|{{button| | | align="center"|{{button|switch|y|size=x24px}} | ||
| | | align="center"|{{button|switch|facel|size=x24px}} | ||
| Only when an item is available. | |||
|} | |} | ||
| Line 445: | Line 1,142: | ||
{{main|Bomb rock#Controlling|t1=Bomb rock}} | {{main|Bomb rock#Controlling|t1=Bomb rock}} | ||
Due to the actions that can be performed by Pikmin carrying [[bomb rock]]s, some special notes need to be taken into consideration in order to not have a bomb rock explode accidentally. | |||
===Radar=== | ===Radar=== | ||
{{main|Radar}} | {{main|Radar}} | ||
A few buttons control the radar. These | A few buttons control the radar. These allow the player to pan it and zoom it. | ||
===''Pikmin 2'' title screen=== | ===''Pikmin 2'' title screen=== | ||
{{main|Easter eggs#Title screen secrets|t1=Title screen secrets}} | {{main|Easter eggs#Title screen secrets|t1=Title screen secrets}} | ||
Some | Some Easter eggs exist on the [[title screen]] for ''Pikmin 2'' and the ''New Play Control!'' remake. These allow the player to change the words the Pikmin spell out, and allows the spawn and control of an enemy. | ||
==Button-mashing== | |||
The term '''button-mashing''' is used when a player rapidly presses buttons or tilts sticks on the controller, without any discernible pattern. The point of doing this varies between games and scenarios, but in the [[Pikmin series|''Pikmin'' games]], one may have to button-mash in certain situations in order to achieve a goal. The following situations require the player to button-mash: | |||
*When the current [[leader]] is being attacked by an opposing Pikmin, twirling the main analog stick allows the leader to shake them off; they'll remained latched until the stick is twirled for long enough. In ''Pikmin'' and {{npcp1}}, actual buttons can also be pressed rapidly to shake off [[Mushroom Pikmin]]. | |||
*When the leader is being held by a [[Greater Spotted Jellyfloat]], [[Swooping Snitchbug]] or [[Bumbling Snitchbug]], the player can rotate the main stick to break free. If they do not do it in time, they subject the leader to damage. In {{p3d}}, the player may also shake the controller itself. | |||
*In ''Pikmin 3'', when a leader is thrown to the ground, the player can mash directions on {{button|wiiu|lstick|wii|stick}} – such as twirling – to make them get up. The player can also shake the Nunchuk to make them get up (usually easier and faster). The leader will get up by themselves eventually, however. In ''Pikmin 3 Deluxe'', they get up by themselves right away. | |||
*When playing as [[Oatchi]] in ''Pikmin 4'', the player can mash the B button to make him recover from a hazard such as [[fire]], [[poison]] or [[panic]] sooner. | |||
In a sense, it could be said that the games prior to ''Pikmin 3'' require the player to mash {{button|gc|a|wii|a}} to continuously [[pluck]] Pikmin, but this is only partially true: the player needs only to press the button during a pluck animation, in order to assure that the next Pikmin will also be automatically plucked. In addition, mashing the [[throw]] button is required in order to throw Pikmin in quick succession. | |||
If the player is not interested in a cutscene's dialog, the fastest way to advance it is by mashing the {{button|gc|a|wii|a|wiiu|a}} and {{button|gc|b|wii|b|wiiu|b}} buttons. If the game in question allows using the "B" button to both advance the text and auto-fill the letters, then that button may be mashed alone. | |||
In ''Pikmin 2'', the mashing logic only reads from the control stick, not any other button or the C-stick. The game keeps track of how hard the player's been mashing lately as a numeric value. As the player mashes, this number increases every frame, but it also decreases every [[frame]] the player doesn't mash, meaning the player has to keep mashing to keep that number up. Due to the way the system works, this number can never go beyond 14. Every frame where that number is higher than 5, the game rolls a [[random]] number between 1 and 22, and if that number is below it, it can proceed to the next check: a roll between 1 and 10, where if the number is 1, the leader is freed. In practice, this means the harder the player has mashed in the past 22 frames, the higher their chance of escaping, and even with the fastest possible mashing, there's a 14/22 × a 1/10 chance every frame to be freed. | |||
==Console and controller resetting== | |||
For the [[GameCube]] games, there are two button combinations that replace the need to interact with the physical console itself: one resets the game without pressing the button on the console, and the other resets the controller's neutral position, without needing to unplug and replug it. The former can be achieved by holding {{button|gc|x}} + {{button|gc|b}} + {{button|gc|start}} for a few seconds. For the latter, the player must hold {{button|gc|x}} + {{button|gc|y}} + {{button|gc|start}}, for three seconds, without touching {{button|gc|stick}}, {{button|gc|c}}, {{button|gc|l}} or {{button|gc|r}}. This is because when the console is booted, or the controller's neutral position is reset, the position of the sticks and the analog shoulder buttons is considered to be the default. If, for instance, the Control Stick is held to the right when the default position is being registered, then the game will assume that the Stick is being held left, if the player releases the Control Stick. | |||
==Controller diagram== | ==Controller diagram== | ||
In | {{p1}}, {{npcp1}}, {{P1s}}, {{P2s}}, and {{p3d}} contain diagrams of the controller with labels on what each button does during gameplay. In ''Pikmin'' and its rereleases, a diagram is found in [[Olimar's monitor]], in the [[Nintendo Switch]] version of ''Pikmin 2'' a diagram (that is directly copied from the Nintendo Switch version of ''Pikmin'') can be viewed at any time by pressing {{button|switch|-}}, and in ''Pikmin 3 Deluxe'', diagrams of the different control styles are found in the Control Guide in the [[pause menu]]. These can be used should the player forget the controls. | ||
<gallery> | <gallery> | ||
Pikmin controls menu.jpg| | Pikmin controls menu.jpg|The controller diagram in the [[GameCube]] version of ''Pikmin''. | ||
NPCP controls.jpg| | NPCP controls.jpg|The controller diagram in the ''[[New Play Control!]]'' version of ''Pikmin''. | ||
P3D Menu Pause Controls Double Joy-Con.jpg|The controller diagram for using 2 Joy-Con in ''Pikmin 3 Deluxe''. | |||
P3D Menu Pause Controls Single Joy-Con.jpg|The controller diagram for using 1 Joy-Con in ''Pikmin 3 Deluxe''. | |||
</gallery> | </gallery> | ||
==Movement and analog stick drift== | |||
After the release of {{p3d}}, there have been reports{{cite web|https://www.reddit.com/r/Pikmin/comments/jlpsx5/for_pikmin_3_deluxe_on_the_switch_movement_gets/|For Pikmin 3 deluxe on the switch, Movement gets stuck when going straight forward. Makes game near unplayable at times and i hate freezing and losing pikmin because I can’t move. Anyone else having this problem?|Reddit|published={{date|31|October|2020}}|retrieved={{date|1|December|2020}}}}{{cite web|https://www.reddit.com/r/Pikmin/comments/jlxffa/pikmin_3_deluxe_issue/|Pikmin 3 Deluxe issue|Reddit|published={{date|1|November|2020}}|retrieved={{date|1|December|2020}}}}{{cite web|https://www.reddit.com/r/Pikmin/comments/jn07ki/pikmin_3_deluxe_unplayable_with_joycon_controller/|Pikmin 3: Deluxe unplayable with joycon controller? Can't walk down|Reddit|published={{date|3|November|2020}}|retrieved={{date|1|December|2020}}}}{{cite web|https://www.reddit.com/r/Pikmin/comments/jky3oc/walking_broken_in_deluxe_pro_controller/|Walking broken in Deluxe? (Pro controller)|Reddit|published={{date|30|October|2020}}|retrieved={{date|1|December|2020}}}}{{cite web|https://www.reddit.com/r/Pikmin/comments/jndow3/issue_with_control_sticks_massive_dead_zones/|Issue with Control Sticks- Massive Dead Zones|Reddit|published={{date|3|November|2020}}|retrieved={{date|1|December|2020}}}}{{cite web|https://www.reddit.com/r/Pikmin/comments/jlcnuf/weird_movement_issues/|Weird movement issues|Reddit|published={{date|31|October|2020}}|retrieved={{date|1|December|2020}}}}{{cite web|https://www.reddit.com/r/Pikmin/comments/joqbd7/are_you_guys_getting_the_bug_where_the_captain/|Are you guys getting the bug where the captain randomly stops moving?|Reddit|published={{date|5|November|2020}}|retrieved={{date|1|December|2020}}}}{{cite web|https://www.reddit.com/r/Pikmin/comments/jn6ty3/controls/|Controls|Reddit|published={{date|3|November|2020}}|retrieved={{date|1|December|2020}}}}{{cite web|https://www.reddit.com/r/Pikmin/comments/joat0l/pikmin_3_deluxe_stop_moving_bug/|Pikmin 3 Deluxe Stop Moving Bug|Reddit|published={{date|5|November|2020}}|retrieved={{date|1|December|2020}}}} of players being unable to move the [[leader]], sometimes in specific angles only. This is because in order to move a leader, one must tilt the analog stick fully, since tilting it partially will only move the cursor (or do nothing, if the player is using gyro cursor controls exclusively), and given that some Joy-Cons and Pro Controllers suffer from analog stick drifting and incorrect range detection{{cite web|https://kotaku.com/nintendo-responds-to-sufferers-of-joy-con-drift-1836614170|Nintendo Responds To Sufferers Of Joy-Con Drift|Kotaku|published={{date|22|July|2019}}|retrieved={{date|1|December|2020}}}}, players suffering from this hardware problem will find themselves unable to move leaders effectively until the affected controllers are repaired. | |||
==Trivia== | ==Trivia== | ||
| Line 475: | Line 1,190: | ||
*[[Menu]] | *[[Menu]] | ||
*[[Camera]] | *[[Camera]] | ||
==References== | |||
{{refs}} | |||
[[Category:Gameplay]] | [[Category:Gameplay]] | ||
[[Category:Real world]] | [[Category:Real world]] | ||
Latest revision as of 18:34, February 27, 2024
|
This article is a stub. You can help Pikipedia by expanding it. |
- This article is about controls of the Pikmin games. For the data file category, see Controls (Exploration Notes).
The Pikmin games have a variety of controls used to control the game's menus, leaders, camera and gameplay mechanics. These controls come in the form of button presses and releases, analog stick tilts, Wii Remote pointer movements and touchscreen touches.
In-game controls[edit]
The following is a list of controls for when the player is controlling a leader on an area or cave, for each game.
Pikmin[edit]
The first title in the franchise is played on the GameCube, and hence, with the GameCube controller. The New Play Control! Pikmin version is played using the Wii Remote and the Nunchuk, and most button inputs are edited accordingly. In the Nintendo Switch port, the controls are more faithful to the GameCube version than New Play Control! Pikmin, though the inputs themselves are very similar to Pikmin 3 Deluxe.
| Action | GameCube | Wii | Switch | Notes |
|---|---|---|---|---|
| Move | fully held |
fully held |
||
| Move cursor – main | lightly or fully held |
lightly or fully held |
||
| Move cursor – alternate | N/A | N/A | Move the right Joy-Con / Move the Pro Controller | |
| Reset cursor | N/A | N/A | ||
| Hold and throw Pikmin | Pressing holds a Pikmin, releasing throws it. | |||
| Release held Pikmin | N/A | N/A | ||
| Whistle | Holding it down longer increases the range. | |||
| Swarm | On the GameCube and Nintendo Switch, the stick determines swarm direction and distance. On the Wii, Pikmin go in the direction and distance of the cursor when the button is held. | |||
| Dismiss | ||||
| Swap Pikmin type | N/A | While holding a Pikmin, swaps it for one of a different type. | ||
| Swap Pikmin maturity | N/A | When holding a Pikmin, swap it for one of a different maturity in the same type. Also causes the swarm effect on the cursor, but the group does not move. | ||
| Pluck sprout | ||||
| Punch | Only when not commanding Pikmin. | |||
| Lie down | Only after day 1. | |||
| Face camera forward | tapped |
tapped |
Tapping the button makes the camera face towards the cursor on the GameCube, but towards where the leader is facing on the Wii and Nintendo Switch. | |
| Rotate camera | lightly or fully held |
held |
On the GameCube and Wii, the player can press the button and use | |
| Change camera's distance | ||||
| Change camera's vertical angle | ||||
| Open Onion menu | When below an Onion's beam. | |||
| Olimar's monitor | ||||
| Pause/resume |
Pikmin 2[edit]
The sequel retains many of the controls from the first game, but with some additions and changes. Like the first game, the original GameCube version is played using a GameCube controller, the New Play Control! Pikmin 2 version is played with the Wii Remote and the Nunchuk, and the Nintendo Switch version uses a control scheme similar to Pikmin 3 Deluxe.
| Action | GameCube | Wii | Switch | Notes |
|---|---|---|---|---|
| Move | fully held |
fully held |
||
| Move cursor – main | lightly or fully held |
lightly or fully held |
||
| Move cursor – alternate | N/A | N/A | Move the right Joy-Con / Move the Pro Controller | |
| Reset cursor | N/A | N/A | ||
| Hold and throw Pikmin | Pressing holds a Pikmin, releasing throws it. | |||
| Release held Pikmin | N/A | N/A | ||
| Whistle | Holding it down longer increases the range. | |||
| Swarm | On the GameCube and Nintendo Switch, the stick determines swarm direction and distance. On the Wii, Pikmin go in the direction and distance of the cursor when the button is held. | |||
| Dismiss | tapped |
tapped |
||
| Swap Pikmin type | While holding a Pikmin, swaps it for one of a different type. | |||
| Swap Pikmin maturity | When holding a Pikmin, swap it for one of a different maturity in the same type. | |||
| Switch leaders | Only if the other leader is not in the active one's group. | |||
| Pluck sprout | ||||
| Punch | Only when not commanding Pikmin. | |||
| Lie down | held |
held |
Only if the Napsack has been obtained. | |
| Use ultra-bitter spray | Not possible when holding a Pikmin. | |||
| Use ultra-spicy spray | Not possible when holding a Pikmin. | |||
| Face camera forward | tapped |
tapped |
Tapping the button makes the camera face towards the cursor on the GameCube, but towards where the leader is facing on the Wii. | |
| Rotate camera | lightly or fully held |
held |
On the GameCube and Wii, the player can press the button and use | |
| Change camera's distance | tapped |
tapped |
||
| Camera ground-level angle | held |
held |
held |
|
| Change camera's vertical angle | ||||
| Open Onion menu | When below an Onion's beam or the Hocotate ship's beam. | |||
| Pause/resume | ||||
| Check controls | N/A | N/A |
Pikmin 3[edit]
Pikmin 3 allows for four ways to control the game. The player can use the the GamePad's buttons, the Wii Remote + Nunchuk, the Wii U Pro Controller, or, as of version 2.0.0, the GamePad's touchscreen; the latter is known as "Stylus Mode". The Wii Classic Controller is not supported. When the player uses a control from a controller different from the one they're currently using, a message will appear on-screen saying the main controller has changed, and the player is then allowed to use that controller from there on out. The exception to this is ![]() .
.
In addition, the player can toggle Off-TV Play with ![]() . While Off-TV Play mode is on, the TV screen will display some Pikmin moving from right to left on a black screen, with the message "Look at the GamePad." on the bottom. Given that with Off-TV Play off, the player uses the TV screen as the main gameplay view-port and the GamePad as the radar, the player will need to use
. While Off-TV Play mode is on, the TV screen will display some Pikmin moving from right to left on a black screen, with the message "Look at the GamePad." on the bottom. Given that with Off-TV Play off, the player uses the TV screen as the main gameplay view-port and the GamePad as the radar, the player will need to use ![]() to toggle between gameplay view and radar view, if Off-TV Play is on.
to toggle between gameplay view and radar view, if Off-TV Play is on.
If the player wishes to play with the Wii Remote and Off-TV Play, they must point the Wii Remote at the GamePad, as opposed to the Sensor Bar.
Controllers[edit]
| Action | GamePad | Wii Remote | Pro Controller | Notes |
|---|---|---|---|---|
| Move | fully held |
fully held |
When playing with the Wii Remote, the camera will automatically rotate to make it easier to navigate. | |
| Move cursor | lightly or fully held |
lightly or fully held |
||
| Hold and throw Pikmin/leader | Pressing holds a Pikmin, releasing throws it. | |||
| Whistle | Holding it down longer increases the range. | |||
| Lock-on | held for a bit |
held for a bit |
held for a bit |
Only if the cursor is on a target. The player only needs to hold on for the time it takes the lock-on to activate. |
| Charge/dismiss | While locked-on, charges, otherwise dismisses. | |||
| Change next Pikmin type | ||||
| Switch leader | Only if the other leader is not in the active one's group. | |||
| Pluck sprout | ||||
| Punch | Only when not commanding Pikmin and near a punchable target. | |||
| Use ultra-spicy spray | ||||
| Dodge | Only if the Dodge Whistle has been obtained. | |||
| Face camera towards cursor | tapped |
tapped |
tapped |
Only if the cursor is not on a target. |
| Rotate camera | N/A | |||
| Hold cursor | held |
N/A | held |
Allows moving the leader without moving the cursor. If locked-on, places the cursor on the object and keeps it there, otherwise fixes the cursor on the spot. |
| Reset cursor on top of leader | N/A | |||
| Open Onion menu | When below an Onion's beam. | |||
| Cancel pluck/Go Here! | ||||
| Toggle radar | Only if Off-TV Play is on. The gameplay is instantly paused when switching to the radar. | |||
| Pause/resume | ||||
| Skip cutscene | Certain cutscenes cannot be skipped. | |||
| Use Bingo Battle item | ||||
| Toggle Off-TV Play | N/A | N/A |
Stylus Mode[edit]
With Stylus Mode, the player does the majority of the important actions by pressing on the touchscreen. In this mode, the controls are exactly the same whether Off-TV Play is on or off, and the same touchscreen spot maps to exactly the same game world location in both cases. To use an ultra-spicy spray, dismiss/charge, open the KopPad's apps, or switch leaders, the corresponding buttons on the left side of the touchscreen must be tapped.
| Action | GamePad | Notes |
|---|---|---|
| Move | The camera will automatically rotate to make it easier to navigate. | |
| Move cursor | tapped or held |
|
| Hold and throw Pikmin/leader | Pressing holds a Pikmin, releasing throws it. | |
| Whistle | both held |
Holding it down longer increases the range. |
| Lock-on | held |
Only if the cursor is on a target. The player only needs to hold on for the time it takes the lock-on to activate. |
| Charge/dismiss | tapped on icon |
While locked-on, charges, otherwise dismisses. |
| Change next Pikmin type | tapped |
Won't take effect if the player whistled after pressing. |
| Switch leader | ||
| Pluck sprout | released |
Won't take effect if the player whistled after pressing. |
| Punch | released |
Only when not commanding Pikmin and near a punchable target. Won't take effect if the player whistled after pressing. |
| Use ultra-spicy spray | tapped on icon |
|
| Dodge | Only if the Dodge Whistle has been obtained. | |
| Face camera towards leader's direction | tapped |
|
| Rotate camera | ||
| Open Onion menu | released |
Won't take effect if the player whistled after pressing. |
| Cancel pluck/Go Here! | ||
| Pause/resume | ||
| Skip cutscene | Certain cutscenes cannot be skipped. | |
| Toggle Off-TV Play |
Pikmin 3 Deluxe[edit]
Pikmin 3 Deluxe changes many of the controls from Pikmin 3 due to factors like the differences between the Wii U and Nintendo Switch (such as the lack of a second screen), changes to mechanics such as charging, and utilization of the Switch's gyroscope.
The available control schemes depend on the amount of players.
- In single-player, the player can use one of the following: 2 combined Joy-Con attached to the console, 2 combined Joy-Con detached from the console, or a Pro Controller.
- In 2-player, each player can use one of the following: 2 combined Joy-Con detached from the console, a Pro Controller, or a single Joy-Con sideways.
The game features three cursor control styles: stick-only, gyro-stick, and gyro-pointer. These control modes are set in the pause menu.
- With stick-only controls, moving
 lightly controls the cursor, and moving fully controls both the leader and cursor. By tilting the stick lightly, the cursor can go past its standard range; when it does, it turns cyan. Pikmin can be thrown farther than normal this way, but only roughly until the midway point between the maximum standard range and the maximum "light tilt" range. The whistle always comes from where the cursor is. Moving the stick fully if the cursor was past the standard range will return it to standard range. In this mode, rotating the camera will keep the cursor in place. Unlike Pikmin 3, the cursor is based on the area's geometry. For instance, if the player is overlooking a cliff and has the cursor on the edge, holding up will make the cursor move forward in the area and dip down the edge, despite the fact that doing this moved the cursor down on the screen.
 - With gyro-stick controls, controls the leader when fully held, but also controls the cursor regardless of how much it is tilted. Tilting the controller will also move the cursor. In reality, there is an imaginary "anchor" that is controlled by , and tilting the controller allows the cursor to offset around this point, up to a fixed radius around the point. For unknown reasons, in certain scenarios the cursor will behave erratically – if the gyro offset is at a given angle, and the anchor moves to that same side compared to the leader, the offset will cause the cursor to very quickly jump to the leader.[1]
 and
and  both reset the cursor's position and gyro offset. With this mode, locking-on will place the cursor on the target, but it can then be offset by tilting the controller. In this mode, rotating the camera will keep the cursor in place, but any gyro offset will change to match the camera's orientation, albeit with erratic results as the camera rotates.[2] Moving the cursor, regardless of input, will make it move around the screen, like with gyro-pointer controls, and not around the area, like the stick-only controls.
 - With gyro-pointer controls, only controls the leader, and only when fully held. Instead, tilting the controller moves the cursor around the screen. It can move to any position on-screen, and cannot go past it. Pressing
 in this mode changes it to centering the cursor instead of changing the standby Pikmin to the next one;
  now changes to the next standby Pikmin. In this mode, rotating the camera will keep the cursor in the same screen location.
There is only one cursor control style option in the options menu, so in 2-player mode, it influences both players. Gyro-pointer cursor mode cannot be used with a sideways Joy-Con – the game will act as if gyro-cursor is on instead for any player that tries, despite the option still being recorded as gyro-pointer behind the scenes until players purposely change that.
This means that if the option is set to gyro-pointer, one player is using combined Joy-Cons or a Pro Controller, and the other player is using a single sideways Joy-Con, one can play with gyro-pointer while the other plays with gyro-cursor, which is not something that is otherwise possible. Any player with a sideways Joy-Con will only have the stick-only and gyro-stick options available in the pause menu, but oddly this means that if player 1 is using two combined Joy-Cons or a Pro Controller, and player 2 is using a sideways Joy-Con, player 1 will be able to set the global cursor style option to any mode, while player 2 will be limited to stick-only or gyro-stick, despite the option affecting both players as stated previously.
| Action | Combined Joy-Cons or Pro Controller | Sideways Joy-Con | Notes |
|---|---|---|---|
| Move | fully held |
fully held |
|
| Move cursor – stick | lightly or fully held |
lightly or fully held |
|
| Move cursor – gyro | Move the right Joy-Con / Move the Pro Controller | Move the Joy-Con | |
| Hold and throw Pikmin/leader | Pressing holds a Pikmin, releasing throws it. | ||
| Whistle | Holding it down longer increases the range. | ||
| Lock-on only | Only in stick-only cursor controls or gyro-only cursor controls, and only if a lock-on target is available. | ||
| Lock-on + reset gyro | Only in gyro-stick cursor controls, and only if a lock-on target is available. | ||
| Cancel lock-on – no more available | Only if locked-on with no more targets available. | ||
| Cancel lock-on – always | |||
| Charge | |||
| Change next Pikmin type – right | |||
| Change next Pikmin type – left | N/A | Only in stick-only cursor controls, or gyro-stick cursor controls. | |
| Use action menu | Allows the player to use an ultra-spicy spray, change leader, bring the other player's leader to the group, dismiss, or use the current Bingo Battle item. | ||
| Throw Pikmin automatically | held |
held |
Only while locked-on. |
| Pluck sprout | |||
| Punch | Only when not commanding Pikmin and near a punchable target. | ||
| Dodge | N/A | Only if the Dodge Whistle has been obtained. | |
| Rotate camera | N/A | ||
| Face camera towards leader's direction only | N/A | Only in gyro-only cursor controls. | |
| Face camera towards leader's direction + extend cursor | Only in stick-only cursor controls. | ||
| Face camera towards leader's direction + reset gyro + reset cursor | Only in gyro-stick cursor controls. | ||
| Reset gyro – gyro-stick | N/A | Only in gyro-stick cursor controls. | |
| Reset gyro – gyro-pointer | N/A | Only in gyro-pointer cursor controls. | |
| Face camera North + point to Onion | Only in Bingo Battle. If the player is rotating the camera manually as they do this, then the camera will not face North. | ||
| Open Onion menu/Assemble All | When below an Onion's beam/when next to the S.S. Drake. | ||
| Cancel pluck/Go Here! | |||
| Zoom mini radar in/out | N/A | ||
| Show hint | N/A | ||
| Radar | (Player 1 only) |
If player 2 uses a solo Joy-Con, they cannot open the radar. | |
| Pause/resume | (Player 2 only) |
If player 1 uses a solo Joy-Con, they cannot pause the game. | |
| Skip cutscene | (Player 1 only) |
If player 2 uses a solo Joy-Con, they cannot skip cutscenes. Certain cutscenes cannot be skipped. |
Pikmin 4[edit]
Pikmin 4 has a similar control scheme to Pikmin 3 Deluxe, with some notable changes. Shigeru Miyamoto said in the game's announcement presentation that “Nintendo Switch has made controlling the game simpler, meaning you can further concentrate on the core essence of Pikmin gameplay.”
The available control schemes depend on the amount of players.
- In single-player, the player can use one of the following: 2 combined Joy-Cons attached to the console, 2 combined Joy-Cons detached from the console, or a Pro Controller.
- In 2-player, either player can use 2 combined Joy-Cons detached from the console, a Pro Controller, or a single Joy-Con horizontally and vertically for P1 and P2 respectively.
| Action | Combined Joy-Cons or Pro Controller | Single Joy-Con | Notes |
|---|---|---|---|
| Move | fully held |
fully held |
|
| Move cursor – main | lightly or fully held |
lightly or fully held |
|
| Move cursor – alternate | Move the right Joy-Con / Move the Pro Controller | Move the Joy-Con | Only while whistling or throwing. |
| Hold and throw Pikmin/Send Oatchi | Pressing holds a Pikmin, releasing throws it. | ||
| Whistle | Holding it down longer increases the range. | ||
| Manual lock-on | N/A | Only if a lock-on target is available. | |
| Cancel manual lock-on | N/A | ||
| Charge | Only after buying the Charging Horn, and when not riding Oatchi. | ||
| Ride/Dismount | |||
| Jump | Only when riding or playing as Oatchi. | ||
| Change next Pikmin type – right | Pressing | ||
| Change next Pikmin type – left | N/A | ||
| Swarm | Only after obtaining the Lineup Trumpet, and when not riding Oatchi. | ||
| Use action menu | Allows the player to disband, give a command to Oatchi, open the Pack, or either dismount Oatchi or switch between the player character and Oatchi. | ||
| Pluck sprout | Only when near a Pikmin sprout. | ||
| Punch | Only when not commanding Pikmin or Oatchi. | ||
| Rush | Only when Oatchi is the selected type, or when riding or playing as Oatchi. | ||
| Rotate camera | N/A | ||
| Rotate camera (alternate) | N/A | ||
| Adjust camera angle vertically | N/A | ||
| Face camera towards leader's direction | |||
| Reset the camera's vertical position | N/A | ||
| Cancel pluck/Go Here!/Rush | |||
| Pause/resume | Single Joy-Con controls only when the Tablet is open and dependent on whether P1 is using the left or right Joy-Con. | ||
| Open Tablet | Single Joy-Con controls dependent on whether P1 is using the left or right Joy-Con. | ||
| Skip cutscene |
Hey! Pikmin[edit]
Hey! Pikmin is primarily played with the 3DS's control stick and the touch screen, as almost all actions can be done with them. While most buttons are not required to play the game, they still have functions to provide an alternative to using the control stick. The buttons exclusive to the New Nintendo 3DS do not do anything.
| Action | Button | Notes |
|---|---|---|
| Move left | ||
| Move right | ||
| Move up | Only when swimming or climbing a vine. | |
| Move down | Only when swimming or climbing a vine. | |
| Hold and throw Pikmin | Pressing holds a Pikmin, releasing throws it. | |
| Whistle | ||
| Change next Pikmin type | ||
| Enter doorway | ||
| Open jetpack | ||
| Close jetpack | ||
| Bounce up | Only when carried by Winged Pikmin. | |
| Fall faster | Only when carried by Winged Pikmin. | |
| Radar | ||
| Pause/resume |
Specific controls[edit]
|
The following article or section is in need of assistance from someone who plays Pikmin 3. |
This section details controls for specific scenarios that can be encountered while playing.
[edit]
The controls for the menus are simple, allowing the player to highlight an option, change its values, or activate it. In general, the controls are as follows:
- To highlight a different option, the D-Pad or main Analog Stick of the controller is used, normally up and down.
- To change the value of a highlighted option, the D-Pad or main Analog Stick of the controller is used, normally left and right.
- To confirm the option, if applicable, the punch button is used.
- To cancel, if applicable, the whistle button is used.
Onions[edit]
In the first two games and the New Play Control! remakes, the Onion menu allows the player to withdraw or save Pikmin using a simple control interface.
- Pressing up or down on the D-Pad or main Analog Stick of the controller allows the player to change the amount of Pikmin of that type in the party. Missing or excessive Pikmin will be automatically withdrawn or stored accordingly. Up increases the amount of Pikmin in the Onion, while down increases the amount in the group.
- Pressing the punch button confirms the choice.
- Pressing the whistle button cancels.
Area selection[edit]
The area selection menu in the first two games has some specific options and controls.
| Action | GameCube | Wii | Switch | Notes |
|---|---|---|---|---|
| Change selected area | Also changes the selected voyage log entry. In Pikmin 2 for the GameCube, | |||
| Pick area/log | Opens a menu asking if the player wishes to enter the area. On Olimar's voyage log, it opens the selected journal. | |||
| Close log | Closes Olimar's voyage log in Pikmin. This button also allows canceling the area choice, if the ship's animation hasn't been completed yet. | |||
| Toggle Olimar's voyage log | ||||
| Open Piklopedia | ||||
| Open Treasure Hoard | ||||
| Quit | Opens a menu that allows the player to continue or return to the title screen. | |||
| Play "boing" | N/A | N/A | In New Play Control! Pikmin 2, it makes the Wii Remote's speaker sound a "boing" sound effect, the same that can be heard when an invalid Pikmin number is attempted on the Onion menu. |
Piklopedia and Treasure Hoard[edit]
On the Piklopedia and Treasure Hoard menu, there are a few specific actions that can be performed.
| Action | GameCube | Wii | Switch | Notes |
|---|---|---|---|---|
| Change entry | Only when no entry is opened. | |||
| Open selected entry | Only when no entry is opened. | |||
| Close entry | Only when an entry is opened. | |||
| Move camera | Only when an entry is opened. | |||
| Zoom in/out | ||||
| Rotate camera | ||||
| Throw pikpik carrot | Only on the Piklopedia, and only if an entry is opened. | |||
| Use ultra-bitter spray | Only on the Piklopedia. | |||
| Open Olimar's journal/Olimar's notes | ||||
| Open sales pitch or Louie's notes | ||||
| Switch between Piklopedia and Treasure Hoard | Only when no entry is opened. | |||
| Quit | Opens a menu asking if the player wishes to remain on the mode or if they went to return to the area selection screen, if no entry is opened. |
Pebble Pitcher[edit]
In Pikmin 4, a second player can control the Pebble Pitcher. As a supportive cursor, it has unique controls.
| Action | Combined Joy-Cons or Pro Controller | Single Joy-Con | Notes |
|---|---|---|---|
| Activate Pebble Pitcher/reset cursor | |||
| Move cursor — L Stick | N/A | Option only available when using Two-Hand Hold. | |
| Move cursor — Motion Controls | Move the Joy-Cons or Pro Controller | Move the Joy-Con | |
| Launch pebble | |||
| Change item selection — right | Single Joy-Con controls dependent on whether P2 is using the left or right Joy-Con. | ||
| Change item selection — left | |||
| Launch item | Only when an item is available. |
Bomb rocks[edit]
- Main article: Bomb rock.
Due to the actions that can be performed by Pikmin carrying bomb rocks, some special notes need to be taken into consideration in order to not have a bomb rock explode accidentally.
Radar[edit]
- Main article: Radar.
A few buttons control the radar. These allow the player to pan it and zoom it.
Pikmin 2 title screen[edit]
- Main article: Title screen secrets.
Some Easter eggs exist on the title screen for Pikmin 2 and the New Play Control! remake. These allow the player to change the words the Pikmin spell out, and allows the spawn and control of an enemy.
Button-mashing[edit]
The term button-mashing is used when a player rapidly presses buttons or tilts sticks on the controller, without any discernible pattern. The point of doing this varies between games and scenarios, but in the Pikmin games, one may have to button-mash in certain situations in order to achieve a goal. The following situations require the player to button-mash:
- When the current leader is being attacked by an opposing Pikmin, twirling the main analog stick allows the leader to shake them off; they'll remained latched until the stick is twirled for long enough. In Pikmin and New Play Control! Pikmin, actual buttons can also be pressed rapidly to shake off Mushroom Pikmin.
- When the leader is being held by a Greater Spotted Jellyfloat, Swooping Snitchbug or Bumbling Snitchbug, the player can rotate the main stick to break free. If they do not do it in time, they subject the leader to damage. In Pikmin 3 Deluxe, the player may also shake the controller itself.
- In Pikmin 3, when a leader is thrown to the ground, the player can mash directions on
 /
/  – such as twirling – to make them get up. The player can also shake the Nunchuk to make them get up (usually easier and faster). The leader will get up by themselves eventually, however. In Pikmin 3 Deluxe, they get up by themselves right away.
 - When playing as Oatchi in Pikmin 4, the player can mash the B button to make him recover from a hazard such as fire, poison or panic sooner.
In a sense, it could be said that the games prior to Pikmin 3 require the player to mash ![]() /
/ ![]() to continuously pluck Pikmin, but this is only partially true: the player needs only to press the button during a pluck animation, in order to assure that the next Pikmin will also be automatically plucked. In addition, mashing the throw button is required in order to throw Pikmin in quick succession.
to continuously pluck Pikmin, but this is only partially true: the player needs only to press the button during a pluck animation, in order to assure that the next Pikmin will also be automatically plucked. In addition, mashing the throw button is required in order to throw Pikmin in quick succession.
If the player is not interested in a cutscene's dialog, the fastest way to advance it is by mashing the ![]() /
/ ![]() /
/ ![]() and
and ![]() /
/ ![]() /
/ ![]() buttons. If the game in question allows using the "B" button to both advance the text and auto-fill the letters, then that button may be mashed alone.
buttons. If the game in question allows using the "B" button to both advance the text and auto-fill the letters, then that button may be mashed alone.
In Pikmin 2, the mashing logic only reads from the control stick, not any other button or the C-stick. The game keeps track of how hard the player's been mashing lately as a numeric value. As the player mashes, this number increases every frame, but it also decreases every frame the player doesn't mash, meaning the player has to keep mashing to keep that number up. Due to the way the system works, this number can never go beyond 14. Every frame where that number is higher than 5, the game rolls a random number between 1 and 22, and if that number is below it, it can proceed to the next check: a roll between 1 and 10, where if the number is 1, the leader is freed. In practice, this means the harder the player has mashed in the past 22 frames, the higher their chance of escaping, and even with the fastest possible mashing, there's a 14/22 × a 1/10 chance every frame to be freed.
Console and controller resetting[edit]
For the GameCube games, there are two button combinations that replace the need to interact with the physical console itself: one resets the game without pressing the button on the console, and the other resets the controller's neutral position, without needing to unplug and replug it. The former can be achieved by holding ![]() +
+ ![]() +
+ ![]() for a few seconds. For the latter, the player must hold
for a few seconds. For the latter, the player must hold ![]() +
+ ![]() +
+ ![]() , for three seconds, without touching
, for three seconds, without touching ![]() ,
, ![]() ,
, ![]() or
or ![]() . This is because when the console is booted, or the controller's neutral position is reset, the position of the sticks and the analog shoulder buttons is considered to be the default. If, for instance, the Control Stick is held to the right when the default position is being registered, then the game will assume that the Stick is being held left, if the player releases the Control Stick.
. This is because when the console is booted, or the controller's neutral position is reset, the position of the sticks and the analog shoulder buttons is considered to be the default. If, for instance, the Control Stick is held to the right when the default position is being registered, then the game will assume that the Stick is being held left, if the player releases the Control Stick.
Controller diagram[edit]
Pikmin, New Play Control! Pikmin, Pikmin 1 (Nintendo Switch), Pikmin 2 (Nintendo Switch), and Pikmin 3 Deluxe contain diagrams of the controller with labels on what each button does during gameplay. In Pikmin and its rereleases, a diagram is found in Olimar's monitor, in the Nintendo Switch version of Pikmin 2 a diagram (that is directly copied from the Nintendo Switch version of Pikmin) can be viewed at any time by pressing ![]() , and in Pikmin 3 Deluxe, diagrams of the different control styles are found in the Control Guide in the pause menu. These can be used should the player forget the controls.
, and in Pikmin 3 Deluxe, diagrams of the different control styles are found in the Control Guide in the pause menu. These can be used should the player forget the controls.
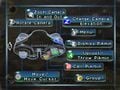
The controller diagram in the GameCube version of Pikmin.
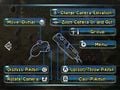
The controller diagram in the New Play Control! version of Pikmin.
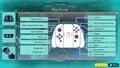
The controller diagram for using 2 Joy-Con in Pikmin 3 Deluxe.
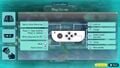
The controller diagram for using 1 Joy-Con in Pikmin 3 Deluxe.


Movement and analog stick drift[edit]
After the release of Pikmin 3 Deluxe, there have been reports[3][4][5][6][7][8][9][10][11] of players being unable to move the leader, sometimes in specific angles only. This is because in order to move a leader, one must tilt the analog stick fully, since tilting it partially will only move the cursor (or do nothing, if the player is using gyro cursor controls exclusively), and given that some Joy-Cons and Pro Controllers suffer from analog stick drifting and incorrect range detection[12], players suffering from this hardware problem will find themselves unable to move leaders effectively until the affected controllers are repaired.
Trivia[edit]
- Interestingly, after switching leaders in Pikmin 3, there is a small delay until the player can switch again. This delay can be bypassed with Stylus mode and the touchscreen buttons.
See also[edit]
References[edit]
- ^ Twitter video on Twitter, published on October 17th, 2020, retrieved on December 1st, 2020
- ^ Twitter video on Twitter, published on October 17th, 2020, retrieved on December 1st, 2020
- ^ For Pikmin 3 deluxe on the switch, Movement gets stuck when going straight forward. Makes game near unplayable at times and i hate freezing and losing pikmin because I can’t move. Anyone else having this problem? on Reddit, published on October 31st, 2020, retrieved on December 1st, 2020
- ^ Pikmin 3 Deluxe issue on Reddit, published on November 1st, 2020, retrieved on December 1st, 2020
- ^ Pikmin 3: Deluxe unplayable with joycon controller? Can't walk down on Reddit, published on November 3rd, 2020, retrieved on December 1st, 2020
- ^ Walking broken in Deluxe? (Pro controller) on Reddit, published on October 30th, 2020, retrieved on December 1st, 2020
- ^ Issue with Control Sticks- Massive Dead Zones on Reddit, published on November 3rd, 2020, retrieved on December 1st, 2020
- ^ Weird movement issues on Reddit, published on October 31st, 2020, retrieved on December 1st, 2020
- ^ Are you guys getting the bug where the captain randomly stops moving? on Reddit, published on November 5th, 2020, retrieved on December 1st, 2020
- ^ Controls on Reddit, published on November 3rd, 2020, retrieved on December 1st, 2020
- ^ Pikmin 3 Deluxe Stop Moving Bug on Reddit, published on November 5th, 2020, retrieved on December 1st, 2020
- ^ Nintendo Responds To Sufferers Of Joy-Con Drift on Kotaku, published on July 22nd, 2019, retrieved on December 1st, 2020