Emergence Cave: Difference between revisions
No edit summary |
(Added Cavegen links.) |
||
| (97 intermediate revisions by 38 users not shown) | |||
| Line 1: | Line 1: | ||
{{ | {{game icons|p2=y}} | ||
|location = Valley of Repose | {{infobox cave | ||
|sublevels = 2 | |image=EmergenceCave2.png | ||
|treasures = 3 | |location=Valley of Repose | ||
| | |sublevels=2 | ||
|treasures=3 | |||
|hazards=None | |||
}} | |||
{{guide}} | |||
'''Emergence Cave''' ({{j|始まりの洞窟|Hajimari no Dōkutsu|Cave of Beginning}}) is a [[cave]] in the [[Valley of Repose]] in {{p2}}, and is the first cave in the game, serving as a tutorial for how caves work. It features a simple layout in each sublevel and no particularly dangerous [[enemy|enemies]] or [[boss]]es, making it the easiest cave in the game. [[Purple Pikmin]] are first encountered here, which are needed to collect the [[Spherical Atlas]] to progress to the next area. In this cave, there are {{pokos|480}} worth of treasures. | |||
==How to reach== | |||
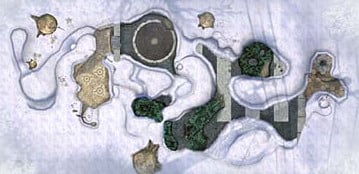
{{location map | width = 246 | height = 411 | image = VoR texture.png | bg = #111 | caption = Location of the cave. | icons = | |||
{{map icon | cave | 135 | 210}} | |||
}} | |||
The Emergence Cave can be reached by progressing past both [[bag]]s and the white bramble [[gate]] near the landing site. It is hard to miss once the white gate is destroyed, and it is impossible to go beyond the cave without discovering [[Blue Pikmin]] first. You should bring all the Pikmin you have at this point (which is usually 70 [[Red Pikmin]] at most). | |||
= | {{clear}} | ||
{{notes|ship=y}} | |||
== | ==Sublevel 1== | ||
[[File:P2 Emergence Cave Sublevel 1.jpg|thumb|175px|A map of sublevel 1. Its layout never changes.]] | |||
* '''Theme''': Snow | |||
* '''Music''': ''[[Music in Pikmin 2#Emergence Cave 1|Emergence Cave 1]]'' | |||
* '''Treasures''': | |||
** {{icon|Citrus Lump|v=TH|y}} | |||
** {{icon|Quenching Emblem|y}} | |||
* '''Enemies''': | |||
** {{icon|Snow Bulborb|y}} × 4 | |||
* '''Obstacles''': | |||
** None | |||
* '''Vegetation''': | |||
** None | |||
* '''Others''': | |||
** None | |||
The first sublevel of this cave has two treasures, which are guarded by four Snow Bulborbs; these are easily killed by [[Group move|swarming]] or [[throw]]ing Pikmin on their backs. Once defeated, the [[Citrus Lump]] and [[Quenching Emblem]] can be carried to the [[Research Pod]]. Bringing defeated enemies back will trigger a [[cutscene]] the first time a corpse is picked up by the Pod, though this can happen in whatever sublevel this first occurs in. | |||
== | {{cavegen|ec1}} | ||
=== | {{sublevel technical | ||
|cave = tutorial_1 | |||
|enemymax = 4 | |||
|itemmax = 2 | |||
|gatemax = 0 | |||
|capmax = 0 | |||
|rooms = 2 | |||
|ctrratio = 0 | |||
|geyser = No | |||
|unitfile = 1_units_north_tutorial_snow.txt | |||
|lightfile = tutorial_1_light.ini | |||
|bg = | |||
|clog = No | |||
|hiddenfloor = 0 | |||
|units = | |||
{{sublevel units | |||
|cap_snow| Dead end | |||
|way3_snow| Three-way crossing | |||
|way4_snow| Four-way crossing | |||
|wayl_snow| Turning corridor | |||
|way2_snow| Corridor | |||
|way2x2_snow| Long corridor | |||
}} | |||
{{sublevel units | |||
|room_north_tutorial_1_snow| '''Circular room''' | |||
}} | |||
}} | |||
{| class="wikitable mw-collapsible mw-collapsed technicaltable" | |||
! colspan="5" style="width: 288px;" | {{tt|Detailed object list|This is a representation of the data in the cave's file, and how the game makes use of it.}} | |||
|- | |||
! colspan="5" | The game spawns these "main" objects: | |||
|- | |||
! ID !! Object !! Amount !! Fall method !! Spawn location | |||
|- | |||
| 1 | |||
| {{icon|Snow Bulborb|y}} | |||
| 4 | |||
| None | |||
| "Easy" enemy spots | |||
|- | |||
! colspan="5" | Then it spawns these "treasure" objects: | |||
|- | |||
! ID !! Object !! Amount !! Fall method !! Spawn location | |||
|- | |||
| 2 | |||
| {{icon|Quenching Emblem|y}} | |||
| 1 | |||
| None | |||
| Treasure spots | |||
|- | |||
| 3 | |||
| {{icon|Citrus Lump|v=TH|y}} | |||
| 1 | |||
| None | |||
| Treasure spots | |||
|} | |||
:''For details on how objects are spawned, and how some may fail to spawn, see [[Pikmin 2 cave generation|here]].'' | |||
{{clear}} | |||
==Sublevel 2== | |||
[[File:P2 Emergence Cave Sublevel 2.jpg|thumb|250px|A map of sublevel 2. Again, the layout is always the same.]] | |||
* '''Theme''': Snow | |||
* | * '''Music''': ''[[Music in Pikmin 2#Emergence Cave 2|Emergence Cave 2]]'' | ||
* | * '''Treasures''': | ||
** {{icon|Spherical Atlas|y}} | |||
* '''Enemies''': | |||
** {{icon|Snow Bulborb|y}} × 7 | |||
[[ | * '''Obstacles''': | ||
[[ | ** None | ||
[[Category: | * '''Vegetation''': | ||
** {{icon|Clover|y}} × 2 | |||
** {{icon|Figwort|y}} (large brown) × 4 | |||
** {{icon|Figwort|y}} (small brown) × 6 | |||
** {{icon|Violet Candypop Bud|y}} × 2 (if [[Candypop Bud#Maximum Pikmin requirement|max Pikmin requirement]] is met) | |||
* '''Others''': | |||
** None | |||
Upon entering the sublevel, defeat the Snow Bulborbs and progress down the corridor, as the treasure nearby can't be collected yet. At the end, in a spherical room, there are two [[Violet Candypop Buds]]. Throwing five Red Pikmin into each flower will produce 10 Pikmin seeds; when [[pluck]]ed, these will be the very first [[Purple Pikmin]] in the game. The [[Spherical Atlas]] at the start of the sublevel can now be brought back to the Ship's Pod, which will unlock the [[Sphere Chart]], an item allowing the player to travel to the [[Awakening Wood]]. | |||
Leaving the cave after collecting the treasure will end the day. It is possible to obtain more than 10 Purple Pikmin on this day by leaving the cave without collecting the treasure, and then returning to it. Because the Candypop Buds disappear only after the player has obtained 20 Purples, three trips of 10, 9 and 10 make the maximum 29 from this cave. This allows the player to get [[White Pikmin]] earlier on in the Awakening Wood, without having to obtain the Purple Pikmin from [[Hole of Beasts]], as a total Pikmin weight of 200 is needed to squash the [[bag]]. | |||
{{cavegen|ec2}} | |||
{{sublevel technical | |||
|cave = tutorial_1 | |||
|enemymax = 9 | |||
|itemmax = 1 | |||
|gatemax = 0 | |||
|capmax = 0 | |||
|rooms = 1 | |||
|ctrratio = 0 | |||
|geyser = Yes | |||
|unitfile = 1_units_purple_snow.txt | |||
|lightfile = tutorial_1_light.ini | |||
|bg = | |||
|clog = No | |||
|hiddenfloor = 0 | |||
|units = | |||
{{sublevel units | |||
|room_purple14x14_snow| '''Purple Pikmin room''' | |||
}} | |||
}} | |||
{| class="wikitable mw-collapsible mw-collapsed technicaltable" | |||
! colspan="5" style="width: 288px;" | {{tt|Detailed object list|This is a representation of the data in the cave's file, and how the game makes use of it.}} | |||
|- | |||
! colspan="5" | The game spawns these "main" objects: | |||
|- | |||
! ID !! Object !! Amount !! Fall method !! Spawn location | |||
|- | |||
| 1 | |||
| {{icon|Violet Candypop Bud|y}} | |||
| 2 | |||
| None | |||
| "Hard" enemy spots | |||
|- | |||
| 2 | |||
| {{icon|Snow Bulborb|y}} | |||
| 7 | |||
| None | |||
| "Easy" enemy spots | |||
|- | |||
! colspan="5" | Then it spawns these "decoration" objects: | |||
|- | |||
! ID !! Object !! Amount !! Fall method !! Spawn location | |||
|- | |||
| 3 | |||
| {{icon|Figwort|y}} (small brown) | |||
| 6 | |||
| None | |||
| Plant spots | |||
|- | |||
| 4 | |||
| {{icon|Figwort|y}} (large brown) | |||
| 4 | |||
| None | |||
| Plant spots | |||
|- | |||
| 5 | |||
| {{icon|Clover|y}} | |||
| 2 | |||
| None | |||
| Plant spots | |||
|- | |||
! colspan="5" | Then it spawns these "treasure" objects: | |||
|- | |||
! ID !! Object !! Amount !! Fall method !! Spawn location | |||
|- | |||
| 6 | |||
| {{icon|Spherical Atlas|y}} | |||
| 1 | |||
| None | |||
| Treasure spots | |||
|} | |||
:''For details on how objects are spawned, and how some may fail to spawn, see [[Pikmin 2 cave generation|here]].'' | |||
{{clear}} | |||
==Emergence Cave challenge== | |||
{{main|Challenge run#Emergence Cave challenge}} | |||
Given that enemies respawn every time a cave is entered, and that their corpses are worth a few Pokos, a player can finish the debt using nothing but the Emergence Cave. This challenge usually requires that the player gets no money from sources outside of the Emergence Cave's corpses. This takes several in-game days and many visits to the cave, as the player can only get {{pokos|22}} from the 11 Snowy Bulborbs each time they enter the cave. | |||
==Gallery== | |||
<gallery> | |||
Emergence Cave Location.png|The cave entrance. | |||
</gallery> | |||
==Names in other languages== | |||
{{Foreignname | |||
|Jap=始まりの洞窟 | |||
|JapR=Hajimari no Dōkutsu | |||
|JapM=Cave of Beginning | |||
|Ger=Höhle des Ursprungs | |||
|GerM=Cave of Origin | |||
|Spa=Cueva de Emergencia | |||
|SpaM=Emergence Cave | |||
|Fra=Grotte Emergente | |||
|FraM=Emerging Cave | |||
|Ita=Grotta Rivelazione | |||
|ItaM=Revelation Cave | |||
|ChiTrad=起始洞窟 | |||
}} | |||
==See also== | |||
*[[Valley of Repose]] | |||
*[[Purple Pikmin]] | |||
{{Valley of Repose}} | |||
{{p2 caves}} | |||
[[Category:Emergence Cave| ]] | |||
Latest revision as of 05:44, April 14, 2024
| Emergence Cave | |
|---|---|

| |
| Location | Valley of Repose |
| Sublevels | 2 |
| Treasures | 3 |
| Hazards | None |
|
The following article or section contains guides. |
Emergence Cave (始まりの洞窟?, lit.: "Cave of Beginning") is a cave in the Valley of Repose in Pikmin 2, and is the first cave in the game, serving as a tutorial for how caves work. It features a simple layout in each sublevel and no particularly dangerous enemies or bosses, making it the easiest cave in the game. Purple Pikmin are first encountered here, which are needed to collect the Spherical Atlas to progress to the next area. In this cave, there are ![]() × 480 worth of treasures.
× 480 worth of treasures.
How to reach[edit]
The Emergence Cave can be reached by progressing past both bags and the white bramble gate near the landing site. It is hard to miss once the white gate is destroyed, and it is impossible to go beyond the cave without discovering Blue Pikmin first. You should bring all the Pikmin you have at this point (which is usually 70 Red Pikmin at most).
Notes
Ship's dialogs
“Interesting... Warm air is welling up from the hole in the ground before you.
What could lie underground? ...What is wrong? You both show expressions of unease.
Do not fear! The leader's group of Pikmin will join you. I shall dispatch my research pod, too.
Approach the hole and press A to jump in!”Sublevel 1[edit]

- Theme: Snow
- Music: Emergence Cave 1
- Treasures:
- Enemies:
 Snow Bulborb × 4
- Obstacles:
- None
- Vegetation:
- None
- Others:
- None
The first sublevel of this cave has two treasures, which are guarded by four Snow Bulborbs; these are easily killed by swarming or throwing Pikmin on their backs. Once defeated, the Citrus Lump and Quenching Emblem can be carried to the Research Pod. Bringing defeated enemies back will trigger a cutscene the first time a corpse is picked up by the Pod, though this can happen in whatever sublevel this first occurs in.
| Technical sublevel information | |||||
|---|---|---|---|---|---|
| Internal cave name | tutorial_1 | ||||
| "Main" object maximum (?) | 4 | ||||
| "Treasure" object maximum (?) | 2 | ||||
| "Gate" object maximum (?) | 0 | ||||
| Dead end unit probability (?) | 0 | ||||
| Number of rooms (?) | 2 | ||||
| Corridor-to-room ratio (?) | 0 | ||||
| Escape geyser (?) | No | ||||
| Clogged hole (?) | No | ||||
| Cave units file (?) | 1_units_north_tutorial_snow.txt | ||||
| Lighting file (?) | tutorial_1_light.ini | ||||
| Background (?) | None | ||||
| Cave units (?) | |||||
 |
 |
 |
 |
 |
|
| Dead end | Three-way crossing | Four-way crossing | Turning corridor | Corridor | Long corridor |
 |
|||||
| Circular room | |||||
| Detailed object list | ||||
|---|---|---|---|---|
| The game spawns these "main" objects: | ||||
| ID | Object | Amount | Fall method | Spawn location |
| 1 | 4 | None | "Easy" enemy spots | |
| Then it spawns these "treasure" objects: | ||||
| ID | Object | Amount | Fall method | Spawn location |
| 2 | 1 | None | Treasure spots | |
| 3 | 1 | None | Treasure spots | |
- For details on how objects are spawned, and how some may fail to spawn, see here.
Sublevel 2[edit]

- Theme: Snow
- Music: Emergence Cave 2
- Treasures:
- Enemies:
- Snow Bulborb × 7
- Obstacles:
- None
- Vegetation:
 Clover × 2
 Figwort (large brown) × 4
- Figwort (small brown) × 6
 Violet Candypop Bud × 2 (if max Pikmin requirement is met)
- Others:
- None
Upon entering the sublevel, defeat the Snow Bulborbs and progress down the corridor, as the treasure nearby can't be collected yet. At the end, in a spherical room, there are two Violet Candypop Buds. Throwing five Red Pikmin into each flower will produce 10 Pikmin seeds; when plucked, these will be the very first Purple Pikmin in the game. The Spherical Atlas at the start of the sublevel can now be brought back to the Ship's Pod, which will unlock the Sphere Chart, an item allowing the player to travel to the Awakening Wood.
Leaving the cave after collecting the treasure will end the day. It is possible to obtain more than 10 Purple Pikmin on this day by leaving the cave without collecting the treasure, and then returning to it. Because the Candypop Buds disappear only after the player has obtained 20 Purples, three trips of 10, 9 and 10 make the maximum 29 from this cave. This allows the player to get White Pikmin earlier on in the Awakening Wood, without having to obtain the Purple Pikmin from Hole of Beasts, as a total Pikmin weight of 200 is needed to squash the bag.
| Technical sublevel information | |||||
|---|---|---|---|---|---|
| Internal cave name | tutorial_1 | ||||
| "Main" object maximum (?) | 9 | ||||
| "Treasure" object maximum (?) | 1 | ||||
| "Gate" object maximum (?) | 0 | ||||
| Dead end unit probability (?) | 0 | ||||
| Number of rooms (?) | 1 | ||||
| Corridor-to-room ratio (?) | 0 | ||||
| Escape geyser (?) | Yes | ||||
| Clogged hole (?) | No | ||||
| Cave units file (?) | 1_units_purple_snow.txt | ||||
| Lighting file (?) | tutorial_1_light.ini | ||||
| Background (?) | None | ||||
| Cave units (?) | |||||
 |
|||||
| Purple Pikmin room | |||||
| Detailed object list | ||||
|---|---|---|---|---|
| The game spawns these "main" objects: | ||||
| ID | Object | Amount | Fall method | Spawn location |
| 1 | 2 | None | "Hard" enemy spots | |
| 2 | 7 | None | "Easy" enemy spots | |
| Then it spawns these "decoration" objects: | ||||
| ID | Object | Amount | Fall method | Spawn location |
| 3 | 6 | None | Plant spots | |
| 4 | 4 | None | Plant spots | |
| 5 | 2 | None | Plant spots | |
| Then it spawns these "treasure" objects: | ||||
| ID | Object | Amount | Fall method | Spawn location |
| 6 | 1 | None | Treasure spots | |
- For details on how objects are spawned, and how some may fail to spawn, see here.
Emergence Cave challenge[edit]
- Main article: Challenge run#Emergence Cave challenge.
Given that enemies respawn every time a cave is entered, and that their corpses are worth a few Pokos, a player can finish the debt using nothing but the Emergence Cave. This challenge usually requires that the player gets no money from sources outside of the Emergence Cave's corpses. This takes several in-game days and many visits to the cave, as the player can only get ![]() × 22 from the 11 Snowy Bulborbs each time they enter the cave.
× 22 from the 11 Snowy Bulborbs each time they enter the cave.
Gallery[edit]
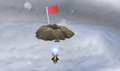
The cave entrance.

Names in other languages[edit]
| Language | Name | Meaning |
|---|---|---|
| 始まりの洞窟? Hajimari no Dōkutsu |
Cave of Beginning | |
(traditional) |
起始洞窟 | |
| Grotte Emergente | Emerging Cave | |
| Höhle des Ursprungs | Cave of Origin | |
| Grotta Rivelazione | Revelation Cave | |
| Cueva de Emergencia | Emergence Cave |
See also[edit]
| Valley of Repose | |||||||||||
|---|---|---|---|---|---|---|---|---|---|---|---|
|
Click an object |
| ||||||||||