The Forest Navel: Difference between revisions
No edit summary |
(Merged.) |
||
| Line 1: | Line 1: | ||
{{game icons|pikmin=y}} | {{game icons|pikmin=y}} | ||
{{infobox area | {{infobox area | ||
| Line 11: | Line 9: | ||
|requirements = Collect 5 [[ship part]]s | |requirements = Collect 5 [[ship part]]s | ||
}} | }} | ||
'''The Forest Navel''' is the third | '''The Forest Navel''' is the third [[area]] in the [[Pikmin (game)|first ''Pikmin'' game]]. The entire area is underground and is accessed by a hole in a vast clearing of the forest. According to [[Captain Olimar]], from high altitude it looks like a belly button, hence its name. This area is where Olimar meets [[Blue Pikmin]] for the first time. Nine pieces of his ship, the [[S.S. Dolphin|Dolphin]], can be found in the area, as well as many new enemies. It is the only ''Pikmin'' area not to be remade in ''[[Pikmin 2]]'', but remade in ''[[Pikmin 3]]'' as [[downloadable content]] – it is known as [[Forgotten Cove]]. | ||
{{listen|filename=Forest Navel.ogg|title=Forest Navel | {{listen|filename=Forest Navel.ogg|title=The Forest Navel music}} | ||
==General layout== | ==General layout== | ||
The Forest Navel is composed mostly of watery areas. In the center lies the landing site, which is surrounded by [[Pellet Posy|Pellet Posies]] and several places to obtain [[nectar]]. To the | The Forest Navel is composed mostly of watery areas. In the center lies the landing site, which is surrounded by [[Pellet Posy|Pellet Posies]] and several places to obtain [[nectar]]. To the west is where Blue Pikmin are originally found. This part consists of several small pools of water, all the way to the north of the map. To the west of that is a narrow path covered with [[hazards#Fire|fire geysers]]. To the south is a sandy beach where [[Fiery Blowhog]]s can be found. There are also some [[bridge]]s that should be constructed so that Pikmin can get back to the ship. To the southwest lies a big lake with [[Wollywog]]s. To the southeast is a dark area with fire geysers and [[Common Glowcap]]s where the [[Puffstool]] can be found. And finally, to the east is the arena where [[Beady Long Legs]] is fought. | ||
[[Bomb-rock]]s in this area are found in pipes, for a total of 25. There is one near the pool where the [[Number 1 Ionium Jet|#1 Ionium Jet]] is found. There's another one next to the place the [[Gravity Jumper]] lies. | [[Bomb-rock]]s in this area are found in pipes, for a total of 25. There is one near the pool where the [[Number 1 Ionium Jet|#1 Ionium Jet]] is found. There's another one next to the place the [[Gravity Jumper]] lies. | ||
| Line 22: | Line 20: | ||
==Enemies== | ==Enemies== | ||
*[[Fiery Blowhog]] | *[[Fiery Blowhog]] x 5 | ||
*[[Breadbug]] | *[[Breadbug]] x 1 | ||
*[[Wollywog]] | *[[Wollywog]] x 4 | ||
*[[Puffstool]] | *[[Puffstool]] x 1 | ||
*[[Honeywisp]] | *[[Honeywisp]] x 5 | ||
*[[Male Sheargrub]] | *[[Male Sheargrub]] x 7 | ||
*[[Shearwig]] | *[[Shearwig]] x 11 | ||
*[[Iridescent Flint Beetle]] | *[[Iridescent Flint Beetle]] x 2 | ||
*[[Beady Long Legs]] | *[[Beady Long Legs]] x 1 | ||
*[[Pellet Posy|Pellet Posies]] xn17 (the 5 blue Posies near the blue Onion do not replenish when torn down) | |||
==Challenge Mode enemies== | ==Challenge Mode enemies== | ||
| Line 49: | Line 48: | ||
==Glitches== | ==Glitches== | ||
There is a glitch that | {{todo|Clean, and move to [[Glitches in Pikmin]].}} | ||
There is a rare glitch that can happen in in this level. When the player defeats an [[enemy]] (usually the [[Wollywog]]), one or more [[Pikmin family|Pikmin]] will vanish with no [[spirit]] shown. When this happens, sometimes the first Pikmin-counter gauge (on the bottom of the [[HUD|screen]]) will show more than the total number of Pikmin in the area. For example: 98/97/305. The Pikmin gauge should stay like that until sunset. This happens in other areas, but in The Forest Navel it is more common. This [[glitch]] can also occur when battling other enemies, and apparently even when there are no enemies around. This glitch can also happen in the [[Awakening Wood]] in ''[[Pikmin 2]]''. | |||
There is also a glitch that will cause Olimar to fall into the abyss by where the Libra is. In [[Challenge Mode]], there are 3 large pellets in the very back area where the [[Analog Computer]] is in the main game. However, the path back to the onions is too narrow for all 3 pellets to be carried back at once. If Olimar is standing between the pellets while they are being carried, he may get pushed off the edge, along with the pellet and possibly the Pikmin carrying it. Olimar will not die or respawn when he falls into the pit; in fact, he will not even fall at all. Instead, he will "float" over the pit as if there was invisible ground. Olimar can walk very far into the darkness, but it may be hard to tell where he is going, because the screen will not follow him. It's also possible to do it in Story Mode, by attracting shearwigs to the bridge and having them eat it. | There is also a glitch that will cause Olimar to fall into the abyss by where the Libra is. In [[Challenge Mode]], there are 3 large pellets in the very back area where the [[Analog Computer]] is in the main game. However, the path back to the onions is too narrow for all 3 pellets to be carried back at once. If Olimar is standing between the pellets while they are being carried, he may get pushed off the edge, along with the pellet and possibly the Pikmin carrying it. Olimar will not die or respawn when he falls into the pit; in fact, he will not even fall at all. Instead, he will "float" over the pit as if there was invisible ground. Olimar can walk very far into the darkness, but it may be hard to tell where he is going, because the screen will not follow him. It's also possible to do it in Story Mode, by attracting shearwigs to the bridge and having them eat it. | ||
| Line 56: | Line 56: | ||
If Olimar falls into the pit by any other means, he will simply respawn after a few seconds back in the same spot he was before he fell. The only other known way to fall into the abyss is to lure the [[Shearwigs]] by the [[Automatic Gear]] all the way to the island where the [[Libra]] is, which will cause them to start chewing the bridge. | If Olimar falls into the pit by any other means, he will simply respawn after a few seconds back in the same spot he was before he fell. The only other known way to fall into the abyss is to lure the [[Shearwigs]] by the [[Automatic Gear]] all the way to the island where the [[Libra]] is, which will cause them to start chewing the bridge. | ||
Finally, the [[Glitches in Pikmin#Libra glitch|Libra glitch]] can also happen with the [[Libra|namesake ship part]]. | |||
==Gallery== | ==Gallery== | ||
| Line 77: | Line 79: | ||
File:DSC00459.JPG|Olimar and his Pikmin wait at one of The Forest Navel's rocky shores, near a Red 10-Pellet in [[Challenge Mode (Pikmin)|Challenge Mode]]. | File:DSC00459.JPG|Olimar and his Pikmin wait at one of The Forest Navel's rocky shores, near a Red 10-Pellet in [[Challenge Mode (Pikmin)|Challenge Mode]]. | ||
File:The Forest Navel preview.png|Preview image on the [[Menu#Area selection|area selection menu]]. | File:The Forest Navel preview.png|Preview image on the [[Menu#Area selection|area selection menu]]. | ||
</gallery> | </gallery> | ||
===Other images=== | ===Other images=== | ||
<gallery> | <gallery> | ||
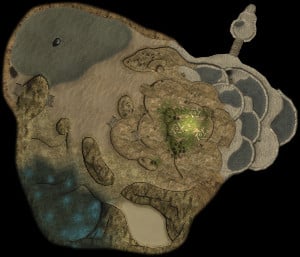
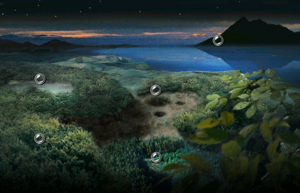
File:The Forest Navel HD.jpg|Overview map. | |||
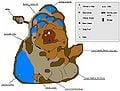
FCFNCompare.png|A map comparing The Forest Navel to the Forgotten Cove. The Forest Navel is in white. | |||
File:Forest_navel.JPG|A fan-made map of the area. | File:Forest_navel.JPG|A fan-made map of the area. | ||
File:FN texture.png|The [[radar]] pattern for The Forest Navel. | File:FN texture.png|The [[radar]] pattern for The Forest Navel. | ||
</gallery> | </gallery> | ||
==Trivia== | |||
*There is a seemingly useless geyser near the [[bomb-rock]] location by the [[Gravity Jumper]]. If the player makes the Pikmin activate it and have Olimar use it, it will launch him up far into the air and make him land on the water. This has no relevance to getting any parts, nor does it aid Olimar in any way, meaning it could be an erroneous [[Mistakes in the Pikmin series|The Forest Navel geyser|leftover]] from an [[Prototype information|Older version]] of the map. | |||
*The best possible score in Challenge Mode is 482. | |||
*The map of The Forest Navel very vaguely resembles a Bulborb or Bulbear. | |||
*All ship parts whose names begin with A are in the Forest Navel. | |||
{{P1 areas|fec|440|440|000|fff}} | {{P1 areas|fec|440|440|000|fff}} | ||
{{The Forest Navel}} | |||
Revision as of 13:55, January 17, 2015
| The Forest Navel | |
|---|---|
| |
| Ship parts | 9 |
| Pikmin available | Blue |
| Requirements | Collect 5 ship parts |
| Music | {{{music}}} |


The Forest Navel is the third area in the first Pikmin game. The entire area is underground and is accessed by a hole in a vast clearing of the forest. According to Captain Olimar, from high altitude it looks like a belly button, hence its name. This area is where Olimar meets Blue Pikmin for the first time. Nine pieces of his ship, the Dolphin, can be found in the area, as well as many new enemies. It is the only Pikmin area not to be remade in Pikmin 2, but remade in Pikmin 3 as downloadable content – it is known as Forgotten Cove.
General layout
The Forest Navel is composed mostly of watery areas. In the center lies the landing site, which is surrounded by Pellet Posies and several places to obtain nectar. To the west is where Blue Pikmin are originally found. This part consists of several small pools of water, all the way to the north of the map. To the west of that is a narrow path covered with fire geysers. To the south is a sandy beach where Fiery Blowhogs can be found. There are also some bridges that should be constructed so that Pikmin can get back to the ship. To the southwest lies a big lake with Wollywogs. To the southeast is a dark area with fire geysers and Common Glowcaps where the Puffstool can be found. And finally, to the east is the arena where Beady Long Legs is fought.
Bomb-rocks in this area are found in pipes, for a total of 25. There is one near the pool where the #1 Ionium Jet is found. There's another one next to the place the Gravity Jumper lies.
Enemies
- Fiery Blowhog x 5
- Breadbug x 1
- Wollywog x 4
- Puffstool x 1
- Honeywisp x 5
- Male Sheargrub x 7
- Shearwig x 11
- Iridescent Flint Beetle x 2
- Beady Long Legs x 1
- Pellet Posies xn17 (the 5 blue Posies near the blue Onion do not replenish when torn down)
Challenge Mode enemies
Ship parts
- #1 Ionium Jet
- Gravity Jumper
- Automatic Gear
- Space Float
- Anti-Dioxin Filter
- Libra
- Analog Computer
- Omega Stabilizer
- Guard Satellite
Glitches
|
To do: Clean, and move to Glitches in Pikmin. |
There is a rare glitch that can happen in in this level. When the player defeats an enemy (usually the Wollywog), one or more Pikmin will vanish with no spirit shown. When this happens, sometimes the first Pikmin-counter gauge (on the bottom of the screen) will show more than the total number of Pikmin in the area. For example: 98/97/305. The Pikmin gauge should stay like that until sunset. This happens in other areas, but in The Forest Navel it is more common. This glitch can also occur when battling other enemies, and apparently even when there are no enemies around. This glitch can also happen in the Awakening Wood in Pikmin 2.
There is also a glitch that will cause Olimar to fall into the abyss by where the Libra is. In Challenge Mode, there are 3 large pellets in the very back area where the Analog Computer is in the main game. However, the path back to the onions is too narrow for all 3 pellets to be carried back at once. If Olimar is standing between the pellets while they are being carried, he may get pushed off the edge, along with the pellet and possibly the Pikmin carrying it. Olimar will not die or respawn when he falls into the pit; in fact, he will not even fall at all. Instead, he will "float" over the pit as if there was invisible ground. Olimar can walk very far into the darkness, but it may be hard to tell where he is going, because the screen will not follow him. It's also possible to do it in Story Mode, by attracting shearwigs to the bridge and having them eat it.
To see a video of this glitch, click here.
If Olimar falls into the pit by any other means, he will simply respawn after a few seconds back in the same spot he was before he fell. The only other known way to fall into the abyss is to lure the Shearwigs by the Automatic Gear all the way to the island where the Libra is, which will cause them to start chewing the bridge.
Finally, the Libra glitch can also happen with the namesake ship part.
Gallery
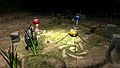
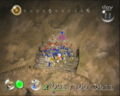
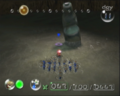
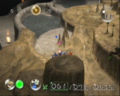
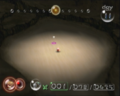
Overview of the landing site.
The landing site.
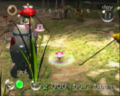
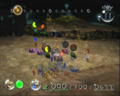
An open dirt area next to the landing zone.
One of the many bridges on the area.
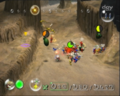
Shearwigs next to the entrance to the Beady Long Legs arena.
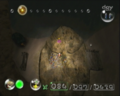
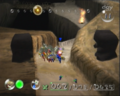
The large dirt area that contains Fiery Blowhogs.
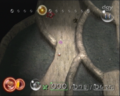
The location of the Gravity Jumper.
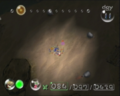
The large lake, with a bottle in it.
The entrance to the Puffstool area.
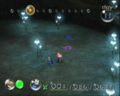
The area where the Puffstool can be found.
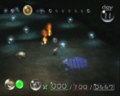
The entrance to the location where Blue Pikmin are first found.
The area where the Blue Pikmin Onion is first found.
The entrance to the path that leads to the Libra and the Analog Computer.
The area with the Libra.
The northernmost section of the area, where the Analog Computer can be found.
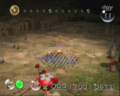
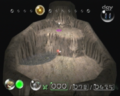
The Beady Long Legs arena.
- DSC00459.JPG
Olimar and his Pikmin wait at one of The Forest Navel's rocky shores, near a Red 10-Pellet in Challenge Mode.
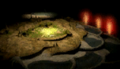
Preview image on the area selection menu.


Other images
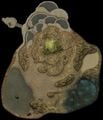
Overview map.
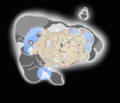
A map comparing The Forest Navel to the Forgotten Cove. The Forest Navel is in white.
A fan-made map of the area.
The radar pattern for The Forest Navel.


Trivia
- There is a seemingly useless geyser near the bomb-rock location by the Gravity Jumper. If the player makes the Pikmin activate it and have Olimar use it, it will launch him up far into the air and make him land on the water. This has no relevance to getting any parts, nor does it aid Olimar in any way, meaning it could be an erroneous The Forest Navel geyser|leftover from an Older version of the map.
- The best possible score in Challenge Mode is 482.
- The map of The Forest Navel very vaguely resembles a Bulborb or Bulbear.
- All ship parts whose names begin with A are in the Forest Navel.
| Pikmin areas |
|---|
 Click an area on the image
The Impact Site • The Forest of Hope • The Forest Navel • The Distant Spring • The Final Trial animtest • codetest • E3play_3 • map_06 • play_4 • route • shapetst • testmap • tuto1 • tuto2 |
| The Forest Navel | ||||||||||
|---|---|---|---|---|---|---|---|---|---|---|
|
Click an object |
| |||||||||