Rockaway Cellars: Difference between revisions
GreenPikmin (talk | contribs) |
(New infobox map.) |
||
| (15 intermediate revisions by 8 users not shown) | |||
| Line 1: | Line 1: | ||
{{game icons|p4=y}} | {{game icons|p4=y}} | ||
{{infobox | {{infobox dandori challenge | ||
| | |screenshot = Rockaway Cellars Overview.jpg | ||
|size = | |map = Rockaway Cellars map.png | ||
| | |size = 250px | ||
| | |red = 25 | ||
| | |redcb = | ||
| | |yellow = | ||
| | |yellowcb = | ||
| | |blue = | ||
| | |bluecb = | ||
|ice = | |||
|icecb = | |||
|rock = 25 | |||
|rockcb = | |||
|winged = | |||
|wingedcb = | |||
|purple = | |||
|purplecb = | |||
|white = | |||
|whitecb = | |||
|bronze = 160 | |||
|silver = 190 | |||
|gold = 220 | |||
|platinum = 240 | |||
|dandori = 2 | |||
|time = 7:00 | |||
|music = [[Music in Pikmin 4#Dandori Challenge 2|Dandori Challenge 2]] | |||
}} | }} | ||
'''Rockaway Cellars''' ({{j|石つぶて研究所|Ishitsubute Kenkyūjo|Rock-Throwing Laboratory}}) is a [[Dandori Challenge]] in {{p4}}. It demonstrates the uses of [[Rock Pikmin]]. | |||
{{ | ==How to reach== | ||
{{see|Dandori Challenge#Locations}} | |||
This Dandori Challenge is third in the dynamic order. It is preceded by [[Hotshock Canyon]] and followed by [[Test Tubs]]. | |||
==Overview== | |||
Rockaway Cellars is set in a dirt cave with brick walls. Its terrain is completely flat and features many walls blocking pathways. As the stage is centered around Rock Pikmin, there are many [[crystal wall]]s, enemies with [[Crush|crushing]] attacks, and enemies with [[Stab|stabbing]] attacks. | |||
==Layout== | |||
This Dandori Challenge is made up of many interconnected hallways. The [[S.S. Beagle]] starts in the center of the stage. To the north, there is a room with two [[Pyroclasmic Slooch|Pyroclasmic Slooches]] fueling a [[sizzling floor]]. On the sizzling floor is a pile of 30 [[Gold Nugget]]s. There are 5 flowered [[Red Pikmin]] buried in a corner. To the east is a hallway connecting to the room east of the starting area. To the west, there is a hallway connecting the room west of the starting area, and a room blocked by a rusty [[iron fence]] and a [[numbered gate]]. In this room there is a [[Scorchcake]] holding two [[Crush Nugget]]s, a [[Child of the Earth]], and 5 flowered Rock Pikmin sprouts. | |||
To the east of the starting area, blocked by a [[crystal wall]], is a room with a [[Joustmite]], two Crush Nuggets on a ledge which must be knocked down with Oatchi's [[Oatchi#Rush|Rush]], a pile of 40 Gold Nuggets, and 5 Rock Pikmin hiding in a bush. There is a hallway leading to the northern area and a hallway leading to the room directly south of the starting area. This room contains 5 Red Pikmin fighting a Pyroclasmic Slooch, a [[Crew-Cut Gourd]] behind a crystal wall, a [[Iridescent Flint Beetle]] hiding underground (dropping [[nectar]], [[ultra-spicy spray]], and a [[bomb rock]]), and a partially-destroyed dirt wall leading to the southern area. | |||
== | To the west of the starting area, blocked by a [[dirt wall]], is a room with three [[Shearflea]]s, a buried Child of the Earth, and a pile of 40 Gold Nuggets. There is a crystal wall leading to a room containing a Scorchcake, a buried [[Anxious Sprout]], a [[Love Nugget]] on a ledge which must be retrieved with Oatchi's Rush, a Foolish Fruit, and 10 Rock Pikmin on top of a tin can. | ||
{{ | |||
The southernmost area contains 5 Rock Pikmin fighting a Joustmite, 5 flowered Red Pikmin sprouts, and a pile of 33 Gold Nuggets. | |||
==Guides== | |||
{{Guide}} | |||
This Dandori Challenge can be approached in many ways due to the complex layout of the stage. It is vital to make use of the ultra-spicy spray and bomb rock that the Iridescent Glint Beetle drops. | |||
Begin by heading forwards into the room with the sizzling floor. Clear out the enemies and pluck the Red Pikmin, and set 5 on the pile of Gold Nuggets as well as three on each of the Pyroclasmic Slooches. Follow the long hallway into the room with the Joustmite. Making use of the Rock Pikmin hiding inside the bush, defeat the enemy. Set the Rock Pikmin to clear the crystal wall, and whistle the Pikmin at the base while walking into the room with Red Pikmin fighting a Pyroclasmic Slooch. Defeat it, and find the Iridescent Glint Beetle hiding near the dirt wall. Make sure to obtain all three of its drops, as they are very useful. | |||
Set three Pikmin to carry the corpse, and send the rest to demolish the dirt wall. Return to the crystal wall, as the Rock Pikmin should have finished that task. Gather them and begin destroying the next crystal wall. While they are working on that task, finish the dirt wall and continue. Defeat the Joustmite here to claim more Rock Pikmin, and pluck the Red Pikmin sprouts, as well as setting 5 more Pikmin on the pile of Gold Nuggets here. Use Red Pikmin to retrieve the Joustmite. | |||
Continue up into a room with another Scorchcake. Call the 10 Rock Pikmin on the tin can and defeat this enemy. There is a choice here: if Oatchi's [[Oatchi#Dig|Dig]] is sufficiently upgraded, you can use the bomb rock on the crystal wall or save it for the dirt wall in the next room. If not, then use the bomb rock to unearth the Anxious Sprout and set your Rock Pikmin to work on the crystal wall, which should not take long. | |||
Defeat the Shearfleas in the next room and destroy the dirt wall. Grab the Pikmin at the base and begin transporting the remaining items. Don't forget to take some Pikmin behind the rusty iron fence to the north-west and clear out that room at some point. From here, simply transport every remaining object. It is a good idea to use the ultra-spicy spray at this point to speed up carrying times as you transport all the items. | |||
==Objects== | ==Objects== | ||
{{ | * '''Pikmin''': | ||
* | ** {{icon|Red Pikmin|v=P4|y}} × 25 | ||
*** 10 in the [[squad]] to begin. | |||
*** 10 [[sprout|buried]]. | |||
*** 5 in [[combat]]. | |||
** {{icon|Rock Pikmin|v=P4|y}} × 25 | |||
*** 15 [[idle]] throughout the stage. | |||
*** 5 buried. | |||
*** 5 in combat. | |||
* '''Treasures''': | * '''Treasures''': | ||
** {{icon|Gold Nugget|v=P4|y}} × 143 | ** {{icon|Gold Nugget|v=P4|y}} × 143 (piles of 30, 33, 40, and 40) | ||
** {{icon|Anxious Sprout|v=P4|y}} × 1 | ** {{icon|Anxious Sprout|v=P4|y}} × 1 (partially buried) | ||
** {{icon|Child of the Earth|v=P4|y}} × 2 | ** {{icon|Child of the Earth|v=P4|y}} × 2 (one partially buried) | ||
** {{icon|Crew-Cut Gourd|v=P4|y}} × 1 | ** {{icon|Crew-Cut Gourd|v=P4|y}} × 1 | ||
** {{icon|Crush Nugget|v=P4|y}} × 4 | ** {{icon|Crush Nugget|v=P4|y}} × 4 (two inside a Scorchcake) | ||
** {{icon|Foolish Fruit|v=P4|y}} × 1 | ** {{icon|Foolish Fruit|v=P4|y}} × 1 | ||
** {{icon|Love Nugget|v=P4|y}} × 1 | ** {{icon|Love Nugget|v=P4|y}} × 1 | ||
| Line 47: | Line 82: | ||
** {{icon|Scorchcake|v=P4|y}} × 2 | ** {{icon|Scorchcake|v=P4|y}} × 2 | ||
** {{icon|Shearflea|v=P4|y}} × 3 | ** {{icon|Shearflea|v=P4|y}} × 3 | ||
** {{icon|Iridescent Flint Beetle|v=P4|y}} × 1 | |||
* '''Obstacles''': | * '''Obstacles''': | ||
* | ** {{icon|Dirt wall|v=P4|y}} × 2 | ||
* | ** {{icon|Crystal wall|v=P4|y}} × 3 | ||
* | ** {{icon|Iron fence|v=P4|y}} × 1 | ||
** {{icon|Numbered gate|v=P4|y}} × 1 (lowers after defeating 1 Scorchcake) | |||
** {{icon|Sizzling floor|v=P4|y}} × 1 | |||
==Notes== | |||
===Dandori Challenge menu=== | |||
{{transcript|A research center for Rock Pikmin. Demonstrate your Dandori skills, and show them how to break those crystal walls.}} | |||
==Gallery== | ==Gallery== | ||
<gallery> | <gallery> | ||
Rockaway Cellars south-west.jpg|A room with treasure, Rock Pikmin, and a Scorchcake. | |||
Rockaway Cellars East.jpg|Rooms displaying hazards which either Red Pikmin or Rock Pikmin are resistant to. | |||
</gallery> | </gallery> | ||
== | ==Trivia== | ||
* This is the first Dandori Challenge in the dynamic order which grants items beyond the [[Survey Drone]], [[Idler's Alert]], and [[Homesick Signal]]. | |||
* With the exception of Gold Nuggets, all of the treasures in this Dandori Challenge are fruit and vegetables. | |||
==Names in other languages== | |||
{{foreignname | {{foreignname | ||
|Jap = | |Jap = 石つぶて研究所 | ||
|JapR = | |JapR = Ishitsubute Kenkyūjo | ||
|JapM = | |JapM = Rock-Throwing Laboratory | ||
|ChiTrad = | |ChiTrad = 碎石研究所 | ||
|ChiTradR = | |ChiTradR = Suìshí Yánjiūsuǒ | ||
|ChiTradM = | |ChiTradM = Rock-Crushing Laboratory | ||
|Dut = | |ChiSimp = 碎石研究所 | ||
|DutM = | |ChiSimpR = Suìshí Yánjiūsuǒ | ||
|Fra = | |ChiSimpM = Rock-Crushing Laboratory | ||
|FraM = | |Dut = Keienkeilkelder | ||
|Ger = | |DutM = Rock-throwing cellar | ||
|GerM = | |Fra = Caveau lance-rocs | ||
|Ita = | |FraM = Rock-throwing cellar | ||
|ItaM = | |Ger = Felsen-Versuchsanlage | ||
|Kor = | |GerM = Rock Test Facility | ||
|KorR = | |Ita = Struttura lanciapietre | ||
|KorM = | |ItaM = Rock-throwing structure | ||
| | |Kor = 돌팔매질 연구소 | ||
| | |KorR = Dolpalmaejil Yeonguso | ||
| | |KorM = Rock-Throwing Laboratory | ||
| | |Spa = Bodega lanzarrocas | ||
|SpaM = Rock-throwing cellar | |||
|Por = Gruta lança-pedra | |||
|PorM = Rock-throwing cave | |||
}} | }} | ||
== See also == | ==See also== | ||
*[[Rock Pikmin]] | |||
*[[Dandori]] | |||
*[[Dandori Challenge]] | |||
*[[Dandori Battle]] | |||
{{p4 caves}} | {{p4 caves}} | ||
Latest revision as of 21:46, June 3, 2024
| Rockaway Cellars | |||||||||
|---|---|---|---|---|---|---|---|---|---|
| |||||||||
| Available Pikmin | |||||||||
| |||||||||
| Requirements | |||||||||
| |||||||||
| Dandori level | |||||||||
| Time limit | 7:00 | ||||||||
| Music | Dandori Challenge 2 | ||||||||


Rockaway Cellars (石つぶて研究所?, lit.: "Rock-Throwing Laboratory") is a Dandori Challenge in Pikmin 4. It demonstrates the uses of Rock Pikmin.
How to reach[edit]
This Dandori Challenge is third in the dynamic order. It is preceded by Hotshock Canyon and followed by Test Tubs.
Overview[edit]
Rockaway Cellars is set in a dirt cave with brick walls. Its terrain is completely flat and features many walls blocking pathways. As the stage is centered around Rock Pikmin, there are many crystal walls, enemies with crushing attacks, and enemies with stabbing attacks.
Layout[edit]
This Dandori Challenge is made up of many interconnected hallways. The S.S. Beagle starts in the center of the stage. To the north, there is a room with two Pyroclasmic Slooches fueling a sizzling floor. On the sizzling floor is a pile of 30 Gold Nuggets. There are 5 flowered Red Pikmin buried in a corner. To the east is a hallway connecting to the room east of the starting area. To the west, there is a hallway connecting the room west of the starting area, and a room blocked by a rusty iron fence and a numbered gate. In this room there is a Scorchcake holding two Crush Nuggets, a Child of the Earth, and 5 flowered Rock Pikmin sprouts.
To the east of the starting area, blocked by a crystal wall, is a room with a Joustmite, two Crush Nuggets on a ledge which must be knocked down with Oatchi's Rush, a pile of 40 Gold Nuggets, and 5 Rock Pikmin hiding in a bush. There is a hallway leading to the northern area and a hallway leading to the room directly south of the starting area. This room contains 5 Red Pikmin fighting a Pyroclasmic Slooch, a Crew-Cut Gourd behind a crystal wall, a Iridescent Flint Beetle hiding underground (dropping nectar, ultra-spicy spray, and a bomb rock), and a partially-destroyed dirt wall leading to the southern area.
To the west of the starting area, blocked by a dirt wall, is a room with three Shearfleas, a buried Child of the Earth, and a pile of 40 Gold Nuggets. There is a crystal wall leading to a room containing a Scorchcake, a buried Anxious Sprout, a Love Nugget on a ledge which must be retrieved with Oatchi's Rush, a Foolish Fruit, and 10 Rock Pikmin on top of a tin can.
The southernmost area contains 5 Rock Pikmin fighting a Joustmite, 5 flowered Red Pikmin sprouts, and a pile of 33 Gold Nuggets.
Guides[edit]
|
The following article or section contains guides. |
This Dandori Challenge can be approached in many ways due to the complex layout of the stage. It is vital to make use of the ultra-spicy spray and bomb rock that the Iridescent Glint Beetle drops.
Begin by heading forwards into the room with the sizzling floor. Clear out the enemies and pluck the Red Pikmin, and set 5 on the pile of Gold Nuggets as well as three on each of the Pyroclasmic Slooches. Follow the long hallway into the room with the Joustmite. Making use of the Rock Pikmin hiding inside the bush, defeat the enemy. Set the Rock Pikmin to clear the crystal wall, and whistle the Pikmin at the base while walking into the room with Red Pikmin fighting a Pyroclasmic Slooch. Defeat it, and find the Iridescent Glint Beetle hiding near the dirt wall. Make sure to obtain all three of its drops, as they are very useful.
Set three Pikmin to carry the corpse, and send the rest to demolish the dirt wall. Return to the crystal wall, as the Rock Pikmin should have finished that task. Gather them and begin destroying the next crystal wall. While they are working on that task, finish the dirt wall and continue. Defeat the Joustmite here to claim more Rock Pikmin, and pluck the Red Pikmin sprouts, as well as setting 5 more Pikmin on the pile of Gold Nuggets here. Use Red Pikmin to retrieve the Joustmite.
Continue up into a room with another Scorchcake. Call the 10 Rock Pikmin on the tin can and defeat this enemy. There is a choice here: if Oatchi's Dig is sufficiently upgraded, you can use the bomb rock on the crystal wall or save it for the dirt wall in the next room. If not, then use the bomb rock to unearth the Anxious Sprout and set your Rock Pikmin to work on the crystal wall, which should not take long.
Defeat the Shearfleas in the next room and destroy the dirt wall. Grab the Pikmin at the base and begin transporting the remaining items. Don't forget to take some Pikmin behind the rusty iron fence to the north-west and clear out that room at some point. From here, simply transport every remaining object. It is a good idea to use the ultra-spicy spray at this point to speed up carrying times as you transport all the items.
Objects[edit]
- Pikmin:
 Red Pikmin × 25
 Rock Pikmin × 25
- 15 idle throughout the stage.
- 5 buried.
- 5 in combat.
- Treasures:
 Gold Nugget × 143 (piles of 30, 33, 40, and 40)
 Anxious Sprout × 1 (partially buried)
 Child of the Earth × 2 (one partially buried)
 Crew-Cut Gourd × 1
 Crush Nugget × 4 (two inside a Scorchcake)
 Foolish Fruit × 1
 Love Nugget × 1
- Enemies:
 Joustmite × 2
 Pyroclasmic Slooch × 3
 Scorchcake × 2
 Shearflea × 3
 Iridescent Flint Beetle × 1
- Obstacles:
 Dirt wall × 2
 Crystal wall × 3
 Iron fence × 1
 Numbered gate × 1 (lowers after defeating 1 Scorchcake)
 Sizzling floor × 1
Notes[edit]
[edit]
“A research center for Rock Pikmin. Demonstrate your Dandori skills, and show them how to break those crystal walls.”
Gallery[edit]
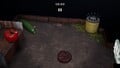
A room with treasure, Rock Pikmin, and a Scorchcake.
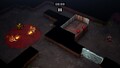
Rooms displaying hazards which either Red Pikmin or Rock Pikmin are resistant to.


Trivia[edit]
- This is the first Dandori Challenge in the dynamic order which grants items beyond the Survey Drone, Idler's Alert, and Homesick Signal.
- With the exception of Gold Nuggets, all of the treasures in this Dandori Challenge are fruit and vegetables.
Names in other languages[edit]
| Language | Name | Meaning |
|---|---|---|
| 石つぶて研究所? Ishitsubute Kenkyūjo |
Rock-Throwing Laboratory | |
(traditional) |
碎石研究所 Suìshí Yánjiūsuǒ |
Rock-Crushing Laboratory |
(simplified) |
碎石研究所 Suìshí Yánjiūsuǒ |
Rock-Crushing Laboratory |
| Keienkeilkelder | Rock-throwing cellar | |
| Caveau lance-rocs | Rock-throwing cellar | |
| Felsen-Versuchsanlage | Rock Test Facility | |
| Struttura lanciapietre | Rock-throwing structure | |
| 돌팔매질 연구소 Dolpalmaejil Yeonguso |
Rock-Throwing Laboratory | |
| Gruta lança-pedra | Rock-throwing cave | |
| Bodega lanzarrocas | Rock-throwing cellar |