Frozen Inferno
| Frozen Inferno | |
|---|---|

| |
| Location | Hero's Hideaway |
| Sublevels | 4 |
| Rescues | 1 |
| Treasures | 12 |
| Onions | 0 |
| Suggested Pikmin | |
| Wild Pikmin | |
|
The following article or section contains guides. |
|
This article or section needs to be cleaned up, either its format or general style. |
The Frozen Inferno is a cave in the Hero's Hideaway in Pikmin 4. As the name implies, it has both fire and ice hazards. However, because it is on top of a lit stove, only Red Pikmin can enter, with Ice Pikmin needing to be found within the cave itself. Likewise, the rookie Rescue Officer and Oatchi cannot enter until they both have the Scorch Guard, and both have it enabled in the "Gear and Skills" menu, making it the only cave that requires gear to enter (other caves may have recommended gear, but those recommendations can be disregarded). This theme is continued with the use of fire starters to melt and burn obstacles and enemies. This includes the cave's boss, the Snowfake Fluttertail, who can be defeated with them. This cave has ![]() × 815 worth of treasure.
× 815 worth of treasure.
How to reach[edit]
This cave can be found in the northern half of the Hero's Hideaway on the countertop of the kitchen. It is located on top of a lit stove, so both the rookie Rescue Officer and Oatchi must have purchased the Scorch Guard upgrade before they can get access, and only Red Pikmin may be taken inside.
Once the second entrance is unlocked, other Pikmin types can be brought into the cave, but like other caves with two entrances, it must be traversed backwards and will be exited through the first entrance.
Notes[edit]
Olimar's Voyage Log[edit]
Sublevel 1[edit]

- Treasures:
 Cushion Cake × 1
 Deceptive Snack × 1
 Heroic Sword × 1
 Puzzle Snack × 1 (hanging from a cobweb)
 Octoplus × 1
- Enemies:
 Fiery Bulblax × 1
 Flighty Joustmite × 1
 Iridescent Flint Beetle × 1
 Pyroclasmic Slooch × 2
- Obstacles:
 Dried plant × 16
 Iron fence × 1
- Tools:
 Bonfire altar × 1
 Bonfire altar × 2
- Wild Pikmin:
- None
- Others:
 Egg × 2
 Raw material pile × 1 (15 pieces)
This sublevel is split into multiple different rooms, with the northern rooms contains multiple treasures and fire-based threats. The northwestern chamber contains a pair of Pyroclasmic Slooches and a Flighty Joustmite. The two Slooches are on top of and are igniting a sizzling floor, with the Cushion Cake sitting on a raised platform in the center. Defeating these three enemies should be defeated to retrieve the treasures in this room, also including the Heroic Sword and the Octoplus , both of which can be found behind some dried plants towards the west. They should be burnt with a fire starter or by luring a Slooch over to burn them. A fire starter can be found in the next room over, towards the east.
This northeastern chamber holds a Fiery Bulblax, also igniting a sizzling floor, along with a lit bonfire altar. Using a Bomb Rock will be the quickest and safest way to deal with the Bulblax, though a large squad of Red Pikmin can take it down. This chamber also contains some more dried plants near the north; the Deceptive Snack is located behind them.
The final treasure in this sublevel, the Puzzle Snack, is located in the easternmost room, in a side area blocked off by an iron fence. Since this treasure hangs from a cobweb, you'll need to bring at least 7 Pikmin with you to pull it down and carry it back — however, the path back is blocked off by more dried plants, which will need to be removed before retrieval.
The entrance to the next sublevel is towards the southwest, and it is blocked off by even more dried plants. In the northern alcove of the northwestern room, you can find an Iridescent Flint Beetle containing 19 raw materials. In the southwestern room, you can find a pair of nectar eggs and a pile of 15 raw materials.
Sublevel 2[edit]

- Treasures:
 Insect Condo × 1
 Stellar Extrusion × 1
 Crush Nugget × 1
- Enemies:
 Chillyhop × 1
 Dwarf Frosty Bulborb × 1
 Frosty Bulborb × 1
 Icy Blowhog × 1
- Obstacles:
 Crystal wall × 1
- Dried plant × 3
 Ice block × 3
 Ice wall × 1
 Ice vent × 1
- Iron fence × 1
 Paper bag × 1
- Tools:
- Bonfire altar × 3 (1 starts lit, 2 start unlit)
 Clay mound × 1 (requires 20 raw material)
- Wild Pikmin:
 Rock Pikmin × 10
- Others:
 Candypop Bud × 1 (Ice)
- Raw material pile × 1 (25 pieces)
First, destroy the ice block leading to the Chillyhop room. Kill it and collect the Crush Nugget. Build the Clay mound and covert Pikmin onto Ice Pikmin. When the clay mound is built, go up to the Frosty Bulborb room. There, kill the Dwarf Frosty Bulborb and push the paper bag. Then, enter the Icy Blowhog arena and kill it. Collect the Stellar Extrusion. Then, pluck the Rock Pikmin in both the Chillyhop and Icy Blowhog rooms. Kill the Frosty Bulborb using a bomb rock and then, destroy the crystal wall to collect the Insect Condo. Then, destroy the ice wall with Ice Pikmin and Oatchi (if upgraded with the ![]() Pup Thermal Defense). Then, enter the next sublevel.
Pup Thermal Defense). Then, enter the next sublevel.
Sublevel 3[edit]

- Treasures:
 Zest Bomb × 1
 Citrus Lump × 1
 Seed Hive × 1
- Enemies:
 Snowy Blowhog × 1
 Arctic Cannon Larva × 2
 Freezecake × 1
- Obstacles:
- Dried plant × 10
- Ice block × 3
- Ice vent × 3
 Switch gate × 1
 Hydro jelly × 2
 Water body × 1 (frozen before the ice blocks are destroyed)
- Tools:
- Bonfire altar × 2 (1 starts lit, 1 is blocked by a hydro jelly)
- Wild Pikmin:
- Others:
- Candypop Bud × 1 (Ice)
First, kill the Snowy Blowhog. Then, go destroy the ice vent with Pikmin. Go over the ice to enter the Freezecake room, making sure the Arctic Cannon Larva was killed and the Seed Hive was collected. Kill the Freezecake to obtain the Zest Bomb and then, lit all unlit bonfire altars. Then, destroy all the ice blocks. Then, destroy the dried plants and collect the Citrus Lump. Then, go to where now where now is a water body. It requires 10 Pikmin to freeze, and that's why there is a Ice Candypop Bud here. Before, press the button with Oatchi. Freeze thw water and jump to the ledge with the next sublevel.
Sublevel 4[edit]

- Treasures:
 Shattering Lance × 1 (inside the Snowfake Fluttertail)
- Enemies:
- Obstacles:
- Hydro jelly × 1
 Numbered gate × 1 (opens when the Snowfake Fluttertail is defeated)
 Stalagmite × 10
- Tools:
- Bonfire altar × 3 (1 starts lit, 1 starts unlit, and 1 is blocked by a hydro jelly)
- Others:
 Castaway (leafling) × 1
- See also: Snowfake Fluttertail strategy.
By going near the bonfire altars or lighting them up, the source of the cold air will appear: the Snowfake Fluttertail. Be careful of its targets because not only will it freeze your Pikmin, it'll also put out the fire starters around its arena. Defeating will lower the numbered gate. The rewards for defeating it will be the Shattering Lance inside the Snowfake Fluttertail, a Leafling castaway, and the cave exit behind the gate.
Gallery[edit]
|
This article or section is in need of more images. Particularly: |
Sublevel 1[edit]
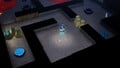
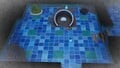
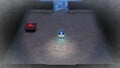
The landing site and surrounding area.
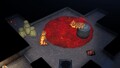
An Octoplus, a Heroic Sword, some dried plants, a sizzling floor with two Pyroclasmic Slooches atop it, the Cushion Cake, a buried Flighty Joustmite, and an unlit bonfire altar.
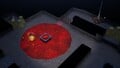
A Deceptive Snack, some dried plants, a Fiery Bulblax and lit bonfire altar atop a sizzling floor, a rusted iron fence, and the Puzzle Snack.


Sublevel 2[edit]
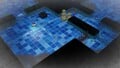
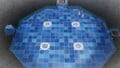
The landing site and surrounding area.
Some Rock Pikmin sprouts, a Crush Nugget, an ice block, an Ice Candypop Bud, a Chillyhop, an unlit bonfire altar, and an unbuilt clay mound.
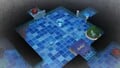
An Insect Condo, a crystal wall, a Dwarf Frosty Bulborb, a Frosty Bulborb, a paper bag, an ice gate, an ice block, and the entrance to the next sublevel.

A lit bonfire altar, some Rock Pikmin sprouts, and a pile of raw material.


Sublevel 3[edit]
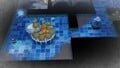
The landing site and surrounding area.

The entrance to the next sublevel, a switch in a frozen pool of water, and a lit bonfire altar.
A frozen hydro jelly, two ice vents, a Freezecake, and an Ice Candypop Bud.

Some dried plants, a nectar egg, a rusted iron fence, and an ice block.


Sublevel 4[edit]
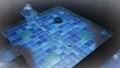
The landing site and surrounding area.
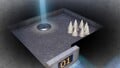
The arena in which the Snowfake Fluttertail is fought.
A leafling and the exit of the Frozen Inferno.


Names in other languages[edit]
| Language | Name | Meaning |
|---|---|---|
| 火事場の冷凍庫? Kajiba no Reitōko |
Fire Scene Freezer | |
(traditional) |
火災現場的冷凍庫 Huǒzāi Xiàncháng de Lěngdòngkù |
Fire Scene Freezer |
(simplified) |
火灾现场的冷冻库 Huǒzāi Xiàncháng de Lěngdòngkù |
Fire Scene Freezer |
| IJzige oven | Icy oven | |
| Frigo de l'enfer | Hell's fridge | |
| Inferno aus Eis | Inferno of Ice | |
| Inferno ghiacciato | Icy inferno | |
| 불난 집의 냉동고 Bulnan Jib-ui Naengdonggo |
Burning House Freezer | |
| Frio dos infernos | Fridge of infernos | |
| Infierno helado | Frozen inferno |
See also[edit]

| Caves in Pikmin 4 | |
|---|---|
| Rescue Command Post | Burrow of Beginnings |
| Sun-Speckled Terrace | Last-Frost Cavern • Crackling Cauldron • Aquiferous Summit • Industrial Maze • Hectic Hollows |
| Blossoming Arcadia | Drafty Gallery • Secluded Courtyard • Sightless Passage • Kingdom of Beasts |
| Serene Shores | Seafloor Resort • Subzero Sauna • Below-Grade Discotheque • Engulfed Castle |
| Hero's Hideaway | Doppelgänger's Den • Frozen Inferno • Plunder Palace |
| Giant's Hearth | Ultimate Testing Range • Dream Home • Cradle of the Beast |
| Primordial Thicket | The Mud Pit • Subterranean Swarm • Cavern for a King |
| Dandori Challenges | Dandori Day Care • Hotshock Canyon • Rockaway Cellars • Test Tubs • Ice-Cross Course • Hefty Haulway • Aerial Incinerator • Strategic Freezeway • Planning Pools • Toggle Training • Cliff-Hanger's Hold • Oasis of Order • Trial of the Sage Leaf |
| Dandori Battles | Trial Run • Battle in a Box • Dandori Castle • Leafy Showdown • Hot Sandy Duel • Final Battle |