Valley of Repose: Difference between revisions
m (→Overview) |
Illya65536 (talk | contribs) |
||
| (30 intermediate revisions by 11 users not shown) | |||
| Line 1: | Line 1: | ||
{{game icons|p2=y}} | {{game icons|p2=y}} | ||
{{infobox area | {{infobox area | ||
|map = | |map = Valley of Repose HD.jpg | ||
|screenshot = | |screenshot = 01 Site Valley of Repose.png | ||
|treasures = 7 | |treasures = 7 | ||
|caves = 3 | |caves = 3 | ||
|pikmin_discovered = [[Red Pikmin]] and [[Purple Pikmin]] | |pikmin_discovered = [[Red Pikmin]] and [[Purple Pikmin]] | ||
|music = ''[[Music in Pikmin 2#Valley of Repose|Valley of Repose]]'' | |music = ''[[Music in Pikmin 2#Valley of Repose|Valley of Repose]]'' | ||
}} | }} | ||
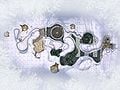
The '''Valley of Repose''' ({{j|ねむりの谷|Nemuri no Tani|Valley of Sleep}}) is | The '''Valley of Repose''' ({{j|ねむりの谷|Nemuri no Tani|Valley of Sleep}}) is the first [[area]] in {{p2}}, set on a snow-covered street crossing. It contains three [[cave]]s and seven overground [[treasure]]s worth {{pokos|990}} in total. [[Red Pikmin]] are discovered in this area, and [[Purple Pikmin]] are discovered in one of its caves. It is the site of the game's tutorial, which takes place over the first two [[day]]s. Its terrain is original and not based on any areas from {{p1}}. | ||
==Overview== | ==Overview== | ||
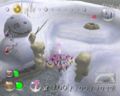
The area is a snowy region | The area is set in a a snowy region with little amounts of overground flora. As implied by the frigid climate in the region, this area is representative of Winter, starting the second game's trend of areas being based on seasons. The landscape shows signs of a road, with a manhole, multiple potholes housing water, white bars similar to crosswalks and curbs. A couple of large snowmen scattered throughout the area introduce a further human element. The shadows cast from above distinctively show leafless trees and a power line. The [[Frontier Cavern]]'s entrance appears to be inside the rusted-away remains of a metal pole. | ||
==Layout== | ==Layout== | ||
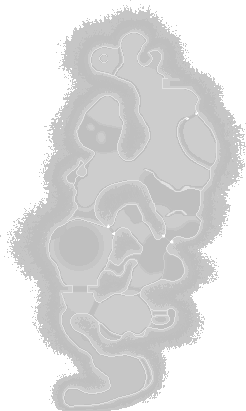
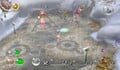
The [[Hocotate ship|ship]] and the [[Onion]]s land in the southwestern portion of the map. This area is home to a sparse number of [[Pellet Posy|Pellet Posies]] of varying color. Behind the ship is a small incline that leads to a circular area with three [[egg]]s. To the landing site's right is a ledge that grows a single [[Pellet Posy]] with a | {{location map | width = 246 | height = 411 | right | image = VoR texture.png | bg = #111 | caption = Map of all treasure and caves, along with the location of the ship, in the Valley of Repose. | icons = | ||
{{map icon | Hocotate ship | 138 | 313 | bg=none}} | |||
{{map icon | cave | 135 | 210 | l=Emergence Cave}} | |||
{{map icon | cave | 200 | 143 | l=Subterranean Complex}} | |||
{{map icon | cave | 103 | 58 | l=Frontier Cavern}} | |||
{{map icon | Courage Reactor | 84 | 337 | bg = rgba(0,0,128,0.5)}} | |||
{{map icon | Fossilized Ursidae | 71 | 177 | bg = rgba(0,0,128,0.5)}} | |||
{{map icon | Pink Menace | 118 | 269 | bg = rgba(0,0,128,0.5)}} | |||
{{map icon | Spiny Alien Treat | 173 | 268 | bg = rgba(0,0,128,0.5)}} | |||
{{map icon | Temporal Mechanism | 109 | 102 | bg = rgba(0,0,128,0.5)}} | |||
{{map icon | Unspeakable Wonder | 144 | 57 | bg = rgba(0,0,128,0.5)}} | |||
{{map icon | Utter Scrap | 58 | 232 | bg = rgba(0,0,128,0.5)}} | |||
}} | |||
The [[Hocotate ship|ship]] and the [[Onion]]s land in the southwestern portion of the map. This area is home to a sparse number of [[Pellet Posy|Pellet Posies]] of varying color. Behind the ship is a small incline that leads to a circular area with three [[egg]]s. To the landing site's right is a ledge that grows a single [[Pellet Posy]] with a ten-pellet that alternates between the three [[Red Pikmin|primary]] [[Yellow Pikmin|Pikmin]] [[Blue Pikmin|types]]. After a [[bag]] is flattened, heading north of the landing site directs the player to a fork that leads to the rest of the map. Following the fork left leads to the western portion of the map. This portion is used as a tutorial for the first day. Here [[Louie]] reestablishes contact with the ship and then discovers the [[Red Onion]]. The [[Courage Reactor]] is found on the path connecting the fork to the area with the Onion and is collected on the first day. | |||
The fork's right leads to a wide circular area with a [[Bulborb|Red Bulborb]] and two (one after the first day) [[Dwarf Bulborb|Dwarf Red Bulborb]]s on top of a massive manhole. At the outer edge of the manhole is the [[Utter Scrap]] treasure nestled in a snow-covered corner. A white [[bramble gate]] leads to the game's first cave, the [[Emergence Cave]]. Past the cave is a lake which can be drained after a [[clog]] is destroyed. Directly across the lake is a small snowy ledge that houses a [[Spiny Alien Treat|buried treasure]]. Taking a right when crossing the lake leads to a steep incline that holds [[Pink Menace|another buried treasure]] guarded by a [[Burrowing Snagret]]. Following this incline returns the player to the manhole. | |||
The | Another gate bars entrance to the eastern portion of the map. The ground increases in elevation here and returns to the pavement terrain. A small creek inhabited by [[Water Dumple]]s is required to be crossed to further access the eastern portion. A [[bridge]] can be built over the creek to allow all the types of Pikmin into this portion. After the bridge the area splits into a northeast area and a far-east area. The northeast area consists of a small pond where more [[Water Dumple]]s make their home as well as a [[Fiery Bulblax]] that has ingested the [[Temporal Mechanism]]. Prior to the pond is a small area that leads back to the manhole. In center of this small area is a large snowy cliff that has the [[Fossilized Ursidae]] on top of it. The far-east area is accessed by heading straight after crossing the bridge and is native to many enemies. A pair of [[Decorated Cannon Beetle]]s meet the player after crossing the bridge. Past them is the a single [[Cloaking Burrow-nit]] and a pair of [[Fiery Blowhog]]s. Taking a detour to the right when advancing forward leads to the [[Subterranean Complex]] which is protected by a [[Watery Blowhog]] and a poisonous white bramble gate. Continuing forward leads to the end of the pavement and a more compact area. A single [[Withering Blowhog]] floats about this region that guards a bridge. This bridge, after being built, leads up a plateau with the [[Frontier Cavern]]. Also present here is a large snowman capped with the [[Unspeakable Wonder]]. The slope leading the top of the snowman contains an [[Armored Cannon Larva|Armored Cannon Beetle Larva]] that burrows up from the ground. | ||
The Valley of Repose contains numerous invisible walls. These walls exist over the first two bags and the hills that initially separate Olimar and Louie on day 1. The walls prevent any Pikmin from being thrown over those obstacles. They were most likely implemented in order to stop the player from [[soft-lock]]ing the game while trying to explore on the first day or skipping the tutorial. These barriers do not disappear after the first day, nor do they disappear once the bags are deflated. | |||
==Caves== | ==Caves== | ||
| Line 33: | Line 44: | ||
=== Treasures === | === Treasures === | ||
{{columns|2| | {{columns|2| | ||
*{{icon|Courage Reactor|y}} | *{{icon|Courage Reactor|y}} / {{icon|Love and Courage Reactor|y}} (Japan) | ||
*{{icon|Fossilized Ursidae|y}} | *{{icon|Fossilized Ursidae|y}} | ||
*{{icon|Pink Menace|y}} | *{{icon|Pink Menace|y}} | ||
| Line 44: | Line 55: | ||
=== Enemies === | === Enemies === | ||
{{columns|2| | {{columns|2| | ||
*{{icon|Armored Cannon | *{{icon|Armored Cannon Larva|y|n=Armored Cannon Beetle Larva}} × 1 | ||
*{{icon|Burrowing Snagret|y}} × 1 (after day 5) | *{{icon|Burrowing Snagret|y}} × 1 (after day 5) | ||
*{{icon|Cloaking Burrow-nit|y}} × 1 | *{{icon|Cloaking Burrow-nit|y}} × 1 | ||
*{{icon|Decorated Cannon Beetle|y}} × 2 | *{{icon|Decorated Cannon Beetle|y}} × 2 | ||
*{{icon|Dwarf | *{{icon|Dwarf Bulborb|y|n=Dwarf Red Bulborb}} × 2 (one disappears after the first day) | ||
*{{icon|Fiery Blowhog|y}} × 2 | *{{icon|Fiery Blowhog|y}} × 2 | ||
*{{icon|Fiery Bulblax|y}} × 1 | *{{icon|Fiery Bulblax|y}} × 1 | ||
*{{icon|Honeywisp|y}} × 2 | *{{icon|Honeywisp|y}} × 2 | ||
*{{icon|Mitite|y}} (randomly come out of [[egg]]s) | *{{icon|Mitite|y}} (randomly come out of [[egg]]s) | ||
*{{icon| | *{{icon|Bulborb|y|n=Red Bulborb}} × 1 | ||
*{{icon|Water Dumple|y}} × 5 | *{{icon|Water Dumple|y}} × 5 | ||
*{{icon|Watery Blowhog|y}} × 1 | *{{icon|Watery Blowhog|y}} × 1 | ||
| Line 60: | Line 71: | ||
=== Obstacles === | === Obstacles === | ||
{{Columns|2| | |||
*{{icon|Clog|y}} × 1 | *{{icon|Clog|y}} × 1 | ||
*{{icon| | *{{icon|Bag|y|v=P2}} × 2 | ||
*{{icon|Poison white bramble gate|y}} × 1 | *{{icon|Poison white bramble gate|y}} × 1 | ||
*{{icon|White bramble gate|y}} × 2 | *{{icon|White bramble gate|y}} × 2 | ||
}} | |||
=== Tools === | |||
*{{icon|Bridge|y|v=P1}} × 2 | |||
===Vegetation=== | ===Vegetation=== | ||
*{{icon|Foxtail|y}} | *{{icon|Foxtail|y}} × 3 | ||
*{{icon|Figwort|y}} (small | *{{icon|Figwort|y}} (small) × 11 (dead) | ||
*{{icon|Pellet Posy|y}} | *{{icon|Pellet Posy|y}} × 4 | ||
===Other=== | |||
*{{icon|Egg|y}} × 3 | |||
==Points of interest== | ==Points of interest== | ||
On the northern part of the map is a large manhole that is unique to this area. It serves as a junction between the western and eastern portions of the map. The western portion of the map where the Red Onion is found grows additional Pellet Posies after the first day has been completed. Behind the landing site is a small collection of [[nectar egg | On the northern part of the map is a large manhole that is unique to this area. It serves as a junction between the western and eastern portions of the map. The western portion of the map where the Red Onion is found grows additional Pellet Posies after the first day has been completed. Behind the landing site is a small collection of [[nectar egg]]s. The lake shortly after the [[Emergence Cave]] can be drained after a clog located behind a submerged white bramble gate is destroyed. | ||
==Piklopedia and Treasure Hoard== | ==Piklopedia and Treasure Hoard== | ||
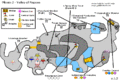
[[File:Piklopedia Valley of Repose map.jpg|thumb|100px | [[File:Piklopedia Valley of Repose map.jpg|thumb|100px|Map of the area when seen on the [[Piklopedia (Pikmin 2)|Piklopedia]].]] | ||
When [[Hocotate ship|the ship]]'s icon is on top of the Valley of Repose on the [[Menu#Area selection|area selection menu]], and the [[Piklopedia]] or the [[Treasure Hoard]] are entered, they will display [[enemies]] and [[treasure]]s on an area themed like the Valley of Repose. The area is quite large, almost the size of the actual Valley of Repose, and is also quite similar, but differs notable from the in-game version. | When [[Hocotate ship|the ship]]'s icon is on top of the Valley of Repose on the [[Menu#Area selection|area selection menu]], and the [[Piklopedia (Pikmin 2)|Piklopedia]] or the [[Treasure Hoard]] are entered, they will display [[enemies]] and [[treasure]]s on an area themed like the Valley of Repose. The area is quite large, almost the size of the actual Valley of Repose, and is also quite similar, but differs notable from the in-game version. | ||
The landing site is the same, although the twig on top of the [[ | The landing site is the same, although the twig on top of the [[bag]] is now a thick branch. The entire path to the south, where the [[Red Onion]] and the [[Courage Reactor]] are found, and where [[Louie]] crash lands, is completely missing. The alcove where the [[Emergence Cave]] is does not exist, and there is a crack on the floor further down the path, indicating that a [[clog]] used to be there. The bit after the Emergence Cave, but before entering the open plain with the crosswalk is considerably simpler, and has a circular structure similar to the one the [[Frontier Cavern]]'s entrance is on. To the north of this is a large ramp to the rest of the map, which in turn, is very empty. A lot more of the sidewalk's markings can be seen compared to the in-game area, as most of the terrain is not covered in snow, walls, or potholes. Midway through the crosswalk plain is a small pond with two islets, similar to the location where the [[Temporal Mechanism]] is located in the final game, but without walls. On the northernmost part of the map is the sidewalk, with displaced hexagon tiles and a spot where, instead of a hexagon tile, is just dirt. Notably, the ground under the first bag resembles an early [[seesaw block]] design seen in [[Pikmin 2 prerelease information#January 2004 Japanese Demo Disk|prerelease material]]. | ||
It is worth noting that the cliff connecting the northern part of the map and the manhole has a (probably accidental) path to an out of bounds area to the west. Also to note is that the terrain surrounding the bounds of the area is a lot more populated with pine trees. | It is worth noting that the cliff connecting the northern part of the map and the manhole has a (probably accidental) path to an out of bounds area to the west. Also to note is that the terrain surrounding the bounds of the area is a lot more populated with pine trees. | ||
| Line 97: | Line 115: | ||
File:VR snowman 1.png|A snowman, next to the entrance to the [[Emergence Cave]]. | File:VR snowman 1.png|A snowman, next to the entrance to the [[Emergence Cave]]. | ||
File:VR snowman 2.png|Another snowman, next to the entrance to the [[Frontier Cavern]]. | File:VR snowman 2.png|Another snowman, next to the entrance to the [[Frontier Cavern]]. | ||
File:VR fiery bulblax.png|The pond | File:VR fiery bulblax.png|The pond where a [[Fiery Bulblax]] rests on the other side. | ||
</gallery> | </gallery> | ||
===Pellet Posies=== | ===Pellet Posies=== | ||
<gallery> | <gallery> | ||
Day 1.jpg|These [[Pellet Posy|Pellet Posies]] only appear on the first day. | |||
Day 2.jpg|These Pellet Posies only appear on the second day. | |||
Day 3.jpg|These Pellet Posies only appear on the third day. | |||
Day2-3.jpg|These Pellet Posies only appear on second and third days. | |||
P2 Valley of Repose Pellet Posies From Day 4.jpg|These Pellet Posies appear permanently in the game after the fourth day. | |||
P2 Valley of Repose More Pellet Posies Day 4.jpg|These Pellet Posies appear permanently in the game after the fourth day. | |||
</gallery> | </gallery> | ||
===Other images=== | ===Other images=== | ||
<gallery> | <gallery> | ||
File:Nemuri snap.jpg| | File:Nemuri snap.jpg|Official overhead map. | ||
File:Valley of Repose HD.jpg|High definition overhead map, taken with in-game screenshots. | |||
File:Pikmin 2 valley of repose.gif|A map of the Valley of Repose. | File:Pikmin 2 valley of repose.gif|A map of the Valley of Repose. | ||
File:VoR paths.png|[[Carrying]] paths on the Valley of Repose. | File:VoR paths.png|[[Carrying]] paths on the Valley of Repose. | ||
| Line 123: | Line 142: | ||
*The Valley of Repose is the only area in ''Pikmin 2'' to not have an [[electric gate]] or a [[Burgeoning Spiderwort]]. | *The Valley of Repose is the only area in ''Pikmin 2'' to not have an [[electric gate]] or a [[Burgeoning Spiderwort]]. | ||
*The Valley of Repose is the only area that is not based on any area from {{p1}}. Because both this one and [[The Forest Navel]] don't have a "counterpart" between the two first games, some fans believe the Valley of Repose to be an altered version of The Forest Navel, despite the lack of similarities. | *The Valley of Repose is the only area that is not based on any area from {{p1}}. Because both this one and [[The Forest Navel]] don't have a "counterpart" between the two first games, some fans believe the Valley of Repose to be an altered version of The Forest Navel, despite the lack of similarities. | ||
*The concrete walls next to the [[ | *The concrete walls next to the [[bag]] that requires thirty-five Pikmin actually wobble back and forth slightly, in sync with the tree shadows. | ||
*There is a shadow of a power line covering the area. This can be best seen when looking directly at the texture for the shadows. | *There is a shadow of a power line covering the area. This can be best seen when looking directly at the texture for the shadows. | ||
<gallery> | <gallery> | ||
Valley of Repose wobbly wall.gif|The walls next to the | Valley of Repose wobbly wall.gif|The walls next to the thirty-five Pikmin [[bag]] wobble. This footage is sped up around seven times. | ||
VoR Shadows.png|The texture for the shadows cast in Valley of Repose. Notice the silhouette of a power line. | VoR Shadows.png|The texture for the shadows cast in Valley of Repose. Notice the silhouette of a power line. | ||
</gallery> | </gallery> | ||
| Line 133: | Line 152: | ||
==Names in other languages== | ==Names in other languages== | ||
{{Foreignname | {{Foreignname | ||
|Jap=ねむりの谷 | |||
|JapR=Nemuri no Tani | |||
|JapM=Valley of Sleep | |||
|Ger=Friedvolles Tal | |Ger=Friedvolles Tal | ||
|GerM=Peaceful Valley | |GerM=Peaceful Valley | ||
| Line 139: | Line 161: | ||
|FraA=Vallée du repos | |FraA=Vallée du repos | ||
|FraAM=Valley of repose | |FraAM=Valley of repose | ||
| | |Spa=Valle del Reposo | ||
| | |SpaM=Valley of Repose | ||
|Ita=Val quiete | |Ita=Val quiete | ||
|ItaM=Quiet valley | |ItaM=Quiet valley | ||
|ChiTrad=沉睡山谷 | |||
}} | }} | ||
Latest revision as of 11:06, March 1, 2024
| Valley of Repose | |
|---|---|
| |
| Treasures | 7 |
| Caves | 3 |
| Pikmin discovered | Red Pikmin and Purple Pikmin |
| Requirements | None |
| Music | Valley of Repose |


The Valley of Repose (ねむりの谷?, lit.: "Valley of Sleep") is the first area in Pikmin 2, set on a snow-covered street crossing. It contains three caves and seven overground treasures worth ![]() × 990 in total. Red Pikmin are discovered in this area, and Purple Pikmin are discovered in one of its caves. It is the site of the game's tutorial, which takes place over the first two days. Its terrain is original and not based on any areas from Pikmin.
× 990 in total. Red Pikmin are discovered in this area, and Purple Pikmin are discovered in one of its caves. It is the site of the game's tutorial, which takes place over the first two days. Its terrain is original and not based on any areas from Pikmin.
Overview[edit]
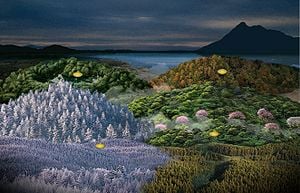
The area is set in a a snowy region with little amounts of overground flora. As implied by the frigid climate in the region, this area is representative of Winter, starting the second game's trend of areas being based on seasons. The landscape shows signs of a road, with a manhole, multiple potholes housing water, white bars similar to crosswalks and curbs. A couple of large snowmen scattered throughout the area introduce a further human element. The shadows cast from above distinctively show leafless trees and a power line. The Frontier Cavern's entrance appears to be inside the rusted-away remains of a metal pole.
Layout[edit]
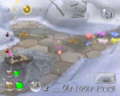
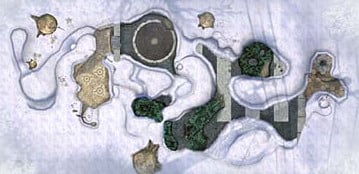
The ship and the Onions land in the southwestern portion of the map. This area is home to a sparse number of Pellet Posies of varying color. Behind the ship is a small incline that leads to a circular area with three eggs. To the landing site's right is a ledge that grows a single Pellet Posy with a ten-pellet that alternates between the three primary Pikmin types. After a bag is flattened, heading north of the landing site directs the player to a fork that leads to the rest of the map. Following the fork left leads to the western portion of the map. This portion is used as a tutorial for the first day. Here Louie reestablishes contact with the ship and then discovers the Red Onion. The Courage Reactor is found on the path connecting the fork to the area with the Onion and is collected on the first day.
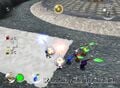
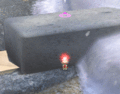
The fork's right leads to a wide circular area with a Red Bulborb and two (one after the first day) Dwarf Red Bulborbs on top of a massive manhole. At the outer edge of the manhole is the Utter Scrap treasure nestled in a snow-covered corner. A white bramble gate leads to the game's first cave, the Emergence Cave. Past the cave is a lake which can be drained after a clog is destroyed. Directly across the lake is a small snowy ledge that houses a buried treasure. Taking a right when crossing the lake leads to a steep incline that holds another buried treasure guarded by a Burrowing Snagret. Following this incline returns the player to the manhole.
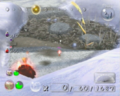
Another gate bars entrance to the eastern portion of the map. The ground increases in elevation here and returns to the pavement terrain. A small creek inhabited by Water Dumples is required to be crossed to further access the eastern portion. A bridge can be built over the creek to allow all the types of Pikmin into this portion. After the bridge the area splits into a northeast area and a far-east area. The northeast area consists of a small pond where more Water Dumples make their home as well as a Fiery Bulblax that has ingested the Temporal Mechanism. Prior to the pond is a small area that leads back to the manhole. In center of this small area is a large snowy cliff that has the Fossilized Ursidae on top of it. The far-east area is accessed by heading straight after crossing the bridge and is native to many enemies. A pair of Decorated Cannon Beetles meet the player after crossing the bridge. Past them is the a single Cloaking Burrow-nit and a pair of Fiery Blowhogs. Taking a detour to the right when advancing forward leads to the Subterranean Complex which is protected by a Watery Blowhog and a poisonous white bramble gate. Continuing forward leads to the end of the pavement and a more compact area. A single Withering Blowhog floats about this region that guards a bridge. This bridge, after being built, leads up a plateau with the Frontier Cavern. Also present here is a large snowman capped with the Unspeakable Wonder. The slope leading the top of the snowman contains an Armored Cannon Beetle Larva that burrows up from the ground.
The Valley of Repose contains numerous invisible walls. These walls exist over the first two bags and the hills that initially separate Olimar and Louie on day 1. The walls prevent any Pikmin from being thrown over those obstacles. They were most likely implemented in order to stop the player from soft-locking the game while trying to explore on the first day or skipping the tutorial. These barriers do not disappear after the first day, nor do they disappear once the bags are deflated.
Caves[edit]
Objects[edit]
Treasures[edit]
 Courage Reactor /
  Love and Courage Reactor (Japan)
 Fossilized Ursidae
 Pink Menace
 Spiny Alien Treat
 Temporal Mechanism (inside the Fiery Bulblax)
 Unspeakable Wonder
 Utter Scrap
Enemies[edit]
 Armored Cannon Beetle Larva × 1
 Burrowing Snagret × 1 (after day 5)
 Cloaking Burrow-nit × 1
 Decorated Cannon Beetle × 2
 Dwarf Red Bulborb × 2 (one disappears after the first day)
 Fiery Blowhog × 2
 Fiery Bulblax × 1
 Honeywisp × 2
 Mitite (randomly come out of eggs)
 Red Bulborb × 1
 Water Dumple × 5
 Watery Blowhog × 1
 Withering Blowhog × 1
Obstacles[edit]
 Clog × 1
 Bag × 2
 Poison white bramble gate × 1
 White bramble gate × 2
Tools[edit]
 Bridge × 2
Vegetation[edit]
 Foxtail × 3
 Figwort (small) × 11 (dead)
 Pellet Posy × 4
Other[edit]
 Egg × 3
Points of interest[edit]
On the northern part of the map is a large manhole that is unique to this area. It serves as a junction between the western and eastern portions of the map. The western portion of the map where the Red Onion is found grows additional Pellet Posies after the first day has been completed. Behind the landing site is a small collection of nectar eggs. The lake shortly after the Emergence Cave can be drained after a clog located behind a submerged white bramble gate is destroyed.
Piklopedia and Treasure Hoard[edit]

When the ship's icon is on top of the Valley of Repose on the area selection menu, and the Piklopedia or the Treasure Hoard are entered, they will display enemies and treasures on an area themed like the Valley of Repose. The area is quite large, almost the size of the actual Valley of Repose, and is also quite similar, but differs notable from the in-game version.
The landing site is the same, although the twig on top of the bag is now a thick branch. The entire path to the south, where the Red Onion and the Courage Reactor are found, and where Louie crash lands, is completely missing. The alcove where the Emergence Cave is does not exist, and there is a crack on the floor further down the path, indicating that a clog used to be there. The bit after the Emergence Cave, but before entering the open plain with the crosswalk is considerably simpler, and has a circular structure similar to the one the Frontier Cavern's entrance is on. To the north of this is a large ramp to the rest of the map, which in turn, is very empty. A lot more of the sidewalk's markings can be seen compared to the in-game area, as most of the terrain is not covered in snow, walls, or potholes. Midway through the crosswalk plain is a small pond with two islets, similar to the location where the Temporal Mechanism is located in the final game, but without walls. On the northernmost part of the map is the sidewalk, with displaced hexagon tiles and a spot where, instead of a hexagon tile, is just dirt. Notably, the ground under the first bag resembles an early seesaw block design seen in prerelease material.
It is worth noting that the cliff connecting the northern part of the map and the manhole has a (probably accidental) path to an out of bounds area to the west. Also to note is that the terrain surrounding the bounds of the area is a lot more populated with pine trees.
Gallery[edit]
Main[edit]
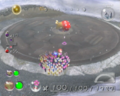
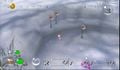
Overview of the landing site.
The starting area.
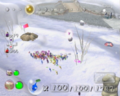
The general area where Louie lands.
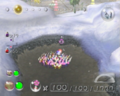
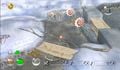
The large manhole after the starting area.
The drainable pond near the Emergence Cave.
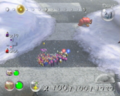
The crosswalk in the center of the area.
The entrance to the Subterranean Complex.
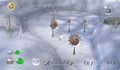
A snowman, next to the entrance to the Emergence Cave.
Another snowman, next to the entrance to the Frontier Cavern.
The pond where a Fiery Bulblax rests on the other side.


Pellet Posies[edit]
These Pellet Posies only appear on the first day.
These Pellet Posies only appear on the second day.
These Pellet Posies only appear on the third day.
These Pellet Posies only appear on second and third days.
These Pellet Posies appear permanently in the game after the fourth day.

These Pellet Posies appear permanently in the game after the fourth day.


Other images[edit]
Official overhead map.
High definition overhead map, taken with in-game screenshots.
A map of the Valley of Repose.
Carrying paths on the Valley of Repose.

The texture used in the radar pattern.
The Valley of Repose in a earlier version of Pikmin 2. Note the different design on the manhole cover and the cave entrance.


- See more: Valley of Repose images category.
Trivia[edit]
- The Valley of Repose is the only area in Pikmin 2 to not have an electric gate or a Burgeoning Spiderwort.
- The Valley of Repose is the only area that is not based on any area from Pikmin. Because both this one and The Forest Navel don't have a "counterpart" between the two first games, some fans believe the Valley of Repose to be an altered version of The Forest Navel, despite the lack of similarities.
- The concrete walls next to the bag that requires thirty-five Pikmin actually wobble back and forth slightly, in sync with the tree shadows.
- There is a shadow of a power line covering the area. This can be best seen when looking directly at the texture for the shadows.
The walls next to the thirty-five Pikmin bag wobble. This footage is sped up around seven times.
The texture for the shadows cast in Valley of Repose. Notice the silhouette of a power line.


Names in other languages[edit]
| Language | Name | Meaning |
|---|---|---|
| ねむりの谷? Nemuri no Tani |
Valley of Sleep | |
(traditional) |
沉睡山谷 | |
| Vallée du repos | Valley of repose | |
| Vallée du Repos | Valley of Repose | |
| Friedvolles Tal | Peaceful Valley | |
| Val quiete | Quiet valley | |
| Valle del Reposo | Valley of Repose |
See also[edit]
| Valley of Repose | |||||||||||
|---|---|---|---|---|---|---|---|---|---|---|---|
|
Click an object |
| ||||||||||
| Pikmin 2 areas |
|---|
 Click an area on the image
Valley of Repose • Awakening Wood • Perplexing Pool • Wistful Wild |