Pikmin 2 icon.png

Brawny Abyss: Difference between revisions

From Pikipedia, the Pikmin wiki
Jump to navigation Jump to search
(American Wii set to Spanish.)
No edit summary
Line 1: Line 1:
{{infobox challenge
{{infobox challenge
|image=Brawny Abyss.png
|image=Brawny Abyss.png
|size=250px
|sublevels=2
|sublevels=2
|bitter=1
|bitter=1
|spicy=1
|spicy=1
|blue=50
|time = sublevel 1 - 130
|bluem=f
 
|gridcol=2
sublevel 2 - 100
|gridrow=2
|blues = 50}}
}}
'''Brawny Abyss''' is the seventh level of the [[Challenge Mode (Pikmin 2)|Challenge Mode]] in ''[[Pikmin 2]]''.
'''Brawny Abyss''' is the seventh level in [[Pikmin 2|''Pikmin 2'']]'s [[Challenge Mode (Pikmin 2)|Challenge Mode]].


==Sublevel 1==
==Sublevel 1==
*'''Theme''': Metal
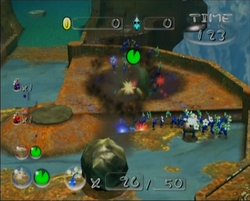
Use the larva to kill the other enemies. Then take out the larva itself. Your Pikmin will be safe after they are thrown off, since they will hug the wall and the boulder will fly over them. Get the treasure near the hole (should the hole pop up at the back near the Bulborbs) for some extra Pokos. Watch out when pressing "A" at the hole. Pikmin are often thrown instead and will drop down to death. However, should this happen, going down the hole before the Pikmin die will prevent them from dying at all.
*'''Time''': 130
*'''Enemies''':
**1 stationary [[Armored Cannon Beetle Larva]]
**3 [[Snow Bulborb]]s
**1 [[Fiery Blowhog]]
*'''Hazards''':
**None
*'''Treasures''':
**[[The Key]] (inside the Armored Cannon Beetle Larva)
**3 [[Mirth Sphere]]s (inside the Snow Bulborbs)
**[[Crystallized Telepathy]] (inside the Fiery Blowhog)
**[[Spirit Flogger]]
**[[Adamantine Girdle]]
**[[Superstrong Stabilizer]]
*'''Plants''':
**5 red [[Glowstem]]s
**5 green [[Glowstem]]s
*'''Others''':
**None
 
{{sublevel technical
|cave        = ch_MUKI_metal
|enemymax    = 5
|itemmax    = 3
|gatemax    = 0
|capmax      = 0
|rooms      = 3
|geyser      = No
|unitfile    = 2_units_nor_tekiF_metal.txt
|lightfile  = metal_light_cha.ini
|bg          = "test" (cavern)
|clog        = No
|hiddenfloor = 0
|units      =
{{sublevel units
|item_cap_metal|Dead end with item
|way3_metal|Three-way crossing
|way4_metal|Four-way crossing
|wayl_metal|Turning corridor
|way2_metal|Corridor
|way2x2_metal|Long corridor
}}
{{sublevel units
|room_hitode4x4_tekiF_3_metal|'''Room with raised blue edge'''
|room_north_1_metal|'''Circular room with 1 exit'''
}}
}}


Use the larva to kill the other enemies. Then take out the larva itself. Your Pikmin will be safe after they are thrown off, since they will hug the wall and the boulder will fly over them. Get the treasure near the hole (should the hole pop up at the back near the Bulborbs) for some extra Pokos. Watch out when pressing {{button|gcn|A|wii|A}} at the hole. Pikmin are often thrown instead and will drop down to death.  However, should this happen, going down the hole before the Pikmin die will prevent them from dying at all.
===Treasures===
*[[The Key]]
*[[Mirth Sphere]] x3
*[[Crystallized Telepathy]]
*[[Spirit Flogger]]
*[[Superstrong Stabilizer]]


==Sublevel 2==
==Sublevel 2==
*'''Theme''': Metal
The [[Decorated Cannon Beetle]] has [[The Key]]. Use a [[Ultra-bitter Spray]] if you like, or use the Cannon Beetle to defeat some enemies (and/or itself). As always, the treasures aren't necessary, but if desired, there is plenty of time to get them.
*'''Time''': +100
*'''Enemies''':
**1 [[Decorated Cannon Beetle]]
**3 [[Dwarf Orange Bulborb]]s
**1 [[Fiery Blowhog]]
*'''Hazards''':
**None
*'''Treasures''':
**[[The Key]] (inside the Decorated Cannon Beetle)
**3 [[Love Sphere]]s (inside the Dwarf Orange Bulborbs)
**[[Crystallized Telepathy]] (inside the Fiery Blowhog)
**[[Omega Flywheel]]
**[[Massage Girdle]]
**[[Repair Juggernaut]]
*'''Plants''':
**5 red [[Glowstem]]s
**5 green [[Glowstem]]s
*'''Others''':
**2 [[egg]]s (in dead ends)
 
{{sublevel technical
|cave        = ch_MUKI_metal
|enemymax    = 5
|itemmax    = 3
|gatemax    = 0
|capmax      = 0
|rooms      = 2
|geyser      = Yes
|unitfile    = 2_units_mid1_nor22_metal.txt
|lightfile  = metal_light_cha.ini
|bg          = "build" (steel)
|clog        = No
|hiddenfloor = 0
|units      =
{{sublevel units
|item_cap_metal|Dead end with item
|way3_metal|Three-way crossing
|way4_metal|Four-way crossing
|wayl_metal|Turning corridor
|way2_metal|Corridor
|way2x2_metal|Long corridor
}}
{{sublevel units
|room_mid1_6_metal|'''Long room with 6 exits'''
|room_north2x2_1_metal|'''T-shaped room'''
}}
}}
 
The [[Decorated Cannon Beetle]] has the [[The Key|key]]. Use a [[Ultra-bitter spray|bitter spray]] if you like, or use the Cannon Beetle to defeat some enemies (and/or itself). As always, the treasures aren't necessary, but if desired, there is plenty of time to get them.


==Names in other languages==
===Treasures===
{{Foreignname
*[[The Key]]
|Jap=鉄人の穴<!-- Found in the Wii version of Pikmin 2's BGM Files, specifically pikmin2 > user > Totaka > ChallengeBgmList.txt -->
*[[Omega Flywheel]]
|SpaA=Abismo Corpulento
*[[Massage Girdle]]
|SpaAM=Corpulent Abyss
*[[Love Sphere]] x3
}}
*[[Crystallized Telepathy]]
*[[Repair Juggernaut]]


{{CM}}
{{CM}}
[[Category:Pikmin 2]]
[[Category:Pikmin 2 Challenge Mode]]

Revision as of 17:46, June 25, 2014

Brawny Abyss
Brawny Abyss.png
Sublevels 2 Ultra-bitter sprays 1
Red Pikmin 0 Ultra-spicy sprays 1
Yellow Pikmin 0
P2 challenge mode flower.png
P2 challenge mode dot.png
Blue Pikmin 0
White Pikmin 0
Purple Pikmin 0
Bulbmin 0

Brawny Abyss is the seventh level of the Challenge Mode in Pikmin 2.

Sublevel 1

Use the larva to kill the other enemies. Then take out the larva itself. Your Pikmin will be safe after they are thrown off, since they will hug the wall and the boulder will fly over them. Get the treasure near the hole (should the hole pop up at the back near the Bulborbs) for some extra Pokos. Watch out when pressing "A" at the hole. Pikmin are often thrown instead and will drop down to death. However, should this happen, going down the hole before the Pikmin die will prevent them from dying at all.

Treasures

Sublevel 2

The Decorated Cannon Beetle has The Key. Use a Ultra-bitter Spray if you like, or use the Cannon Beetle to defeat some enemies (and/or itself). As always, the treasures aren't necessary, but if desired, there is plenty of time to get them.

Treasures