The Final Trial: Difference between revisions
ZanyDragon (talk | contribs) No edit summary |
|||
| (82 intermediate revisions by 26 users not shown) | |||
| Line 1: | Line 1: | ||
{{game icons|p=y}} | |||
{{infobox area | {{infobox area | ||
|map = The Final Trial HD.jpg | |map = The Final Trial HD.jpg | ||
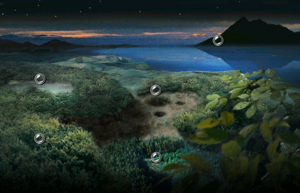
|screenshot = | |screenshot = 05 Site Final Trial.png | ||
|parts = 1 | |parts = 1 | ||
|requirements = Collect 29 [[ship part]]s | |requirements = Collect 29 [[ship part]]s | ||
|music = ''[[Music in Pikmin#The Final Trial|The Final Trial]]'' | |||
}} | }} | ||
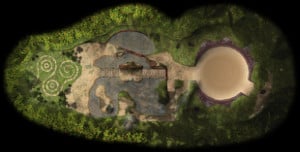
'''The Final Trial''' ({{j|最後の試練|Saigo no Shiren|Final Ordeal}}) is the fifth and final [[area]] in {{p1}}. It is set in a sandy forest and has a complex layout that encourages the use of all three Pikmin types. As its name suggests, it serves as a final test of the player's knowledge on the [[Pikmin family|Pikmin]]. It is unlocked by collecting 29 [[ship part]]s, one less than the total number of parts. The final ship part, the [[Secret Safe]], is found within the [[Emperor Bulblax]], the final boss of the game, in this area. This area was reused in {{p2}} as part of the [[Wistful Wild]]. | |||
==General layout== | |||
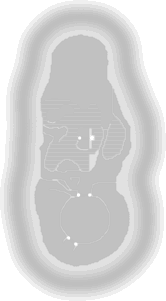
{{location map | width = 350 | height = 635 | image = FT texture.png | bg = #111 | caption = Map of all ship parts and the location of the ship in The Final Trial. | icons = | |||
{{map icon | S.S. Dolphin | 168 | 95 | bg = none}} | |||
{{map icon | Secret Safe | 179 | 462}} | |||
}} | |||
In the south of the area lies the landing site, along with three different types of Candypop Bud. (Since Pikmin cannot be produced here unless the [[boss]] is killed, these are the only way to increase the population of a Pikmin type (at the expense of another type).) To the north, the area "splits" into three paths. The left path focuses on [[Red Pikmin]], due to the [[fire geysers]]. The center path contains water which only [[Blue Pikmin]] can traverse through. And the path on the right contains [[bomb-rock]]s, which only [[Yellow Pikmin]] can hold. The central part of the area contains a small pool of water. To the west of it, there is a narrow path with fire geysers. To the east are a group of small islands with 8 [[bomb-rock]]s, although sometimes 9 appear instead. In the middle of the pool are two bridges and a normal stone [[gate]]. To the north is a [[cardboard box]]. | |||
The arena where the Emperor Bulblax is fought and a wall that leads to three pipes with 15 bomb-rocks each lies at the northernmost part of the area. On the far west of the pool is a ledge with no hazards, meaning Olimar can throw additional Pikmin onto the ledge, then run down to collect them when he reaches the end of the main path. | |||
In Challenge Mode, a Yellow Wollywog is found in the pool and a Beady Long Legs appears once he enters the arena. A Burrowing Snagret is found in the cliffs around it. Smaller enemies are found around Olimar's base, such as a Dwarf Red Bulborb, Dwarf Bulbears and Sheargrubs. Unlike in the other levels, 100 Pikmin are already present on the map, buried in various locations. | |||
{{Clear}} | |||
==Objects== | |||
===Ship parts=== | |||
*{{icon|Secret Safe|y}}: Inside the Emperor Bulblax. | |||
{{ | ===Enemies=== | ||
*{{icon|Emperor Bulblax|y}} × 1 | |||
== | ===Obstacles=== | ||
{{columns|2| | |||
*{{icon|White bramble gate|y}} × 2 | |||
*{{icon|White reinforced wall|y|v=P1}} × 1 | |||
*{{icon|Cardboard box|y}} × 1 | |||
*{{icon|Fire geyser|y}} × 10 | |||
}} | |||
===Tools=== | |||
*{{icon|Bridge|y|v=P1}} × 2 | |||
*{{icon|Geyser|y}} × 2 | |||
===Vegetation=== | |||
{{columns|2| | |||
*{{icon|Figwort|y}} (small) × 18 | |||
*{{icon|Figwort|y}} (large) × 12 | |||
*{{icon|Crimson Candypop Bud|l=Candypop Bud|n=Candypop Bud|y}} (Red) × 1 | |||
*{{icon|Golden Candypop Bud|l=Candypop Bud|n=Candypop Bud|y}} (Yellow) × 1 | |||
*{{icon|Lapis Lazuli Candypop Bud|l=Candypop Bud|n=Candypop Bud|y}} (Blue) × 1 | |||
*{{icon|Nectar weed|y}} × 2 | |||
}} | |||
== | ==In Challenge Mode== | ||
[[File:P1 Challenge Mode Final Trial Plateaus.jpg|thumb|250px|Some plateaus with Pikmin sprouts in Challenge Mode.]] | |||
[[File:P1 Challenge Mode Final Trial Beady Long Legs.jpg|thumb|250px|Fighting the Beady Long Legs in Challenge Mode.]] | |||
The Final Trial is unique among [[Challenge Mode (Pikmin)|Challenge Mode]] stages in that the player starts with 100 Pikmin, enough to reach the [[Pikmin limit]]. However, most of these Pikmin are scattered around the area in small groups of sprouts, meaning to expand their [[squad]] size, the player doesn't have to collect the objects near the landing site, they have to explore the area for the other sprouts, while collecting things at the same time to increase the total number of Pikmin. The boss arena contains a [[Beady Long Legs]], and there is also a [[Burrowing Snagret]] nearby. The maximum number of Pikmin obtainable is 299 and the time limit is 13 minutes and 30 seconds, the same as a normal [[day]]. | |||
== | ===Object breakdown=== | ||
{|class="wikitable sortable" | {|class="wikitable sortable" | ||
!Pikmin | !Pikmin source!!{{tt|Seeds|Max produced with correct harvesting}}!!Amount!!Total | ||
|- | |- | ||
|Starting Reds||||34||34 | |Starting Reds||||34||34 | ||
| Line 39: | Line 66: | ||
|Starting Blues||||33||33 | |Starting Blues||||33||33 | ||
|- | |- | ||
|Red 1 | |Red 1 pellets||2||1||2 | ||
|- | |- | ||
|Red 5 | |Red 5 pellets||5||1||5 | ||
|- | |- | ||
|Red 10 | |Red 10 pellets||10||2||20 | ||
|- | |- | ||
|Yellow 1 | |Yellow 1 pellets||2||1||2 | ||
|- | |- | ||
|Yellow 5 | |Yellow 5 pellets||5||1||5 | ||
|- | |- | ||
|Yellow 10 | |Yellow 10 pellets||10||2||20 | ||
|- | |- | ||
|Blue 1 | |Blue 1 pellets||2||1||2 | ||
|- | |- | ||
|Blue 5 | |Blue 5 pellets||5||1||5 | ||
|- | |- | ||
|Blue 20 | |Blue 20 pellets||20||1||20 | ||
|- | |- | ||
|Beady Long Legs||{{tt|40|Four random 10 pellets}}||1||40 | |Beady Long Legs||{{tt|40|Four random 10 pellets}}||1||40 | ||
| Line 63: | Line 90: | ||
|Dwarf Bulbear||5||1||5 | |Dwarf Bulbear||5||1||5 | ||
|- | |- | ||
|Dwarf | |Dwarf Bulborb||4||4||16 | ||
|- | |- | ||
|Female Sheargrub||2||3||6 | |Female Sheargrub||2||3||6 | ||
| Line 69: | Line 96: | ||
|Male Sheargrub||3||3||9 | |Male Sheargrub||3||3||9 | ||
|- | |- | ||
|Yellow Wollywog||{{tt|13|One random 5 pellet plus 8 seeds}}|| | |Yellow Wollywog||{{tt|13|One random 5 pellet plus 8 seeds}}||1||13 | ||
|- | |- | ||
!Total | |||
|colspan="3" style="text-align: center;" | 299 | |||
|} | |} | ||
{{clear}} | {{clear}} | ||
==Gallery== | ==Gallery== | ||
<gallery> | <gallery> | ||
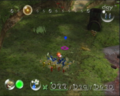
05 Site Final Trial.png|The landing site. | |||
TFT start.png|Another view of the landing site. | |||
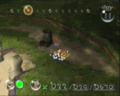
TFT start 2.png|East of the landing site. | |||
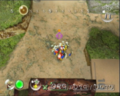
TFT fire.png|The fiery path in which [[Red Pikmin]] are needed. | |||
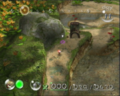
TFT bombs.png|The easternmost island. | |||
TFT bridge.png|The two central bridges and the central island. | |||
TFT water.png|Part of the large body of water in the area. | |||
TFT before boss.png|The section before the [[Emperor Bulblax]]'s arena. | |||
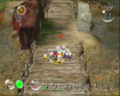
TFT bombs 2.png|The ledge where [[bomb-rock]]s can be found, used to take down the [[gate]]s. | |||
TFT boss.png|The Emperor Bulblax, burrowed. | |||
TFT boss east.png|Eastern section of the Emperor Bulblax's arena. | |||
TFT boss north.png|Northern section of the Emperor Bulblax's arena. | |||
TFT boss west.png|Western section of the Emperor Bulblax's arena. | |||
TFT west.png|Westernmost path of the area. | |||
FT.jpg|The bomb-rock island. | |||
Pikminlast1.jpg|The Final Trial in Challenge Mode. | |||
The Final Trial preview.png|Preview image on the [[area selection menu]]. | |||
The Final Trial HD.jpg|Overview map. | |||
FT texture.png|The [[radar]] pattern for The Final Trial. | |||
</gallery> | </gallery> | ||
==Trivia== | ==Trivia== | ||
*The terrain and surroundings of this area, along with the terrain and surroundings of | *The terrain and surroundings of this area, along with the terrain and surroundings of [[The Impact Site]], make up the layout for the [[Wistful Wild]] in ''[[Pikmin 2]]'', with the exception of the places where the two map layouts meet. In addition, the object around the Emperor Bulblax's arena is confirmed to be a sideways tire rim, as evident by the filename of its texture in ''Pikmin 2'': <code>last_wheel_s3tc</code>. | ||
*Although it is intended that all 3 types are used to complete this area, it can be completed with just [[Yellow Pikmin]]. This can be done by making the Pikmin "swim" to the [[bridge]]s, and by [[throw]]ing them over the slanted part of the metal wall between the second bridge and the [[Cardboard box|box]], then making the Pikmin run over to said box. | |||
*Strangely, a Bulborb appears here in the [[Sunset|end of day cutscene]], as well as in the perfect [[cutscene|ending]], despite the only visible Grub-dog in the area being the [[Emperor Bulblax]]. | *Strangely, a Bulborb appears here in the [[Sunset|end of day cutscene]], as well as in the perfect [[cutscene|ending]], despite the only visible Grub-dog in the area being the [[Emperor Bulblax]]. | ||
*On ''[[New Play Control! Pikmin]]'', it is possible to throw Pikmin directly to the island with the bridges by leaning against the western wall directly to the south of the ledge of the fire geyser path, and throwing Pikmin east so they land on top of the island's metal wall.{{cite youtube|0VbV3pMMvnM&|demonstrating the Pikmin in ''New Play Control! Pikmin'' being thrown to the island from near the fire geysers|s=58}} | |||
*Upon unlocking The Final Trial, shooting stars will appear at the top of the area selection screen. | |||
==Names in other languages== | |||
{{Foreignname | |||
|Jap=最後の試練 | |||
|JapR=Saigo no Shiren | |||
|JapM=Final Trial | |||
|FraA=L'Épreuve finale<br>L'Epreuve Finale (loading screen) | |||
|FraAM=The Final trial<br>The Final Trial | |||
|FraE=L'Epreuve Finale<br>L'Épreuve Finale (Switch version) | |||
|FraEM=The Final Trial | |||
|Ger=Der letzte Versuch | |||
|GerM=The final Trial | |||
|Spa=La Prueba Final | |||
|SpaM=The Final Trial | |||
|Kor=마지막 시련 | |||
|KorR=majimag silyeon | |||
|KorM=Final Trial | |||
|Ita=Prova finale | |||
|ItaM=Final trial | |||
}} | |||
==See also== | |||
*[[Emperor Bulblax]] | |||
*[[Secret Safe]] | |||
*[[Wistful Wild]] | |||
*[[Formidable Oak]] | |||
*[[Hero's Hideaway]] | |||
==References== | |||
{{refs}} | |||
{{featured|{{date|1|December|2019}}|{{date|1|February|2020}}}} | |||
{{DEFAULTSORT:Final Trial, The}} | |||
{{The Final Trial}} | {{The Final Trial}} | ||
{{P1 areas|ffffcc|772200|772200}} | {{P1 areas|ffffcc|772200|772200}} | ||
[[Category:The Final Trial| ]] | [[Category:The Final Trial| ]] | ||
Latest revision as of 13:40, December 9, 2023
| The Final Trial | |
|---|---|
| |
| Ship parts | 1 |
| Requirements | Collect 29 ship parts |
| Music | The Final Trial |


The Final Trial (最後の試練?, lit.: "Final Ordeal") is the fifth and final area in Pikmin. It is set in a sandy forest and has a complex layout that encourages the use of all three Pikmin types. As its name suggests, it serves as a final test of the player's knowledge on the Pikmin. It is unlocked by collecting 29 ship parts, one less than the total number of parts. The final ship part, the Secret Safe, is found within the Emperor Bulblax, the final boss of the game, in this area. This area was reused in Pikmin 2 as part of the Wistful Wild.
General layout[edit]
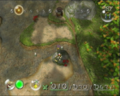
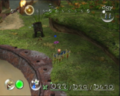
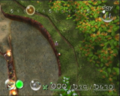
In the south of the area lies the landing site, along with three different types of Candypop Bud. (Since Pikmin cannot be produced here unless the boss is killed, these are the only way to increase the population of a Pikmin type (at the expense of another type).) To the north, the area "splits" into three paths. The left path focuses on Red Pikmin, due to the fire geysers. The center path contains water which only Blue Pikmin can traverse through. And the path on the right contains bomb-rocks, which only Yellow Pikmin can hold. The central part of the area contains a small pool of water. To the west of it, there is a narrow path with fire geysers. To the east are a group of small islands with 8 bomb-rocks, although sometimes 9 appear instead. In the middle of the pool are two bridges and a normal stone gate. To the north is a cardboard box.
The arena where the Emperor Bulblax is fought and a wall that leads to three pipes with 15 bomb-rocks each lies at the northernmost part of the area. On the far west of the pool is a ledge with no hazards, meaning Olimar can throw additional Pikmin onto the ledge, then run down to collect them when he reaches the end of the main path.
In Challenge Mode, a Yellow Wollywog is found in the pool and a Beady Long Legs appears once he enters the arena. A Burrowing Snagret is found in the cliffs around it. Smaller enemies are found around Olimar's base, such as a Dwarf Red Bulborb, Dwarf Bulbears and Sheargrubs. Unlike in the other levels, 100 Pikmin are already present on the map, buried in various locations.
Objects[edit]
Ship parts[edit]
 Secret Safe: Inside the Emperor Bulblax.
Enemies[edit]
 Emperor Bulblax × 1
Obstacles[edit]
 White bramble gate × 2
 White reinforced wall × 1
 Cardboard box × 1
 Fire geyser × 10
Tools[edit]
Vegetation[edit]
 Figwort (small) × 18
- Figwort (large) × 12
 Candypop Bud (Red) × 1
 Candypop Bud (Yellow) × 1
 Candypop Bud (Blue) × 1
 Nectar weed × 2
In Challenge Mode[edit]


The Final Trial is unique among Challenge Mode stages in that the player starts with 100 Pikmin, enough to reach the Pikmin limit. However, most of these Pikmin are scattered around the area in small groups of sprouts, meaning to expand their squad size, the player doesn't have to collect the objects near the landing site, they have to explore the area for the other sprouts, while collecting things at the same time to increase the total number of Pikmin. The boss arena contains a Beady Long Legs, and there is also a Burrowing Snagret nearby. The maximum number of Pikmin obtainable is 299 and the time limit is 13 minutes and 30 seconds, the same as a normal day.
Object breakdown[edit]
| Pikmin source | Seeds | Amount | Total |
|---|---|---|---|
| Starting Reds | 34 | 34 | |
| Starting Yellows | 33 | 33 | |
| Starting Blues | 33 | 33 | |
| Red 1 pellets | 2 | 1 | 2 |
| Red 5 pellets | 5 | 1 | 5 |
| Red 10 pellets | 10 | 2 | 20 |
| Yellow 1 pellets | 2 | 1 | 2 |
| Yellow 5 pellets | 5 | 1 | 5 |
| Yellow 10 pellets | 10 | 2 | 20 |
| Blue 1 pellets | 2 | 1 | 2 |
| Blue 5 pellets | 5 | 1 | 5 |
| Blue 20 pellets | 20 | 1 | 20 |
| Beady Long Legs | 40 | 1 | 40 |
| Burrowing Snagret | 29 | 1 | 29 |
| Dwarf Bulbear | 5 | 1 | 5 |
| Dwarf Bulborb | 4 | 4 | 16 |
| Female Sheargrub | 2 | 3 | 6 |
| Male Sheargrub | 3 | 3 | 9 |
| Yellow Wollywog | 13 | 1 | 13 |
| Total | 299 | ||
Gallery[edit]

The landing site.
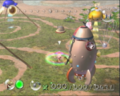
Another view of the landing site.
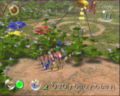
East of the landing site.
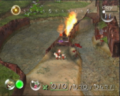
The fiery path in which Red Pikmin are needed.
The easternmost island.
The two central bridges and the central island.
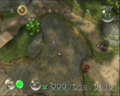
Part of the large body of water in the area.
The section before the Emperor Bulblax's arena.
The ledge where bomb-rocks can be found, used to take down the gates.
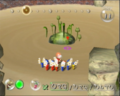
The Emperor Bulblax, burrowed.
Eastern section of the Emperor Bulblax's arena.
Northern section of the Emperor Bulblax's arena.
Western section of the Emperor Bulblax's arena.
Westernmost path of the area.

The bomb-rock island.

The Final Trial in Challenge Mode.
Preview image on the area selection menu.
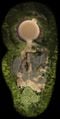
Overview map.
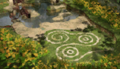
The radar pattern for The Final Trial.


Trivia[edit]
- The terrain and surroundings of this area, along with the terrain and surroundings of The Impact Site, make up the layout for the Wistful Wild in Pikmin 2, with the exception of the places where the two map layouts meet. In addition, the object around the Emperor Bulblax's arena is confirmed to be a sideways tire rim, as evident by the filename of its texture in Pikmin 2:
last_wheel_s3tc. - Although it is intended that all 3 types are used to complete this area, it can be completed with just Yellow Pikmin. This can be done by making the Pikmin "swim" to the bridges, and by throwing them over the slanted part of the metal wall between the second bridge and the box, then making the Pikmin run over to said box.
- Strangely, a Bulborb appears here in the end of day cutscene, as well as in the perfect ending, despite the only visible Grub-dog in the area being the Emperor Bulblax.
- On New Play Control! Pikmin, it is possible to throw Pikmin directly to the island with the bridges by leaning against the western wall directly to the south of the ledge of the fire geyser path, and throwing Pikmin east so they land on top of the island's metal wall.[1]
- Upon unlocking The Final Trial, shooting stars will appear at the top of the area selection screen.
Names in other languages[edit]
| Language | Name | Meaning |
|---|---|---|
| 最後の試練? Saigo no Shiren |
Final Trial | |
| L'Épreuve finale L'Epreuve Finale (loading screen) |
The Final trial The Final Trial | |
| L'Epreuve Finale L'Épreuve Finale (Switch version) |
The Final Trial | |
| Der letzte Versuch | The final Trial | |
| Prova finale | Final trial | |
| 마지막 시련 majimag silyeon |
Final Trial | |
| La Prueba Final | The Final Trial |
See also[edit]
References[edit]
- ^ YouTube video demonstrating the Pikmin in New Play Control! Pikmin being thrown to the island from near the fire geysers (at 0:58)
| The Final Trial | |
|---|---|
|
Click an object |
|
| Pikmin areas |
|---|
 Click an area on the image
The Impact Site • The Forest of Hope • The Forest Navel • The Distant Spring • The Final Trial animtest • codetest • E3play_3 • map_06 • play_4 • route • shapetst • testmap • tuto1 • tuto2 |