
| Subterranean Complex | |
|---|---|

| |
| Location | Valley of Repose |
| Sublevels | 9 |
| Treasures | 16 |
| Hazards | |
|
The following article or section contains guides. |
The Subterranean Complex (地下の秘密基地?, lit.: "Subterranean Secret Base") is a cave located in the Valley of Repose area, and is typically the second cavern one will access there.
This giant dungeon starts out as a snow-covered cave like the Emergence Cave; however, as one goes deeper into the complex it becomes a rusty, mechanical area with bottomless pits, with a style similar to Rusty Gulch. Many of the enemies here have projectile and explosive attacks – be very careful when bringing Pikmin in, as explosions will kill them instantly. The boss is the Man-at-Legs, an Arachnorb species armed with a laser-guided machine gun. The total value of all the treasure here is ![]() × 1480 in the US version and
× 1480 in the US version and ![]() × 1310 in the European version.
× 1310 in the European version.
Because the way the layout generation works, some sublevels, particularly sublevel 3 and sublevel 8, can place the sublevel hole right next to the edge. The player can use the ramped surface of the hole to climb on top of the railing and jump off into the pit.
How to reach
Like the Frontier Cavern, it is impossible to reach the cave before getting Blue Pikmin. Use Blue Pikmin to remove the clog in the first pond and build a bridge over the second. Once this is done, Pikmin of all types can be brought across. Beside the Watery Blowhog that is beyond the clump of enemies is a gate covered by gas pipes, requiring White Pikmin to destroy. The cave is located beyond this gate, up a slope that is challenging for Pikmin to climb. Defeating the Decorated Cannon Beetles, the various Blowhogs and the Cloaking Burrow-Nit is recommended, but not strictly necessary.
No water is found in this cave, so your Pikmin squad should not include Blue Pikmin. The hazards of this dungeon are limited, with more focus being placed on bomb rock explosions, so minimal care needs to be placed on the proportions of the other Pikmin types. There is little reason to include less than 100 Pikmin in your party to take advantage of the Queen Candypop Buds until after all treasures have been collected, unless you elected to bring a small squad of Purple Pikmin. This is because the Queen Candypop Buds are located on sublevel 8, and the only danger following is the Man-At-Legs.
Notes
Ship's dialogs
“Interesting... My metal detectors are reacting violently!
I can only conclude that there may be some sort of machine below, but that seems illogical...”Sublevel 1

- Theme: Snow
- Music: Snow 2
- Treasures:
- Enemies:
 Bumbling Snitchbug × 3 (1 drops from the sky in a dead end)
 Hairy Bulborb × 2
 Snow Bulborb × 9
- Obstacles:
- Others:
 Egg × 2 (drop from the sky in dead ends)
| Technical sublevel information | |||||
|---|---|---|---|---|---|
| Internal cave name | tutorial_2 | ||||
| "Main" object maximum (?) | 19 | ||||
| "Treasure" object maximum (?) | 2 | ||||
| "Gate" object maximum (?) | 0 | ||||
| Dead end unit probability (?) | 0 | ||||
| Number of rooms (?) | 3 | ||||
| Corridor-to-room ratio (?) | 0 | ||||
| Escape geyser (?) | No | ||||
| Clogged hole (?) | No | ||||
| Cave units file (?) | 3_MAT_mid1_mid2_uzu1_snow.txt | ||||
| Lighting file (?) | tutorial_1_light.ini | ||||
| Background (?) | None | ||||
| Cave units (?) | |||||
 |
 |
 |
 |
 |
 |
| Dead end | Dead end with item | Three-way crossing | Four-way crossing | Turning corridor | Corridor |
 |
 |
 |
|||
| Long corridor | Room with 6 exits | Y-shaped room | Room with spiraling trunk | ||
The cave starts off with the first sublevel having a snowy cave appearance, much like the Frontier Cavern. However, this is the only sublevel in the cave to take on this appearance.
Start by destroying the poison pipes, and defeating some Bumbling Snitchbugs if they happen to be an annoyance. There are two treasures in this level: the Nouveau Table, which should be buried, and the Exhausted Superstick. The Snow Bulborbs and Hairy Bulborbs can then be dealt with, preferably using Purple Pikmin.
Sublevel 2
- Theme: Metal
- Music: Metal 2
- Treasures:
- Enemies:
- Obstacles:
 Bomb-rock × 9 (3 drop from the sky in dead ends)
- Plants and fungi:
- Others:
- Egg × 2 (in dead ends)
| Technical sublevel information | |||||
|---|---|---|---|---|---|
| Internal cave name | tutorial_2 | ||||
| "Main" object maximum (?) | 10 | ||||
| "Treasure" object maximum (?) | 2 | ||||
| "Gate" object maximum (?) | 0 | ||||
| Dead end unit probability (?) | 0 | ||||
| Number of rooms (?) | 3 | ||||
| Corridor-to-room ratio (?) | 0 | ||||
| Escape geyser (?) | No | ||||
| Clogged hole (?) | No | ||||
| Cave units file (?) | 2_MAT_h335_h447_metal.txt | ||||
| Lighting file (?) | metal_light_lv1.ini | ||||
| Background (?) | ice ( | ||||
| Cave units (?) | |||||
 |
 |
 |
 |
 |
|
| Dead end with item | Three-way crossing | Four-way crossing | Turning corridor | Corridor | Long corridor |
 |
 |
||||
| Room with blue ledge | Room with large blue circle | ||||
The snow and poison have vanished here. Pikmin might fall off the floor when thrown; as such, extra care should also be taken when attempting to activate the hole to the next sublevel.
The main focus on this level is on the various bomb-rocks. You should dismiss the Pikmin, and set off all bomb-rocks you can find. The Careening Dirigibugs will be armed by now, but this will not be as troublesome as the bomb-rocks that were on the ground.
The enemies should now be attacked one by one. The Swooping Snitchbug here has a high tendency to throw Pikmin in the gaps that are between the larger expanses. This still doesn't make it as big of a threat as the Dirigibugs, but it still shouldn't be completely ignored. The treasures here are the Spirit Flogger and the Network Mainbrain.
Sublevel 3
- Theme: Metal
- Music: Metal 1
- Treasures:
 Coiled Launcher
 Omega Flywheel
 Superstrong Stabilizer (inside the burrowed Armored Cannon Beetle Larva)
- Enemies:
 Armored Cannon Beetle Larva × 3 (1 stuck on the ground)
- Obstacles:
- Bomb-rock × 1 (drops from the sky in a dead end)
 Fire geyser × 6
- Plants and fungi:
 Glowstem (green) × 8
- Glowstem (red) × 8
 Ivory Candypop Bud × 1
- Others:
- Egg × 3 (drop from the sky in dead ends)
| Technical sublevel information | |||||
|---|---|---|---|---|---|
| Internal cave name | tutorial_2 | ||||
| "Main" object maximum (?) | 10 | ||||
| "Treasure" object maximum (?) | 2 | ||||
| "Gate" object maximum (?) | 0 | ||||
| Dead end unit probability (?) | 40 | ||||
| Number of rooms (?) | 6 | ||||
| Corridor-to-room ratio (?) | 0 | ||||
| Escape geyser (?) | No | ||||
| Clogged hole (?) | No | ||||
| Cave units file (?) | 2_MAT_h224_h443_tekiF_metal.txt | ||||
| Lighting file (?) | metal_light_lv2.ini | ||||
| Background (?) | ice ( | ||||
| Cave units (?) | |||||
| |
|
|
|
|
|
| Dead end with item | Three-way crossing | Four-way crossing | Turning corridor | Corridor | Long corridor |
 |
 |
||||
| Circular room with blue ledge | Pathway with tubes | ||||
This level has three Armored Cannon Beetle Larvae, along with multiple fire geysers. When taking them down, make sure the beetles aren't facing the void, or else your Pikmin will be tossed into it. Once the threats are cleared, the Ivory Candypop Bud can be used to make White Pikmin if desired. Note that because of the way sublevels are generated, the Ivory Candypop Bud might not appear. Treasures here are the Superstrong Stabilizer, the Omega Flywheel and the Coiled Launcher.
Sublevel 4
- Theme: Metal
- Music: Rest
- Treasures:
- None
- Enemies:
- None
- Obstacles:
- None
- Plants and fungi:
- Glowstem (green) × 10
- Ivory Candypop Bud × 3
- Others:
- Egg × 6 (3 in dead ends)
| Technical sublevel information | |||||
|---|---|---|---|---|---|
| Internal cave name | tutorial_2 | ||||
| "Main" object maximum (?) | 6 | ||||
| "Treasure" object maximum (?) | 0 | ||||
| "Gate" object maximum (?) | 0 | ||||
| Dead end unit probability (?) | 50 | ||||
| Number of rooms (?) | 4 | ||||
| Corridor-to-room ratio (?) | 0.05 | ||||
| Escape geyser (?) | Yes | ||||
| Clogged hole (?) | No | ||||
| Cave units file (?) | 1_units_hit224_metal.txt | ||||
| Lighting file (?) | metal_light_lv0.ini | ||||
| Background (?) | test ( | ||||
| Cave units (?) | |||||
| |
|
|
|
|
|
| Dead end with item | Three-way crossing | Four-way crossing | Turning corridor | Corridor | Long corridor |
| |
|||||
| Pathway with tubes | |||||
This is a typical rest sublevel. The only objects worth mentioning are eggs, Candypop Buds and a geyser, which can be used to get to the surface. There are three Ivory Candypops that can produce White Pikmin.
Sublevel 5

- Theme: Metal
- Music: Metal 1
- Treasures:
- Enemies:
 Volatile Dweevil × 8 (2 drop from the sky)
- Obstacles:
- Bomb-rock × 24 (9 drop from the sky)
- Plants and fungi:
- Others:
- None
| Technical sublevel information | |||||
|---|---|---|---|---|---|
| Internal cave name | tutorial_2 | ||||
| "Main" object maximum (?) | 30 | ||||
| "Treasure" object maximum (?) | 2 | ||||
| "Gate" object maximum (?) | 0 | ||||
| Dead end unit probability (?) | 0 | ||||
| Number of rooms (?) | 1 | ||||
| Corridor-to-room ratio (?) | 0 | ||||
| Escape geyser (?) | No | ||||
| Clogged hole (?) | No | ||||
| Cave units file (?) | 1_units_nobo2_metal.txt | ||||
| Lighting file (?) | metal_light_lv1.ini | ||||
| Background (?) | test ( | ||||
| Cave units (?) | |||||
| |
|
|
|
|
|
| Dead end with item | Three-way crossing | Four-way crossing | Turning corridor | Corridor | Long corridor |
 |
|||||
| Zigzagging corridors | |||||
Here, it is advisable to dismiss the Pikmin into the corner behind the pod and to take a leader. The main objective now is to make all the bomb-rocks and Volatile Dweevils that spawn from the ceiling fall; you want them to fall now instead of later, when the Pikmin are busy. Every bomb that is in sight should be set off as well. Once everything is cleared, Whites should be used to collect the Mystical Disc and the Adamantine Girdle. More Dweevils and bomb-rocks will fall when the Pikmin carry the treasures. Note that, although rare, it is possible for a bomb rock to fall near the starting location.[1]
Sublevel 6
- Theme: Metal
- Music: Metal 3
- Treasures:
- Enemies:
 Anode Beetle × 6
 Careening Dirigibug × 2
 Fiery Dweevil × 2
 Munge Dweevil × 2
- Obstacles:
- Plants and fungi:
- Others:
- Egg × 1 (in a dead end)
| Technical sublevel information | |||||
|---|---|---|---|---|---|
| Internal cave name | tutorial_2 | ||||
| "Main" object maximum (?) | 15 | ||||
| "Treasure" object maximum (?) | 3 | ||||
| "Gate" object maximum (?) | 0 | ||||
| Dead end unit probability (?) | 0 | ||||
| Number of rooms (?) | 3 | ||||
| Corridor-to-room ratio (?) | 0 | ||||
| Escape geyser (?) | Yes | ||||
| Clogged hole (?) | No | ||||
| Cave units file (?) | 5_units_mid2_cent_hit4_hit5_nor2_metal.txt | ||||
| Lighting file (?) | chikahimi_metal_light_lv4.ini | ||||
| Background (?) | test ( | ||||
| Cave units (?) | |||||
| |
|
|
|
|
|
| Dead end with item | Three-way crossing | Four-way crossing | Turning corridor | Corridor | Long corridor |
 |
 |
 |
 |
 |
|
| 4-way purple-floored room | Y-shaped room | Roughly plus-shaped room | T-shaped room | X-shaped room | |
Many enemies spawn close to each other in this level, and consist of Careening Dirigibugs, Dweevils and some Anode Beetles. The enemies spawn in different positions each time, and as such, not much advice can be given, but killing the creatures that are a little off from the groups first is usually a safe tactic. The Dweevils can also be chased near an edge, and chances are they will walk off the side – their treasures will reappear elsewhere. You can also dispose of the Anode Beetles by carrying a couple of Pikmin with you to flip them over, and using cleverly lured Dirigibugs to drop bombs on them and kill them. Treasures available are the Repair Juggernaut, the Vacuum Processor and the Space Wave Receiver.
There is an exit geyser on this sublevel if you need to leave the cave, but there is also a rest stop two sublevels down which can be used to replenish your Pikmin army.
Sublevel 7
- Theme: Metal
- Music: Metal 2
- Treasures:
 Furious Adhesive
 Indomitable CPU (inside stationary Gatling Groink)
 Thirst Activator (US) /
  Perfect Container (Europe) /
  Alternative Reactor (Japan)
- Enemies:
- Careening Dirigibug × 1
 Gatling Groink × 2 (1 stationary on pillar)
- Volatile Dweevil × 2 (drops from the sky when Pikmin are carrying nearby)
- Obstacles:
- Bomb-rock × 25
- Plants and fungi:
- Others:
- Egg × 2 (in dead ends)
| Technical sublevel information | |||||
|---|---|---|---|---|---|
| Internal cave name | tutorial_2 | ||||
| "Main" object maximum (?) | 28 | ||||
| "Treasure" object maximum (?) | 2 | ||||
| "Gate" object maximum (?) | 0 | ||||
| Dead end unit probability (?) | 50 | ||||
| Number of rooms (?) | 4 | ||||
| Corridor-to-room ratio (?) | 0 | ||||
| Escape geyser (?) | No | ||||
| Clogged hole (?) | No | ||||
| Cave units file (?) | 3_MAT_ari_h446_h443_tower_metal.txt | ||||
| Lighting file (?) | houdai_light.ini | ||||
| Background (?) | build ( | ||||
| Cave units (?) | |||||
| |
|
|
|
|
|
| Dead end with item | Three-way crossing | Four-way crossing | Turning corridor | Corridor | Long corridor |
 |
 |
 |
|||
| Circular room with gaps | Room with hatch | Circular room with tower | |||
- See also: Gatling Groink strategy.
This level contains Gatling Groinks, one walking about, and the other on a pillar. After you clear the enemies, the Indomitable CPU, the Furious Adhesive and the Thirst Activator need to be collected. One of the treasures may be in a corner, and when this one is picked up, bomb-rocks are likely to fall from the sky. Make sure to be especially cautious collecting treasures here.
A good way to get rid of the walking Gatling Groink is to lure it over a gap which causes it to fall and instantly die. To note is that, due to the way cave sublevels are generated, the stationary Gatling Groink may not appear, and as such, you can miss out on the Indomitable CPU, as detailed here and here.
Sublevel 8
- Theme: Metal
- Music: Rest
- Treasures:
- None
- Enemies:
- None
- Obstacles:
- None
- Plants and fungi:
- Glowstem (green) × 12
 Queen Candypop Bud × 2
 Violet Candypop Bud × 3
- Others:
- Egg × 7 (1 drops from the sky in a dead end)
| Technical sublevel information | |||||
|---|---|---|---|---|---|
| Internal cave name | tutorial_2 | ||||
| "Main" object maximum (?) | 11 | ||||
| "Treasure" object maximum (?) | 0 | ||||
| "Gate" object maximum (?) | 0 | ||||
| Dead end unit probability (?) | 80 | ||||
| Number of rooms (?) | 6 | ||||
| Corridor-to-room ratio (?) | 0 | ||||
| Escape geyser (?) | Yes | ||||
| Clogged hole (?) | No | ||||
| Cave units file (?) | 1_units_hit224_metal.txt | ||||
| Lighting file (?) | houdai_light.ini | ||||
| Background (?) | build ( | ||||
| Cave units (?) | |||||
| |
|
|
|
|
|
| Dead end with item | Three-way crossing | Four-way crossing | Turning corridor | Corridor | Long corridor |
| |
|||||
| Pathway with tubes | |||||
Another rest level, and in this one, there are two Queen Candypop Buds which can help make up for lost Pikmin. There are also three Violet Candypop Buds for Purple Pikmin, and a geyser to return to the surface.
Sublevel 9

- Theme: Metal
- Music: Boss (only when combating)
- Treasures:
 Stellar Orb (inside the Man-at-Legs)
- Enemies:
 Man-at-Legs × 1
- Obstacles:
- None
- Plants and fungi:
- Others:
- None
| Technical sublevel information | |||||
|---|---|---|---|---|---|
| Internal cave name | tutorial_2 | ||||
| "Main" object maximum (?) | 1 | ||||
| "Treasure" object maximum (?) | 0 | ||||
| "Gate" object maximum (?) | 0 | ||||
| Dead end unit probability (?) | 0 | ||||
| Number of rooms (?) | 1 | ||||
| Corridor-to-room ratio (?) | 0 | ||||
| Escape geyser (?) | Yes | ||||
| Clogged hole (?) | Yes (despite being non-existent) | ||||
| Cave units file (?) | 1_units_houdai_metal.txt | ||||
| Lighting file (?) | houdai_light.ini | ||||
| Background (?) | build ( | ||||
| Cave units (?) | |||||
| |
|
|
|
|
|
| Dead end with item | Three-way crossing | Four-way crossing | Turning corridor | Corridor | Long corridor |
 |
|||||
| Man-at-Legs dry arena | |||||
- See also: Man-at-Legs strategy.
Looking around this level will reveal some metal switches and walls sticking out of the ground. There is an orb in the middle, which is the boss. However, it should not be attacked with normal Pikmin. Purples will inflict additional damage when they land on it while it is still dormant. The Man-at-Legs should have lost up to half of its health or more. This strategy is no longer possible in New Play Control! Pikmin 2, as the creature is invincible while it is getting up from its dormant state. However, it can still be bombarded with Pikmin when in its dormant state.
Other than that, defeat the boss as per the strategy, recover the Stellar Orb, and go to the surface.
Note
This is also an excellent cave to get Purple Pikmin and White Pikmin. At least 22 of any Pikmin type other than White or Purple should be brought along into the cave. On the third sublevel there will be a lone Ivory Candypop Bud. Should it not be there, resetting the game and reloading the level should make it appear eventually. The next sublevel spawns three Ivory Candypops. On the eighth sublevel there will be three Violet Candypop Buds and two Queen Candypop Buds.
By using the Queen Candypop Buds, the new Pikmin generated can be used for the Violet Candypop Buds. The eggs scattered about the level will provide nectar for the leaf and bud Pikmin. The cave can then be exited via the geyser. This process can be repeated infinitely, as the Candypop Buds are not limited to a certain number of White or Purple Pikmin total.
Gallery
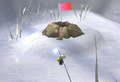
The cave entrance.
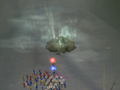
The entrance when foggy.
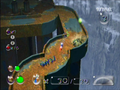
The sublevel hole appearing near the edge in sublevel 3.


Names in other languages
| Language | Name | Meaning |
|---|---|---|
| 地下の秘密基地? Chika no Himitsu Kichi |
Subterranean Secret Base | |
| Complexe Souterrain | Subterranean Complex | |
| Mysteriöses Gebiet | Mysterious Area | |
| Roccaforte Segreta | Secret Stronghold | |
| Complejo Subterráneo | Subterranean Complex |
See also
References
- ^ Twitch clip on Twitch, published on August 14th, 2018, retrieved on August 17th, 2018
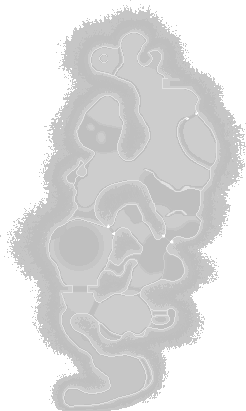
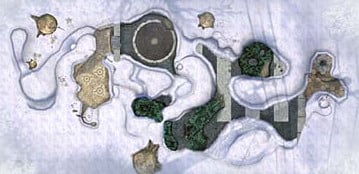
| Valley of Repose | |||||||||||
|---|---|---|---|---|---|---|---|---|---|---|---|
|
Click an object |
| ||||||||||
![[icon]](/index.php?title=Special:Upload&wpDestFile=Gas_pipe_icon.png)
|
This page is currently pending deletion. Reason: |
#REDIRECT Template:P2 caves