Formidable Oak: Difference between revisions
(Replaced the infobox screenshot with a Pikmin 3 Deluxe version. (There's basically no difference between them though.)) |
m (→Trivia: the successfully part is meant to contextualise that you escaped with your life in both cases, this was the only way i could think of phrasing it) |
||
| (41 intermediate revisions by 15 users not shown) | |||
| Line 2: | Line 2: | ||
{{Infobox area | {{Infobox area | ||
|screenshot = P3D Landing Site Formidable Oak.jpg | |screenshot = P3D Landing Site Formidable Oak.jpg | ||
|map = Formidable Oak map.png | |map = Formidable Oak map P3D.png | ||
|size = 300px | |size = 300px | ||
|fruits = 0 | |fruits = 0 | ||
|requirements = Save Louie from the [[Quaggled Mireclops]] | |requirements = Save Louie from the [[Quaggled Mireclops]] | ||
|music = ''[[Music in Pikmin 3#Formidable Oak|Formidable Oak]]'' | |music = ''[[Music in Pikmin 3#Formidable Oak|Formidable Oak]]'' | ||
}} | }} | ||
The '''Formidable Oak''' ({{j|哀しき獣の塔|Kanashiki Kemono no Tō|Tower of the | {{Spoiler|the final boss and ending of ''[[Pikmin 3]]''}} | ||
The '''Formidable Oak''' ({{j|哀しき獣の塔|Kanashiki Kemono no Tō|Tower of the Wretched Beast}}) is the final [[area]] in {{p3}}. It is set in a steppe with most of the area being a large cave system inside a termite hill. There are no [[fruit]]s in this area, as it functions as a final trial to test the player's knowledge of [[Pikmin family|Pikmin]] types (similar to that of [[The Final Trial]] from ''[[Pikmin (game)|Pikmin]]''). The [[boss]] of the area is the [[Plasm Wraith]], but before the boss can be fought, the player must transport an unconscious [[Captain Olimar]] through a maze of puzzles and enemies while keeping him away from the [[Mysterious Life-Form]]. | |||
==Plot== | ==Plot== | ||
After Louie has been rescued from the [[Quaggled Mireclops]], he discloses the location where he thinks [[Captain Olimar]] is, which happens to be at the Formidable Oak. As the Koppaites land in the area, they make their way up the termite hill, only to find an unconscious Olimar with a strange golden creature standing over him. As the explorers approach the life-form, it forms a protective bubble around Olimar, but with the help of the Pikmin, they free the captain in seconds. Since they can't take the same path they took up the termite hill to get back to the [[S.S. Drake]], they venture through the cave, as [[Brittany]] guides the carrier Pikmin. | After Louie has been rescued from the [[Quaggled Mireclops]], he discloses the location where he thinks [[Captain Olimar]] is, which happens to be at the Formidable Oak. As the Koppaites land in the area, they make their way up the termite hill, only to find an unconscious Olimar with a strange golden creature standing over him. As the explorers approach the life-form, it forms a protective bubble around Olimar, but with the help of the Pikmin, they free the captain in seconds. Since they can't take the same path they took up the termite hill to get back to the [[S.S. Drake]], they venture through the cave, as [[Brittany]] guides the carrier Pikmin. | ||
| Line 21: | Line 20: | ||
==Overview== | ==Overview== | ||
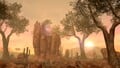
[[File: | [[File:P3 Formidable Oak Vegetation.jpg|thumb|250px|A view of the steppe climate found here.]] | ||
The Formidable Oak is a large termite hill found in a | The Formidable Oak is a large termite hill found in a steppe climate. From the top of the termite hill, one can access the cave system, which is the largest cave system in ''Pikmin 3''. It has all sorts of areas, from open rooms to tight corridors, with some [[segment]]s connecting with others. It also boasts much biodiversity, having enemies like the Arachnode and the Bearded Amprat all in the same cave as well as some enemies that are found nowhere else, such as the Watery Blowhog and the Shearwig. However, whenever enemies are defeated, they disintegrate into plasm, possibly meaning that they are illusions created by the Plasm Wraith. This area is also home to all 5 colors of [[Candypop Bud]] in ''Pikmin 3''. South of the landing site is a circular arena which is where the Plasm Wraith is fought. Interestingly, the pattern on the ground of the arena resembles the few islands near the [[Smoky Progg]]'s egg from [[The Distant Spring]] in ''[[Pikmin (game)|Pikmin]].'' | ||
== | ==Segments== | ||
The densest part of the area takes place inside the hill. | The densest part of the area takes place inside the hill. The following is a list of all [[segment]]s in the area: | ||
;Landing site | ;Landing site | ||
The [[S.S. Drake]] lands on a stump a bit above ground level. There are two corridors here. One leads to the top of the hill, while a smaller one goes to the Plasm Wraith's arena. This battlefield has a very rough round shape, with an alcove that is a dead end and has a ledge from which one exits the | The [[S.S. Drake]] lands on a stump a bit above ground level. There are two corridors here. One leads to the top of the hill, while a smaller one goes to the Plasm Wraith's arena. This battlefield has a very rough round shape, with an alcove that is a dead end and has a ledge from which one exits the hill's interior. | ||
;Top of the hill | ;Top of the hill | ||
| Line 34: | Line 33: | ||
;Entrance corridor | ;Entrance corridor | ||
Upon entering the hill, there is a long pathway leading forward. Near the start there is a fork in the path that goes to a shortcut, but it is blocked off by a [[reinforced wall]], so it cannot be taken the first time around, as [[bomb rock]]s can't be found yet. There is a column-like wall in the middle of this shortcut, which leads to a | Upon entering the hill, there is a long pathway leading forward. Near the start there is a fork in the path that goes to a shortcut, but it is blocked off by a [[reinforced wall]], so it cannot be taken the first time around, as [[bomb rock]]s can't be found yet. There is a column-like wall in the middle of this shortcut, which leads to a segment further down south. At the end of the main hallway is the first main segment of the cave. | ||
;First main | ;First main segment | ||
The | The segment starts off with an open room containing [[Yellow Spectralids]]. The corridor on the other end splits into two, with one side heading to a new room and the other being blocked off by a [[paper bag]] on a higher ledge. | ||
The second room has [[ | The second room has [[Bulborb]]s and a [[dirt wall]] blocking the way forward. It also has a pathway coming off the side that drops down to the Spectralids room for a one-way shortcut back. | ||
After that room is a T-junction. To the left, there is a small room with [[Candypop Bud]]s, closed off by a [[crystal wall]]. To the right, the path goes up and accesses the next room. There is an [[iron ball]] at the entrance, that can be used to burst open the aforementioned crystal wall. | After that room is a T-junction. To the left, there is a small room with [[Candypop Bud]]s, closed off by a [[crystal wall]]. To the right, the path goes up and accesses the next room. There is an [[iron ball]] at the entrance, that can be used to burst open the aforementioned crystal wall. | ||
| Line 45: | Line 44: | ||
The next room is quite large, and has a ring shaped wall in the center, opened on two ends. To the west is the path that leads to the paper bag, which can be pushed from here. To the east is a [[bridge]] leading up to the next ledge, but with an [[Arachnode]] web in the way. To the south is a convoluted path with two U-turns and two dirt walls, that ends up on the same ledge the bridge does. On this ledge, the northern path goes to the shortcut on the starting corridor, and the eastern path goes to the second main part of the cave. | The next room is quite large, and has a ring shaped wall in the center, opened on two ends. To the west is the path that leads to the paper bag, which can be pushed from here. To the east is a [[bridge]] leading up to the next ledge, but with an [[Arachnode]] web in the way. To the south is a convoluted path with two U-turns and two dirt walls, that ends up on the same ledge the bridge does. On this ledge, the northern path goes to the shortcut on the starting corridor, and the eastern path goes to the second main part of the cave. | ||
;Second main | ;Second main segment | ||
The last | The last segment of the area takes place in a huge room with several walls and platforms. To the southwest of the entrance is a ledge with an access ramp. The main path from the entrance goes south and circles between the wall and the lake in the center, which is split in two due to a high ledge. This high ledge is reachable from the one near the entrance, using a [[bridge]]. | ||
The path continues south, circles the lake and ends up at the eastern side of the cave. As it heads north, it circles around the second main ledge, and makes a U-turn. The path then goes west surrounding the lake, and almost closing a circuit, if not for the walkway on the northwest up above. Regardless, a small tunnel provides access back to the starting point. | The path continues south, circles the lake and ends up at the eastern side of the cave. As it heads north, it circles around the second main ledge, and makes a U-turn. The path then goes west surrounding the lake, and almost closing a circuit, if not for the walkway on the northwest up above. Regardless, a small tunnel provides access back to the starting point. | ||
| Line 57: | Line 56: | ||
* {{icon|Arachnode|y}} × 2 | * {{icon|Arachnode|y}} × 2 | ||
* {{icon|Bearded Amprat|y}} × 1 | * {{icon|Bearded Amprat|y}} × 1 | ||
* {{icon|Dwarf | * {{icon|Dwarf Bulborb|v=P3|y}} × 6 | ||
* {{icon|Female Sheargrub|v=P3|y}} × 4 | * {{icon|Female Sheargrub|v=P3|y}} × 4 | ||
* {{icon|Fiery Blowhog|v=P3|y}} × 1 | * {{icon|Fiery Blowhog|v=P3|y}} × 1 | ||
| Line 63: | Line 62: | ||
* {{icon|Mysterious Life-Form|y}} × 1 | * {{icon|Mysterious Life-Form|y}} × 1 | ||
* {{icon|Nectarous Dandelfly|y}} × 1 | * {{icon|Nectarous Dandelfly|y}} × 1 | ||
* {{icon| | * {{icon|Bulborb|v=P3|y}} × 1 | ||
* {{icon|Shearwig|v=P3|y}} × 4 | * {{icon|Shearwig|v=P3|y}} × 4 | ||
* {{icon|Skutterchuck|y}} × 2 | * {{icon|Skutterchuck|y}} × 2 | ||
| Line 72: | Line 71: | ||
}} | }} | ||
All enemies | All enemies disintegrate into plasm when defeated as they are illusions created by the Plasm Wraith. The Nectarous Dandelfly just flies away, meaning it is impossible to conclude if it is an illusion as well or not. | ||
===Obstacles=== | ===Obstacles=== | ||
| Line 78: | Line 77: | ||
*{{icon|Dirt wall|y}} × 5 | *{{icon|Dirt wall|y}} × 5 | ||
*{{icon|Crystal wall|y}} × 1 | *{{icon|Crystal wall|y}} × 1 | ||
*{{icon|Reinforced wall|v=P3|y}} × 1 | *{{icon|Reinforced wall|v=P3|y}} × 1 | ||
*{{icon|Paper bag|v=P3|y}} × 1 | *{{icon|Paper bag|v=P3|y}} × 1 | ||
*{{icon|Crystal nodule|y}} × 6 | *{{icon|Crystal nodule|y}} × 6 | ||
*{{icon|Large crystal|y}} × 2 | *{{icon|Large crystal|y}} × 2 | ||
}} | |||
===Tools=== | |||
{{columns|2| | |||
*{{icon|Iron ball|y}} × 1 | |||
*{{icon|Geyser|y}} × 1 | |||
*{{icon|Dirt mound|y}} × 5 | |||
*{{icon|Bridge|v=P3|y}} (Red) {{icon|fragment}} × 50 (piles of 30 and 20, 20 buried) | *{{icon|Bridge|v=P3|y}} (Red) {{icon|fragment}} × 50 (piles of 30 and 20, 20 buried) | ||
*{{icon|Bridge|v=P3|y}} (Blue) {{icon|fragment}} × 50 (2 piles of 25) | *{{icon|Bridge|v=P3|y}} (Blue) {{icon|fragment}} × 50 (2 piles of 25) | ||
}} | }} | ||
=== | ===Vegetation and mycobiota=== | ||
{{columns|2| | {{columns|2| | ||
* {{icon|Bloominous Stemple|y}} × 7 | *{{icon|Bloominous Stemple|y}} × 7 | ||
* {{icon| | *{{icon|Candypop Bud|v=P3 red|y}} (Red) × 1 | ||
* {{icon| | *{{icon|Candypop Bud|v=P3 rock|y}} (Rock) × 2 | ||
* {{icon| | *{{icon|Candypop Bud|v=P3 yellow|y}} (Yellow) × 4 | ||
* {{icon| | *{{icon|Candypop Bud|v=P3 winged|y}} (Winged) × 2 | ||
* {{icon| | *{{icon|Candypop Bud|v=P3 blue|y}} (Blue) × 2 | ||
* {{icon| | *{{icon|Common Glowcap|v=P3|y}} (blue) × 29 | ||
*{{icon|Common Glowcap|v=P3|y}} (red) × 16 | |||
*{{icon|Shoot|y}} (Arachnode) × 2 | |||
*{{icon|Shoot|y}} × 8 | |||
}} | }} | ||
===Other=== | |||
*[[Captain Olimar#Pikmin 3|Captain Olimar]] | |||
==Data files== | ==Data files== | ||
| Line 136: | Line 145: | ||
==Quotes== | ==Quotes== | ||
{{stub}} | {{stub|section=y}} | ||
==Changes in ''Pikmin 3 Deluxe''== | |||
Like most areas, Formidable Oak has received some changes in {{p3d}}: | |||
* There is an added screw in the ground in the dark part of the cave next to the single [[Bloominous Stemple]]. | |||
* Some [[data files]] have been added, removed, or moved elsewhere. | |||
==Guide== | ==Guide== | ||
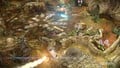
[[File:P3D Formidable Oak Run.jpg|thumb|250px|Keep Olimar away from the Mysterious Life-Form!]] | |||
{{guide}} | {{guide}} | ||
| Line 146: | Line 161: | ||
To start, ascend the obvious path up the Formidable Oak, and fight the golden blob you find. Once it has been defeated, you will find [[Captain Olimar]]. Assign five Pikmin of types you feel are expendable, and [[Brittany]] will begin to guide them. As you follow her through the only available path, the [[Mysterious Life-Form]] will begin the chase. | To start, ascend the obvious path up the Formidable Oak, and fight the golden blob you find. Once it has been defeated, you will find [[Captain Olimar]]. Assign five Pikmin of types you feel are expendable, and [[Brittany]] will begin to guide them. As you follow her through the only available path, the [[Mysterious Life-Form]] will begin the chase. | ||
When you first enter the first room and get started in earnest, the first thing to note is to move forward. There is exactly one path you can take, and that path will lead to a [[ | When you first enter the first room and get started in earnest, the first thing to note is to move forward. There is exactly one path you can take, and that path will lead to a [[Bulborb]] and six [[Dwarf Bulborb]]s. Defeat at least the ones on the left side (facing the way you entered said room), and put all of your Pikmin to work on the dirt wall opposite. Brittany now has a full loop she can take to make the Mysterious Life-Form completely ignore you, making solving the puzzles here a lot easier, provided you remind Brittany to Go Here! in a triangular fashion whenever prompted. | ||
Once the dirt wall is destroyed, go up the pathway to find an [[iron ball]]. Roll it down the hill to destroy a crystal wall, and get access to an alcove containing [[Shearwig]]s, two [[Candypop Bud]]s ( | Once the dirt wall is destroyed, go up the pathway to find an [[iron ball]]. Roll it down the hill to destroy a crystal wall, and get access to an alcove containing [[Shearwig]]s, two [[Candypop Bud]]s (yellow and rock), a dirt mound with three bomb rocks, and a [[data file]]. Collect these bomb rocks: they are really valuable later. | ||
In this main hub itself, you will find a [[Fiery Blowhog]], a [[Watery Blowhog]], a [[Bearded Amprat]], and two [[Swooping Snitchbug]]s. Defeat them all, remembering to use each enemy's specific weakness (Red, Blue, Yellow, and Winged/Rock, in that order) to defeat them. Dig into the dirt mound here to find 20 fragments, and there are 30 fragments in the center of the room. Use these to build the bridge, and then defeat the [[Arachnode]] opposite. There is also a [[paper bag]] in the corridor to the west (near the Bearded Amprat) that, if pushed, will grant Brittany a bigger loop, making it so you have to attend to her less often. | In this main hub itself, you will find a [[Fiery Blowhog]], a [[Watery Blowhog]], a [[Bearded Amprat]], and two [[Swooping Snitchbug]]s. Defeat them all, remembering to use each enemy's specific weakness (Red, Blue, Yellow, and Winged/Rock, in that order) to defeat them. Dig into the dirt mound here to find 20 fragments, and there are 30 fragments in the center of the room. Use these to build the bridge, and then defeat the [[Arachnode]] opposite. There is also a [[paper bag]] in the corridor to the west (near the Bearded Amprat) that, if pushed, will grant Brittany a bigger loop, making it so you have to attend to her less often. | ||
| Line 178: | Line 193: | ||
==Gallery== | ==Gallery== | ||
<gallery> | <gallery> | ||
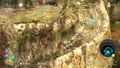
Formidable Oak map.png| | Formidable Oak map.png|The radar map of the Formidable Oak in ''Pikmin 3''. | ||
Formidable Oak Prima map.jpg| | Formidable Oak map P3D.png|The radar map of the Formidable Oak in ''Pikmin 3 Deluxe''. | ||
Formidable Oak minimap.png|The mini radar map of the Formidable Oak in ''Pikmin 3 Deluxe''. | |||
Formidable Oak Prima map.jpg|A map from the Prima guide. | |||
P3 Formidable Oak Stump.jpg|The Formidable Oak as seen from afar. | |||
P3 Formidable Oak Background.jpg|Some of the background scenery at the Formidable Oak. | |||
Formidable Oak P3 space view.jpg|View from outer space. | Formidable Oak P3 space view.jpg|View from outer space. | ||
P3D Formidable Oak Olimar Captured.jpg|The room at the top of the Formidable Oak. | |||
Formidable Oak first corridor.png|The first corridor within the oak. | Formidable Oak first corridor.png|The first corridor within the oak. | ||
P3D Formidable Oak Bloominous Stemples.jpg|The dark room with the [[Bloominous Stemple]]s all activated. | |||
P3 Formidable Oak Landing Area.jpg|The [[S.S. Drake]] and [[Onion|Master Onion]] blast off from the landing site. | |||
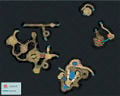
Formidable Oak unrestricted radar glitch.jpg|Viewing the Formidable Oak from a top-down view in [[Defeat Bosses!]], with the use of [[Glitches in Pikmin 3#Unrestricted radar|a glitch]]. | Formidable Oak unrestricted radar glitch.jpg|Viewing the Formidable Oak from a top-down view in [[Defeat Bosses!]], with the use of [[Glitches in Pikmin 3#Unrestricted radar|a glitch]]. | ||
</gallery> | </gallery> | ||
{{see more|Category:Formidable Oak images|t1=Formidable Oak images category}} | {{see more|Category:Formidable Oak images|t1=Formidable Oak images category}} | ||
| Line 194: | Line 212: | ||
*This location's continental shape is based on Greenland, though unlike the other continent locations on ''Pikmin 3''{{'s}} world map, the location of the continent is not based on predictions on what Earth will look like in the future. | *This location's continental shape is based on Greenland, though unlike the other continent locations on ''Pikmin 3''{{'s}} world map, the location of the continent is not based on predictions on what Earth will look like in the future. | ||
*This area is the only one with a unique rain musical track. | *This area is the only one with a unique rain musical track. | ||
*The [[Music (Pikmin 3)#Rain| | **The [[Music (Pikmin 3)#Rain|rain theme]] is similar to the theme of [[The Final Trial]]. | ||
*The music that plays when Olimar is rescued from the cave uses the same melody as when exiting a [[cave]] in ''[[Pikmin 2]]'' with a [[geyser]] (i.e. successfully). | |||
*It is possible to go out of bounds here, which enables the player to go through the cave backwards. This makes it much easier to retrieve Captain Olimar and complete the game faster. However, actually having a leader climbing to the top of the Oak where the Plasm Wraith is first encountered will cause a severely broken sequence of displaced camera positioning and unused cutscenes. | *It is possible to go out of bounds here, which enables the player to go through the cave backwards. This makes it much easier to retrieve Captain Olimar and complete the game faster. However, actually having a leader climbing to the top of the Oak where the Plasm Wraith is first encountered will cause a severely broken sequence of displaced camera positioning and unused cutscenes. | ||
*Although it is said to be a tree, this level is actually one of several termite hills on this desert continent. Other hills like this can be seen in the background. | *Although it is said to be a tree, this level is actually one of several termite hills on this desert continent. Other hills like this can be seen in the background. | ||
*The long, thin, off-white toadstools in this level closely resemble those of the {{w|Termitomyces}} fungus. This fungus is cultivated by termites to feed themselves and their young, although the Formidable Oak itself more closely resembles those built by Mound-building termites which do not cultivate this fungus. | |||
*To completely finish the maze (including Data Files), the only Pikmin required are Yellow Pikmin. However, other Pikmin types are recommended for convenience. | *To completely finish the maze (including Data Files), the only Pikmin required are Yellow Pikmin. However, other Pikmin types are recommended for convenience. | ||
*The area where the [[Plasm Wraith]] is fought has a similar pattern on the ground as the area where the [[Smoky Progg]] egg is found in [[The Distant Spring]]. | *The area where the [[Plasm Wraith]] is fought has a similar pattern on the ground as the area where the [[Smoky Progg]] egg is found in [[The Distant Spring]]. | ||
| Line 203: | Line 223: | ||
==Names in other languages== | ==Names in other languages== | ||
{{Foreignname | {{Foreignname | ||
|Kor=슬픈 짐승의 탑 | |||
|KorR=seulpeun jimseung-ui tab | |||
|KorM=Tower of the Wretched Beast | |||
|Fra=Tour de la mélancolie | |Fra=Tour de la mélancolie | ||
|FraM=Tower of melancholy | |FraM=Tower of melancholy | ||
| | |Spa=Torre de la Soledad | ||
| | |SpaM=Tower of Solitude | ||
|Ger=Turm der Einsamkeit | |Ger=Turm der Einsamkeit | ||
|GerM=Tower of Solitude | |GerM=Tower of Solitude | ||
|Ita=Torre | |Ita=Torre dedalo | ||
|ItaM=Labyrinth Tower | |ItaM=Labyrinth tower | ||
| | |ChiTrad=悲獸之塔 | ||
| | |ChiTradR=Bēi shòu zhī tǎ | ||
|ChiTradM=Tower of the Wretched Beast | |||
|ChiSimp=悲兽之塔 | |||
|ChiSimpR=Bēi shòu zhī tǎ | |||
|ChiSimpM=Tower of the Wretched Beast | |||
|Jap=哀しき獣の塔 | |Jap=哀しき獣の塔 | ||
|JapM=Tower of the | |JapR=Kanashiki Kemono no Tō | ||
|JapM=Tower of the Wretched Beast | |||
}} | }} | ||
Latest revision as of 18:36, April 11, 2024
| Formidable Oak | |
|---|---|
| |
| Fruits | 0 |
| Requirements | Save Louie from the Quaggled Mireclops |
| Music | Formidable Oak |


The Formidable Oak (哀しき獣の塔?, lit.: "Tower of the Wretched Beast") is the final area in Pikmin 3. It is set in a steppe with most of the area being a large cave system inside a termite hill. There are no fruits in this area, as it functions as a final trial to test the player's knowledge of Pikmin types (similar to that of The Final Trial from Pikmin). The boss of the area is the Plasm Wraith, but before the boss can be fought, the player must transport an unconscious Captain Olimar through a maze of puzzles and enemies while keeping him away from the Mysterious Life-Form.
Plot[edit]
After Louie has been rescued from the Quaggled Mireclops, he discloses the location where he thinks Captain Olimar is, which happens to be at the Formidable Oak. As the Koppaites land in the area, they make their way up the termite hill, only to find an unconscious Olimar with a strange golden creature standing over him. As the explorers approach the life-form, it forms a protective bubble around Olimar, but with the help of the Pikmin, they free the captain in seconds. Since they can't take the same path they took up the termite hill to get back to the S.S. Drake, they venture through the cave, as Brittany guides the carrier Pikmin.
As Alph and Captain Charlie go into the cave with the remaining Pikmin, the gold creature comes in pursuit of them in a form known as the Mysterious Life-Form. The Mysterious Life-Form chases after the Pikmin carrying Olimar, and tries to take him back out to the termite hill. As such, Brittany tries to stall the creature as Alph and Charlie clear the way forward.
They eventually make it to the end of the cave, in which they end up in a circular arena near base. As the Mysterious Life-Form makes it out of the cave, it transforms into the Plasm Wraith and absorbs Olimar. The explorers begin to fight the wraith, and once defeated flees to the termite hill, freeing the captain. Olimar and the Koppaites proceed to have a conversation, in which Olimar apologizes for the trouble Louie has caused them by giving a "piece of treasure", which is actually the cosmic drive key. Olimar mentions how the Hocotate ship is out of commission, so the Koppaites offer to drop Olimar off on Hocotate before venturing to Koppai. As they leave, they have a small conversation about the Pikmin, how much they helped them along the journey, and how their life will go on without them. Before they hit the atmosphere, they see the Plasm Wraith atop of the termite hill, roaring at the S.S. Drake.
Overview[edit]

The Formidable Oak is a large termite hill found in a steppe climate. From the top of the termite hill, one can access the cave system, which is the largest cave system in Pikmin 3. It has all sorts of areas, from open rooms to tight corridors, with some segments connecting with others. It also boasts much biodiversity, having enemies like the Arachnode and the Bearded Amprat all in the same cave as well as some enemies that are found nowhere else, such as the Watery Blowhog and the Shearwig. However, whenever enemies are defeated, they disintegrate into plasm, possibly meaning that they are illusions created by the Plasm Wraith. This area is also home to all 5 colors of Candypop Bud in Pikmin 3. South of the landing site is a circular arena which is where the Plasm Wraith is fought. Interestingly, the pattern on the ground of the arena resembles the few islands near the Smoky Progg's egg from The Distant Spring in Pikmin.
Segments[edit]
The densest part of the area takes place inside the hill. The following is a list of all segments in the area:
- Landing site
The S.S. Drake lands on a stump a bit above ground level. There are two corridors here. One leads to the top of the hill, while a smaller one goes to the Plasm Wraith's arena. This battlefield has a very rough round shape, with an alcove that is a dead end and has a ledge from which one exits the hill's interior.
- Top of the hill
The corridor that leads to the top ends in a dead end, but has an opening to fall down onto a circular room. This is where Captain Olimar sleeps and where the Mysterious Life-Form is first encountered. A hole leads inside the termite hill, and one can get back up to the corridor by use of a nearby geyser, meaning that Olimar cannot be carried back through the same path.
- Entrance corridor
Upon entering the hill, there is a long pathway leading forward. Near the start there is a fork in the path that goes to a shortcut, but it is blocked off by a reinforced wall, so it cannot be taken the first time around, as bomb rocks can't be found yet. There is a column-like wall in the middle of this shortcut, which leads to a segment further down south. At the end of the main hallway is the first main segment of the cave.
- First main segment
The segment starts off with an open room containing Yellow Spectralids. The corridor on the other end splits into two, with one side heading to a new room and the other being blocked off by a paper bag on a higher ledge.
The second room has Bulborbs and a dirt wall blocking the way forward. It also has a pathway coming off the side that drops down to the Spectralids room for a one-way shortcut back.
After that room is a T-junction. To the left, there is a small room with Candypop Buds, closed off by a crystal wall. To the right, the path goes up and accesses the next room. There is an iron ball at the entrance, that can be used to burst open the aforementioned crystal wall.
The next room is quite large, and has a ring shaped wall in the center, opened on two ends. To the west is the path that leads to the paper bag, which can be pushed from here. To the east is a bridge leading up to the next ledge, but with an Arachnode web in the way. To the south is a convoluted path with two U-turns and two dirt walls, that ends up on the same ledge the bridge does. On this ledge, the northern path goes to the shortcut on the starting corridor, and the eastern path goes to the second main part of the cave.
- Second main segment
The last segment of the area takes place in a huge room with several walls and platforms. To the southwest of the entrance is a ledge with an access ramp. The main path from the entrance goes south and circles between the wall and the lake in the center, which is split in two due to a high ledge. This high ledge is reachable from the one near the entrance, using a bridge.
The path continues south, circles the lake and ends up at the eastern side of the cave. As it heads north, it circles around the second main ledge, and makes a U-turn. The path then goes west surrounding the lake, and almost closing a circuit, if not for the walkway on the northwest up above. Regardless, a small tunnel provides access back to the starting point.
The aforementioned walkway takes place on the northern edge of the room, and circles over a small lake to the north of the bottom path. To the east of the walkway is the exit that leads to the Plasm Wraith's arena.
Objects[edit]
Enemies[edit]
 Arachnode × 2
 Bearded Amprat × 1
 Dwarf Bulborb × 6
 Female Sheargrub × 4
 Fiery Blowhog × 1
 Male Sheargrub × 10
 Mysterious Life-Form × 1
 Nectarous Dandelfly × 1
 Bulborb × 1
 Shearwig × 4
 Skutterchuck × 2
 Swooping Snitchbug × 2
 Watery Blowhog × 1
 Yellow Spectralids × 3
 Plasm Wraith – Final boss
All enemies disintegrate into plasm when defeated as they are illusions created by the Plasm Wraith. The Nectarous Dandelfly just flies away, meaning it is impossible to conclude if it is an illusion as well or not.
Obstacles[edit]
 Dirt wall × 5
 Crystal wall × 1
 Reinforced wall × 1
 Paper bag × 1
 Crystal nodule × 6
 Large crystal × 2
Tools[edit]
 Iron ball × 1
 Geyser × 1
 Dirt mound × 5
 Bridge (Red)
  × 50 (piles of 30 and 20, 20 buried)
- Bridge (Blue) × 50 (2 piles of 25)
Vegetation and mycobiota[edit]
 Bloominous Stemple × 7
 Candypop Bud (Red) × 1
 Candypop Bud (Rock) × 2
 Candypop Bud (Yellow) × 4
 Candypop Bud (Winged) × 2
 Candypop Bud (Blue) × 2
 Common Glowcap (blue) × 29
- Common Glowcap (red) × 16
 Shoot (Arachnode) × 2
- Shoot × 8
Other[edit]
Data files[edit]
- Main article: Data file.
- Pikmin Behavior / Pikminology
- None
- Controls
- None
- Indigenous Life
- Area Hints
- Shortcut
- Closed Path / A not unknown path
- Olimar's Log
- Journal Entry #6 / Olimar's diary #6; Pikmin 3 Deluxe only
- Journal Entry #7 / Olimar's diary #7
- Journal Entry #8 / Olimar's diary #8
- Journal Entry #9 / Olimar's diary #9
- Journal Entry #10 / Olimar's diary #10
- Secret File
- Olimar's Log Vol. 2
Hidden murals[edit]
- Main article: Hidden mural.
|
Warning: the following text contains major spoilers about the hidden murals in the area.
|
|---|
|


Quotes[edit]
|
This section is a stub. You can help Pikipedia by expanding it. |
Changes in Pikmin 3 Deluxe[edit]
Like most areas, Formidable Oak has received some changes in Pikmin 3 Deluxe:
- There is an added screw in the ground in the dark part of the cave next to the single Bloominous Stemple.
- Some data files have been added, removed, or moved elsewhere.
Guide[edit]

|
The following article or section contains guides. |
Basic guide[edit]
To start, it is safe to say that no one Pikmin type is more useful than another here. Each has their part to play, and each has disadvantages. It is recommended that you bring no less than ten of each type, and choose the rest of your team make up based on your own personal preference. A note: make sure that you have ten Yellow Pikmin by the second area!
To start, ascend the obvious path up the Formidable Oak, and fight the golden blob you find. Once it has been defeated, you will find Captain Olimar. Assign five Pikmin of types you feel are expendable, and Brittany will begin to guide them. As you follow her through the only available path, the Mysterious Life-Form will begin the chase.
When you first enter the first room and get started in earnest, the first thing to note is to move forward. There is exactly one path you can take, and that path will lead to a Bulborb and six Dwarf Bulborbs. Defeat at least the ones on the left side (facing the way you entered said room), and put all of your Pikmin to work on the dirt wall opposite. Brittany now has a full loop she can take to make the Mysterious Life-Form completely ignore you, making solving the puzzles here a lot easier, provided you remind Brittany to Go Here! in a triangular fashion whenever prompted.
Once the dirt wall is destroyed, go up the pathway to find an iron ball. Roll it down the hill to destroy a crystal wall, and get access to an alcove containing Shearwigs, two Candypop Buds (yellow and rock), a dirt mound with three bomb rocks, and a data file. Collect these bomb rocks: they are really valuable later.
In this main hub itself, you will find a Fiery Blowhog, a Watery Blowhog, a Bearded Amprat, and two Swooping Snitchbugs. Defeat them all, remembering to use each enemy's specific weakness (Red, Blue, Yellow, and Winged/Rock, in that order) to defeat them. Dig into the dirt mound here to find 20 fragments, and there are 30 fragments in the center of the room. Use these to build the bridge, and then defeat the Arachnode opposite. There is also a paper bag in the corridor to the west (near the Bearded Amprat) that, if pushed, will grant Brittany a bigger loop, making it so you have to attend to her less often.
Before entering the next room, there is something important to do. Destroy the crystal on your left, and take one leader to follow the path up to a reinforced wall. Blow it up with those bomb rocks you got earlier. You now have a shortcut if/when you need an extra day to complete the Formidable Oak's puzzle. There is a Secret File hidden in the Spotcaps here, so be sure to grab that on your way back.
Now that that is out of the way, the second room. Although the characters point out the darkness, it is of little consequence. Ignore the ramp nearby, and progress along the path that has been laid out for you. You will find 25 blue fragments. Assign Pikmin to work on these (ideally they'll be Winged or Blue, but if your numbers of those are lower, Red, Rock and Yellow are fine), and have the rest of your Pikmin destroy the dirt wall beyond. Continue past it, to eventually find another 25 blue fragments. Gather these ones, and have eight Winged Pikmin lift the clipboard right behind you. Leave them behind, and head to the bridge (which is up the earlier ramp).
Call the Pikmin assembling the fragments back once they have been laid, so they don't return to where they found them, and light the electrode on this ledge. Cross the bridge, and there is another electrode to light. The third isn't far, but there is a puzzle. Go along the right Bloominous Stemple bridge, and toss a leader and ten Yellows to the other side. Have the other leader light the electrode, finishing both Stemple paths.
Cross the other Stemple path. Be careful, for there is an Arachnode lying in wait. Defeat it if you have Winged Pikmin, and continue. There is a dirt mound here that contains the other Secret File, so grab it if you so wish, and then continue. The clipboard bridge has been assembled, with your Winged Pikmin here, so gather them and continue. You will eventually reach the end of the cave. Consequently, once the third electrode has been lit, it is all clear to stop commanding Brittany to go in circles, and come to the end of the cave.
Once Olimar is removed from the cave, the Plasm Wraith fight will begin. Consult that page to defeat it and beat Pikmin 3. If your day happens to end once you have solved most, if not all, of the puzzles, your team to finish escorting Olimar should be more suited to fighting the Wraith than solving the puzzles.
Speed completion[edit]
Grab 80 Winged Pikmin, 10 Rock Pikmin, and 10 Yellow Pikmin. Walk to the top and take out the Mysterious Life-Form. Get 10 Winged Pikmin on Captain Olimar. Walk into the cave as a squad. Go to the paper bag and dodge and charge the obstacle. Ignore the enemies and grab the 30 fragments. Throw Brittany and Captain Charlie across the bridge and around the Arachnode. Whistle Alph as you enter the cave. Split off, switch to Charlie and go across the river holding Brittany and 8 Winged Pikmin in your squad. Flip over the clipboard and wait for Olimar to get close. When Olimar is close enough, hold Brittany and walk slowly into the opening behind the fragments. Stand in the back right corner and perform an easy clip. Captain Charlie will hold Brittany and aim over the fragments. If you whistle correctly, Brittany should be out of bounds. If you dismiss, Brittany will very likely respawn on the ledge above. Exit and fight the Plasm Wraith like normal except supercharge all your Pikmin with a spray a few times. The sprays speed up the fight a lot.
In other game modes[edit]
These Mission Mode and Side Story stages take place within the Formidable Oak:
- Mission Mode
- Side Stories
Gallery[edit]
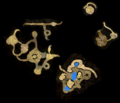
The radar map of the Formidable Oak in Pikmin 3.
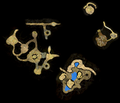
The radar map of the Formidable Oak in Pikmin 3 Deluxe.
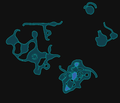
The mini radar map of the Formidable Oak in Pikmin 3 Deluxe.
A map from the Prima guide.
The Formidable Oak as seen from afar.

Some of the background scenery at the Formidable Oak.

View from outer space.
The room at the top of the Formidable Oak.
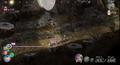
The first corridor within the oak.
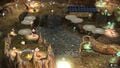
The dark room with the Bloominous Stemples all activated.
The S.S. Drake and Master Onion blast off from the landing site.
Viewing the Formidable Oak from a top-down view in Defeat Bosses!, with the use of a glitch.


- See more: Formidable Oak images category.
Trivia[edit]
- This is the only level in which Shearwigs and a Watery Blowhog appear in Story Mode. However, since they are apparently just illusions created by the Plasm Wraith, it could be said they do not appear in Story Mode at all.
- This location's continental shape is based on Greenland, though unlike the other continent locations on Pikmin 3's world map, the location of the continent is not based on predictions on what Earth will look like in the future.
- This area is the only one with a unique rain musical track.
- The rain theme is similar to the theme of The Final Trial.
- The music that plays when Olimar is rescued from the cave uses the same melody as when exiting a cave in Pikmin 2 with a geyser (i.e. successfully).
- It is possible to go out of bounds here, which enables the player to go through the cave backwards. This makes it much easier to retrieve Captain Olimar and complete the game faster. However, actually having a leader climbing to the top of the Oak where the Plasm Wraith is first encountered will cause a severely broken sequence of displaced camera positioning and unused cutscenes.
- Although it is said to be a tree, this level is actually one of several termite hills on this desert continent. Other hills like this can be seen in the background.
- The long, thin, off-white toadstools in this level closely resemble those of the Termitomyces fungus. This fungus is cultivated by termites to feed themselves and their young, although the Formidable Oak itself more closely resembles those built by Mound-building termites which do not cultivate this fungus.
- To completely finish the maze (including Data Files), the only Pikmin required are Yellow Pikmin. However, other Pikmin types are recommended for convenience.
- The area where the Plasm Wraith is fought has a similar pattern on the ground as the area where the Smoky Progg egg is found in The Distant Spring.
- By using the camera to look upward, the player can notice that the cave has no roof.
Names in other languages[edit]
| Language | Name | Meaning |
|---|---|---|
| 哀しき獣の塔? Kanashiki Kemono no Tō |
Tower of the Wretched Beast | |
(traditional) |
悲獸之塔 Bēi shòu zhī tǎ |
Tower of the Wretched Beast |
(simplified) |
悲兽之塔 Bēi shòu zhī tǎ |
Tower of the Wretched Beast |
| Tour de la mélancolie | Tower of melancholy | |
| Turm der Einsamkeit | Tower of Solitude | |
| Torre dedalo | Labyrinth tower | |
| 슬픈 짐승의 탑 seulpeun jimseung-ui tab |
Tower of the Wretched Beast | |
| Torre de la Soledad | Tower of Solitude |
See also[edit]
| Formidable Oak | |
|---|---|
|
Click an object |
|

| Pikmin 3 areas |
|---|
 Click an area on the image Tropical Wilds • Garden of Hope • Distant Tundra • Twilight River • Formidable Oak |