E-Reader: Difference between revisions
No edit summary |
(→List of Pikmin Puzzle Cards: Added Yellow backs) |
||
| Line 89: | Line 89: | ||
| #00 || [[Red Pikmin]] || [[File:R1.JPG|100px]] || || Red || 1 - Pikmin || Plucking Pikmin || 01, 02, 03 | | #00 || [[Red Pikmin]] || [[File:R1.JPG|100px]] || || Red || 1 - Pikmin || Plucking Pikmin || 01, 02, 03 | ||
|- | |- | ||
| #00 || [[Yellow Pikmin]] || [[File:Y1.JPG|100px]] || || Yellow || 1 - Pikmin || Marching Pikmin || 01, 02, 03 | | #00 || [[Yellow Pikmin]] || [[File:Y1.JPG|100px]] || [[File:PuzzleCarde+ back Yellowleaf.png|100px]] || Yellow || 1 - Pikmin || Marching Pikmin || 01, 02, 03 | ||
|- | |- | ||
| #00 || [[Blue Pikmin]] || [[File:B1.JPG|100px]] || || Blue || 1 - Pikmin || Connecting Pikmin || 01, 02, 03 | | #00 || [[Blue Pikmin]] || [[File:B1.JPG|100px]] || || Blue || 1 - Pikmin || Connecting Pikmin || 01, 02, 03 | ||
| Line 95: | Line 95: | ||
| #01 || [[Red Bulborb]] || [[File:R2.JPG|100px]] || || Red || 1 - Pikmin || Plucking Pikmin || 04, 05, 06 | | #01 || [[Red Bulborb]] || [[File:R2.JPG|100px]] || || Red || 1 - Pikmin || Plucking Pikmin || 04, 05, 06 | ||
|- | |- | ||
| #02 || [[Hairy Bulborb]] || [[File:Y2.JPG|100px]] || || Yellow || 1 - Pikmin || Marching Pikmin || 04, 05, 06 | | #02 || [[Hairy Bulborb]] || [[File:Y2.JPG|100px]] || [[File:PuzzleCarde+ back Yellowleaf.png|100px]] || Yellow || 1 - Pikmin || Marching Pikmin || 04, 05, 06 | ||
|- | |- | ||
| #03 || [[Orange Bulborb]] || [[File:B2.JPG|100px]] || || Blue || 1 - Pikmin || Connecting Pikmin || 04, 05, 06 | | #03 || [[Orange Bulborb]] || [[File:B2.JPG|100px]] || || Blue || 1 - Pikmin || Connecting Pikmin || 04, 05, 06 | ||
| Line 101: | Line 101: | ||
| #04 || [[Dwarf Red Bulborb]] || [[File:R3.JPG|100px]] || || Red || 1 - Pikmin || Plucking Pikmin || 07, 08, 09 | | #04 || [[Dwarf Red Bulborb]] || [[File:R3.JPG|100px]] || || Red || 1 - Pikmin || Plucking Pikmin || 07, 08, 09 | ||
|- | |- | ||
| #05 || [[Snow Bulborb]] || [[File:Y3.JPG|100px]] || || Yellow || 1 - Pikmin || Marching Pikmin || 07, 08, 09 | | #05 || [[Snow Bulborb]] || [[File:Y3.JPG|100px]] || [[File:PuzzleCarde+ back Yellowbud.jpg|100px]] || Yellow || 1 - Pikmin || Marching Pikmin || 07, 08, 09 | ||
|- | |- | ||
| #06 || [[Dwarf Orange Bulborb]] || [[File:B3.JPG|100px]] || || Blue || 1 - Pikmin || Connecting Pikmin || 07, 08, 09 | | #06 || [[Dwarf Orange Bulborb]] || [[File:B3.JPG|100px]] || || Blue || 1 - Pikmin || Connecting Pikmin || 07, 08, 09 | ||
| Line 109: | Line 109: | ||
| #08 || [[Dwarf Bulbear]] || [[File:R17.JPG|100px]] || || Red || 4 - Candypop Bud ||Plucking Pikmin || 49, 50, 51 | | #08 || [[Dwarf Bulbear]] || [[File:R17.JPG|100px]] || || Red || 4 - Candypop Bud ||Plucking Pikmin || 49, 50, 51 | ||
|- | |- | ||
| #09 || [[Bulborb Larva]] || [[File:Y6.JPG|100px]] || || Yellow || 2 - Onion ||Marching Pikmin || 16, 17, 18 | | #09 || [[Bulborb Larva]] || [[File:Y6.JPG|100px]] || [[File:PuzzleCarde+ back Yellowleaf.png|100px]] || Yellow || 2 - Onion ||Marching Pikmin || 16, 17, 18 | ||
|- | |- | ||
| #10 || [[Fiery Bulblax]] || [[File:R19.JPG|100px]] || || Red || 4 - Candypop Bud ||Plucking Pikmin || 55, 56, 57 | | #10 || [[Fiery Bulblax]] || [[File:R19.JPG|100px]] || || Red || 4 - Candypop Bud ||Plucking Pikmin || 55, 56, 57 | ||
| Line 117: | Line 117: | ||
| #12 || [[Bulbmin]] || [[File:R13.JPG|100px]] || || Red || 3 - Pellet Posy ||Plucking Pikmin || 37, 38, 39 | | #12 || [[Bulbmin]] || [[File:R13.JPG|100px]] || || Red || 3 - Pellet Posy ||Plucking Pikmin || 37, 38, 39 | ||
|- | |- | ||
| #13 || [[Emperor Bulblax]] || [[File:Y19.JPG|100px]] || || Yellow || 4 - Candypop Bud ||Marching Pikmin || 55, 56, 57 | | #13 || [[Emperor Bulblax]] || [[File:Y19.JPG|100px]] || [[File:PuzzleCarde+ back Yellowflower.jpg|100px]] || Yellow || 4 - Candypop Bud ||Marching Pikmin || 55, 56, 57 | ||
|- | |- | ||
| #14 || [[Empress Bulblax]] || [[File:e+ Red4 14.png|100px]] || || Red || 4 - Candypop Bud || Plucking Pikmin || 58, 59, 60 | | #14 || [[Empress Bulblax]] || [[File:e+ Red4 14.png|100px]] || || Red || 4 - Candypop Bud || Plucking Pikmin || 58, 59, 60 | ||
| Line 125: | Line 125: | ||
| #16 || [[Watery Blowhog]] || [[File:B17.JPG|100px]] || || Blue || 4 - Candypop Bud ||Connecting Pikmin || 49, 50, 51 | | #16 || [[Watery Blowhog]] || [[File:B17.JPG|100px]] || || Blue || 4 - Candypop Bud ||Connecting Pikmin || 49, 50, 51 | ||
|- | |- | ||
| #17 || [[Armored Cannon Beetle]] || [[File:Y7.JPG|100px]] || || Yellow || 2 - Onion ||Marching Pikmin || 19, 20, 21 | | #17 || [[Armored Cannon Beetle]] || [[File:Y7.JPG|100px]] || [[File:PuzzleCarde+ back Yellowleaf.png|100px]] || Yellow || 2 - Onion ||Marching Pikmin || 19, 20, 21 | ||
|- | |- | ||
| #18 || [[Puffy Blowhog]] || [[File:R15.JPG|100px]] || || Red || 3 - Pellet Posy ||Plucking Pikmin || 43, 44, 45 | | #18 || [[Puffy Blowhog]] || [[File:R15.JPG|100px]] || || Red || 3 - Pellet Posy ||Plucking Pikmin || 43, 44, 45 | ||
| Line 131: | Line 131: | ||
| #19 || [[Withering Blowhog]] || [[File:B18.JPG|100px]] || || Blue || 4 - Candypop Bud ||Connecting Pikmin || 52, 53, 54 | | #19 || [[Withering Blowhog]] || [[File:B18.JPG|100px]] || || Blue || 4 - Candypop Bud ||Connecting Pikmin || 52, 53, 54 | ||
|- | |- | ||
| #20 || [[Gatling Groink]] || [[File:Y15.JPG|100px]] || || Yellow || 3 - Pellet Posy ||Marching Pikmin || 43, 44, 45 | | #20 || [[Gatling Groink]] || [[File:Y15.JPG|100px]] || [[File:PuzzleCarde+ back Yellowflower.jpg|100px]] || Yellow || 3 - Pellet Posy ||Marching Pikmin || 43, 44, 45 | ||
|- | |- | ||
| #21 || [[Anode Beetle]] || [[File:Y12.JPG|100px]] || || Yellow || 3 - Pellet Posy ||Marching Pikmin || 34, 35, 36 | | #21 || [[Anode Beetle]] || [[File:Y12.JPG|100px]] || [[File:PuzzleCarde+ back Yellowbud.jpg|100px]] || Yellow || 3 - Pellet Posy ||Marching Pikmin || 34, 35, 36 | ||
|- | |- | ||
| #22 || [[Iridescent Glint Beetle]] || [[File:Y9.JPG|100px]] || || Yellow || 2 - Onion ||Marching Pikmin || 25, 26, 27 | | #22 || [[Iridescent Glint Beetle]] || [[File:Y9.JPG|100px]] || [[File:PuzzleCarde+ back Yellowbud.jpg|100px]] || Yellow || 2 - Onion ||Marching Pikmin || 25, 26, 27 | ||
|- | |- | ||
| #23 || [[Doodlebug]] || [[File:B19.JPG|100px]] || || Blue || 4 - Candypop Bud ||Connecting Pikmin || 55, 56, 57 | | #23 || [[Doodlebug]] || [[File:B19.JPG|100px]] || || Blue || 4 - Candypop Bud ||Connecting Pikmin || 55, 56, 57 | ||
| Line 147: | Line 147: | ||
| #27 || [[Cloaking Burrow-nit]] || [[File:R8.JPG|100px]] || || Red || 2 - Onion ||Plucking Pikmin || 22, 23, 24 | | #27 || [[Cloaking Burrow-nit]] || [[File:R8.JPG|100px]] || || Red || 2 - Onion ||Plucking Pikmin || 22, 23, 24 | ||
|- | |- | ||
| #28 || [[Ravenous Whiskerpillar]] || [[File:Y5.JPG|100px]] || || Yellow || 1 - Pikmin ||Marching Pikmin || 13, 14, 15 | | #28 || [[Ravenous Whiskerpillar]] || [[File:Y5.JPG|100px]] || [[File:PuzzleCarde+ back Yellowflower.jpg|100px]] || Yellow || 1 - Pikmin ||Marching Pikmin || 13, 14, 15 | ||
|- | |- | ||
| #29 || [[Segmented Crawbster]] || [[File:B12.JPG|100px]] || || Blue || 3 - Pellet Posy ||Connecting Pikmin || 34, 35, 36 | | #29 || [[Segmented Crawbster]] || [[File:B12.JPG|100px]] || || Blue || 3 - Pellet Posy ||Connecting Pikmin || 34, 35, 36 | ||
|- | |- | ||
| #30 || [[Beady Long Legs]] || [[File:Y10.JPG|100px]] || || Yellow || 2 - Onion ||Marching Pikmin || 28, 29, 30 | | #30 || [[Beady Long Legs]] || [[File:Y10.JPG|100px]] || [[File:PuzzleCarde+ back Yellowflower.jpg|100px]] || Yellow || 2 - Onion ||Marching Pikmin || 28, 29, 30 | ||
|- | |- | ||
| #31 || [[Raging Long Legs]] || [[File:Y17.JPG|100px]] || || Yellow || 4 - Candypop Bud ||Marching Pikmin || 49, 50, 51 | | #31 || [[Raging Long Legs]] || [[File:Y17.JPG|100px]] || [[File:PuzzleCarde+ back Yellowbud.jpg|100px]] || Yellow || 4 - Candypop Bud ||Marching Pikmin || 49, 50, 51 | ||
|- | |- | ||
| #32 || [[Man-at-Legs]] || [[File:B10.JPG|100px]] || || Blue || 2 - Onion ||Connecting Pikmin || 28, 29, 30 | | #32 || [[Man-at-Legs]] || [[File:B10.JPG|100px]] || || Blue || 2 - Onion ||Connecting Pikmin || 28, 29, 30 | ||
| Line 165: | Line 165: | ||
| #36 || [[Bumbling Snitchbug]] || [[File:B15.JPG|100px]] || || Blue || 3 - Pellet Posy ||Connecting Pikmin || 43, 44, 45 | | #36 || [[Bumbling Snitchbug]] || [[File:B15.JPG|100px]] || || Blue || 3 - Pellet Posy ||Connecting Pikmin || 43, 44, 45 | ||
|- | |- | ||
| #37 || [[Careening Dirigibug]] || [[File:Y14.JPG|100px]] || || Yellow || 3 - Pellet Posy ||Marching Pikmin || 40, 41, 42 | | #37 || [[Careening Dirigibug]] || [[File:Y14.JPG|100px]] || [[File:PuzzleCarde+ back Yellowflower.jpg|100px]] || Yellow || 3 - Pellet Posy ||Marching Pikmin || 40, 41, 42 | ||
|- | |- | ||
| #38 || [[Antenna Beetle]] || [[File:Y4.JPG|100px]] || || Yellow || 1 - Pikmin ||Marching Pikmin || 10, 11, 12 | | #38 || [[Antenna Beetle]] || [[File:Y4.JPG|100px]] || [[File:PuzzleCarde+ back Yellowbud.jpg|100px]] || Yellow || 1 - Pikmin ||Marching Pikmin || 10, 11, 12 | ||
|- | |- | ||
| #39 || [[Lesser Spotted Jellyfloat]] || [[File:B14.JPG|100px]] || || Blue || 3 - Pellet Posy ||Connecting Pikmin || 40, 41, 42 | | #39 || [[Lesser Spotted Jellyfloat]] || [[File:B14.JPG|100px]] || || Blue || 3 - Pellet Posy ||Connecting Pikmin || 40, 41, 42 | ||
| Line 175: | Line 175: | ||
| #41 || Elemental [[Dweevil family|Dweevils]] || [[File:Cnp6.JPG|100px]] || || Promotional || N/A || All || 03 | | #41 || Elemental [[Dweevil family|Dweevils]] || [[File:Cnp6.JPG|100px]] || || Promotional || N/A || All || 03 | ||
|- | |- | ||
| #42 || [[Volatile Dweevil]] || [[File:Y13.JPG|100px]] || || Yellow || 3 - Pellet Posy ||Marching Pikmin || 37, 38, 39 | | #42 || [[Volatile Dweevil]] || [[File:Y13.JPG|100px]] || [[File:PuzzleCarde+ back Yellowbud.jpg|100px]] || Yellow || 3 - Pellet Posy ||Marching Pikmin || 37, 38, 39 | ||
|- | |- | ||
| #43 || [[Titan Dweevil]] || [[File:Y20.JPG|100px]] || || Yellow || 4 - Candypop Bud ||Marching Pikmin || 58, 59, 60 | | #43 || [[Titan Dweevil]] || [[File:Y20.JPG|100px]] || [[File:PuzzleCarde+ back Yellowflower.jpg|100px]] || Yellow || 4 - Candypop Bud ||Marching Pikmin || 58, 59, 60 | ||
|- | |- | ||
| #44 || [[Female Sheargrub]] || [[File:B11.JPG|100px]] || || Blue || 3 - Pellet Posy ||Connecting Pikmin || 31, 32, 33 | | #44 || [[Female Sheargrub]] || [[File:B11.JPG|100px]] || || Blue || 3 - Pellet Posy ||Connecting Pikmin || 31, 32, 33 | ||
|- | |- | ||
| #45 || [[Male Sheargrub]] || [[File:Y11.JPG|100px]] || || Yellow || 3 - Pellet Posy ||Marching Pikmin || 31, 32, 33 | | #45 || [[Male Sheargrub]] || [[File:Y11.JPG|100px]] || [[File:PuzzleCarde+ back Yellowleaf.png|100px]] || Yellow || 3 - Pellet Posy ||Marching Pikmin || 31, 32, 33 | ||
|- | |- | ||
| #46 || [[Shearwig]] || [[File:R11.JPG|100px]] || || Red || 3 - Pellet Posy ||Plucking Pikmin || 31, 32, 33 | | #46 || [[Shearwig]] || [[File:R11.JPG|100px]] || || Red || 3 - Pellet Posy ||Plucking Pikmin || 31, 32, 33 | ||
| Line 195: | Line 195: | ||
| #51 || [[Pileated Snagret]] || [[File:R12.JPG|100px]] || || Red || 3 - Pellet Posy ||Plucking Pikmin || 34, 35, 36 | | #51 || [[Pileated Snagret]] || [[File:R12.JPG|100px]] || || Red || 3 - Pellet Posy ||Plucking Pikmin || 34, 35, 36 | ||
|- | |- | ||
| #52 || [[Honeywisp]] || [[File:Y18.JPG|100px]] || || Yellow || 4 - Candypop Bud ||Marching Pikmin || 52, 53, 54 | | #52 || [[Honeywisp]] || [[File:Y18.JPG|100px]] || [[File:PuzzleCarde+ back Yellowbud.jpg|100px]] || Yellow || 4 - Candypop Bud ||Marching Pikmin || 52, 53, 54 | ||
|- | |- | ||
| #53 || [[Unmarked Spectralids]] || [[File:R18.JPG|100px]] || || Red || 4 - Candypop Bud ||Plucking Pikmin || 52, 53, 54 | | #53 || [[Unmarked Spectralids]] || [[File:R18.JPG|100px]] || || Red || 4 - Candypop Bud ||Plucking Pikmin || 52, 53, 54 | ||
| Line 211: | Line 211: | ||
| #59 || [[Skitter Leaf]] || [[File:B7.JPG|100px]] || || Blue || 2 - Onion ||Connecting Pikmin || 19, 20, 21 | | #59 || [[Skitter Leaf]] || [[File:B7.JPG|100px]] || || Blue || 2 - Onion ||Connecting Pikmin || 19, 20, 21 | ||
|- | |- | ||
| #60 || [[Breadbug]] || [[File:Y16.JPG|100px]] || || Yellow || 4 - Candypop Bud ||Marching Pikmin || 46, 47, 48 | | #60 || [[Breadbug]] || [[File:Y16.JPG|100px]] || [[File:PuzzleCarde+ back Yellowleaf.png|100px]] || Yellow || 4 - Candypop Bud ||Marching Pikmin || 46, 47, 48 | ||
|- | |- | ||
| #61 || [[Giant Breadbug]] || [[File:B16.JPG|100px]] || || Blue || 4 - Candypop Bud ||Connecting Pikmin || 46, 47, 48 | | #61 || [[Giant Breadbug]] || [[File:B16.JPG|100px]] || || Blue || 4 - Candypop Bud ||Connecting Pikmin || 46, 47, 48 | ||
|- | |- | ||
| #62 || [[Mamuta]] || [[File:Y8.JPG|100px]] || || Yellow || 2 - Onion ||Marching Pikmin || 22, 23, 24 | | #62 || [[Mamuta]] || [[File:Y8.JPG|100px]] || [[File:PuzzleCarde+ back Yellowbud.jpg|100px]] || Yellow || 2 - Onion ||Marching Pikmin || 22, 23, 24 | ||
|- | |- | ||
| #63 || [[Waterwraith]] || [[File:R16.JPG|100px]] || || Red || 4 - Candypop Bud ||Plucking Pikmin || 46, 47, 48 | | #63 || [[Waterwraith]] || [[File:R16.JPG|100px]] || || Red || 4 - Candypop Bud ||Plucking Pikmin || 46, 47, 48 | ||
Revision as of 23:36, November 24, 2015
The Nintendo e-Reader, or Nintendo e+ in Japan, is a Game Boy Advance, Game Boy SP, and Nintendo DS add-on device that reads a special strip on e-Reader cards via an LED scanner. It can connect to the GameCube via a Game Boy Advance to Nintendo GameCube Link Cable. The purpose of the cards is to unlock mini-games, items, levels or functions for games on the GBA, or as games in and of themselves.
There are multiple available packs of Pikmin e+ cards, released only in Japan after the release of Pikmin 2, called Pikmin Puzzle Cards (for) e+ (ピクミンパズルカードe+?, lit.: "Pikmin Puzzle Cards-e"). Each card contains a number of simple Pikmin-based mini-games, which can be played by connecting the e+ to a Game Boy Advance or Game Boy Player connected to a GameCube in which the Pikmin 2 disk is placed. Due to region locking, running these mini-games require that the GameCube, e+, and copy of Pikmin 2 to be the Japanese versions. The Game Boy Advance and Game Boy-to-GameCube connector can be from any region.
The cards come in packs with red, yellow, and blue themes. Each theme has four packs numbered 1-4, with the designs being Pikmin, Onions, Pellet Posies and Candypop Buds in respective order. Individual cards depict enemies, Pikmin or leaders. Every pack contains 5 cards, totaling to 60 cards plus 12 promotional cards. Each card contains three levels of one of three mini-games except the promotional cards which vary from one to three bonus levels. Connecting to Pikmin 2 brings up a screen showing several leaf Pikmin of the respective card color, each one representing a level. Cards can then be scanned to make some levels playable. The Pikmin grows a flower when the level is beat. The game remembers the player's progress, thus the goal is to get a flower on every level, similar to the Pikmin 2 Challenge Mode.
Pikmin Puzzle Card mini-games
Plucking Pikmin
Japanese name: ひっこぬき ピクミン?
Objective: The player must control Olimar or Louie to pluck every Pikmin from the ground.
Controls:
- D-Pad to move
- A to pluck
- B to cancel pluck
- Hold B with D-Pad to change direction
- Start to restart or quit
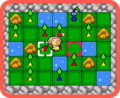
Overview: The player moves around a grid of tiles and must face the tile containing the Pikmin they want in order to pluck it. Red and Blue Pikmin will land on the tile directly behind the player while Yellows will land two tiles behind them. Some tiles contain fire, electricity, and water hazards that only Pikmin of the respective type can land on. Some electrical hazards will form a harmful current in the tiles between them, which can be disabled by having a Yellow Pikmin land on one of the hazards. No Pikmin can land on rock tiles or outside the edge of the map. The player cannot move past rocks, plucked Pikmin, or hazards (except water) thus they must find the best order to pluck the Pikmin in without getting stuck. The player is prevented from plucking a Pikmin if a rock or edge is in the way, but not if there's a hazard harmful to the Pikmin they are plucking, which will result in a death. The game is won once all Pikmin are unearthed and lost when a Pikmin dies or no moves are left. This game is played using red cards and the music is a remix of the Pikmin 2 Challenge Mode menu theme.
Marching Pikmin
Japanese name: てくてく ピクミン?
Objective: The player must control multiple Pikmin moving in the same direction to get them all to the treasure.
Controls:
- D-Pad to move
- A or B with D-Pad to look around
- Start to restart, look around, or quit
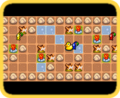
Overview: The player moves multiple Pikmin, usually of different types, around a grid of tiles. All Pikmin are controlled by the same input, thus the player must be careful to move them without having any touch hazards that are harmful to them or fall into pits. Tiles containing rocks can be used to keep some Pikmin from moving if they're in the way of the direction being moved. Some rocks have a number on them signifying how many times they can be bumped into before disappearing. All five Pikmin types are present and Candypop Buds of every type can be found throughout to change the type of a single Pikmin per plant. A Pikmin that is the same type as the Candypop Bud will waste it. Fire, electricity, water, and poison hazards will be encountered that Pikmin of the respective types can move over. Additionally, Bulborbs will occupy some tiles and will kill any Pikmin that touches them except Purples, which will kill the Bulborb. Every Pikmin moves one square at a time except Whites, which move two squares. Each level contains one of eleven treasures from the game (see below). When a Pikmin reaches the treasure, it disappears and the player no longer has to worry about it. The game is won when every Pikmin reaches the treasure and lost as soon as a Pikmin dies. This game is played using yellow cards and the music is a remix of the Awakening Wood theme.
The treasures that can be found are:
- ^ The Danger Chime present here is silver, as was the case with an early version of the game.
Connecting Pikmin
Japanese name: つなげて ピクミン?
Objective: The player must move panels around to create a path for the Pikmin so that they can reach the Research Pod.
Controls:
- D-Pad to move cursor
- A to select panel
- B to cancel selection
- Start to restart or quit
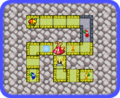
Overview: The player chooses two panels to switch places, so that the Pikmin can move over them without running into hazards or enemies. The chosen panels to switch cannot have a Pikmin, hazard, enemy, or the Research Pod on them. Once a panel has been moved once it cannot be moved again. Arrows next to Pikmin and enemies signify which direction they'll move next, and the shape of the panels determine which way they'll turn. If there's space, Pikmin and Bulborbs move one space after each panel switch, while Yellow Wollywogs move two spaces. They will change direction if they reach a dead end. All five Pikmin types are present, as are fire, electricity, water, and poison hazards. Purple Pikmin kill any enemy they run into. The game is won when all Pikmin reach the Research Pod and lost once a Pikmin dies. This game is played using blue cards and the music is a remix of the Valley of Repose theme.
List of Pikmin Puzzle Cards
| List of cards | |||||||
|---|---|---|---|---|---|---|---|
| Nr. | Name | Front | Back | Pack | Levels | ||
| Theme | Design | Game | Numbers | ||||
| Olimar | Captain Olimar | File:Gc promo 1.JPG |  |
Promotional | N/A | Plucking Pikmin | 01, 02, 03 |
| Louie | Louie | File:Gc promo 3.JPG | File:E+ back Louie.png | Promotional | N/A | Connecting Pikmin | 01, 02, 03 |
| President | The President | File:Gc promo 2.JPG |  |
Promotional | N/A | Marching Pikmin | 01, 02, 03 |
| #00 | Red Pikmin | File:R1.JPG | Red | 1 - Pikmin | Plucking Pikmin | 01, 02, 03 | |
| #00 | Yellow Pikmin |  |
 |
Yellow | 1 - Pikmin | Marching Pikmin | 01, 02, 03 |
| #00 | Blue Pikmin | File:B1.JPG | Blue | 1 - Pikmin | Connecting Pikmin | 01, 02, 03 | |
| #01 | Red Bulborb | File:R2.JPG | Red | 1 - Pikmin | Plucking Pikmin | 04, 05, 06 | |
| #02 | Hairy Bulborb |  |
|
Yellow | 1 - Pikmin | Marching Pikmin | 04, 05, 06 |
| #03 | Orange Bulborb | File:B2.JPG | Blue | 1 - Pikmin | Connecting Pikmin | 04, 05, 06 | |
| #04 | Dwarf Red Bulborb | File:R3.JPG | Red | 1 - Pikmin | Plucking Pikmin | 07, 08, 09 | |
| #05 | Snow Bulborb |  |
 |
Yellow | 1 - Pikmin | Marching Pikmin | 07, 08, 09 |
| #06 | Dwarf Orange Bulborb | File:B3.JPG | Blue | 1 - Pikmin | Connecting Pikmin | 07, 08, 09 | |
| #07 | Spotty Bulbear | File:R9.JPG | Red | 2 - Onion | Plucking Pikmin | 25, 26, 27 | |
| #08 | Dwarf Bulbear | File:R17.JPG | Red | 4 - Candypop Bud | Plucking Pikmin | 49, 50, 51 | |
| #09 | Bulborb Larva | File:Y6.JPG | |
Yellow | 2 - Onion | Marching Pikmin | 16, 17, 18 |
| #10 | Fiery Bulblax | File:R19.JPG | Red | 4 - Candypop Bud | Plucking Pikmin | 55, 56, 57 | |
| #11 | Water Dumple | File:B8.JPG | Blue | 2 - Onion | Connecting Pikmin | 22, 23, 24 | |
| #12 | Bulbmin | File:R13.JPG | Red | 3 - Pellet Posy | Plucking Pikmin | 37, 38, 39 | |
| #13 | Emperor Bulblax |  |
 |
Yellow | 4 - Candypop Bud | Marching Pikmin | 55, 56, 57 |
| #14 | Empress Bulblax | File:E+ Red4 14.png | Red | 4 - Candypop Bud | Plucking Pikmin | 58, 59, 60 | |
| #15 | Fiery Blowhog | File:R4.JPG | Red | 1 - Pikmin | Plucking Pikmin | 10, 11, 12 | |
| #16 | Watery Blowhog | File:B17.JPG | Blue | 4 - Candypop Bud | Connecting Pikmin | 49, 50, 51 | |
| #17 | Armored Cannon Beetle |  |
|
Yellow | 2 - Onion | Marching Pikmin | 19, 20, 21 |
| #18 | Puffy Blowhog | File:R15.JPG | Red | 3 - Pellet Posy | Plucking Pikmin | 43, 44, 45 | |
| #19 | Withering Blowhog | File:B18.JPG | Blue | 4 - Candypop Bud | Connecting Pikmin | 52, 53, 54 | |
| #20 | Gatling Groink |  |
|
Yellow | 3 - Pellet Posy | Marching Pikmin | 43, 44, 45 |
| #21 | Anode Beetle |  |
|
Yellow | 3 - Pellet Posy | Marching Pikmin | 34, 35, 36 |
| #22 | Iridescent Glint Beetle |  |
|
Yellow | 2 - Onion | Marching Pikmin | 25, 26, 27 |
| #23 | Doodlebug | File:B19.JPG | Blue | 4 - Candypop Bud | Connecting Pikmin | 55, 56, 57 | |
| #24 | Iridescent Flint Beetle | File:Cnp2.JPG | Promotional | N/A | All | 02 | |
| #25 | Ranging Bloyster | File:B20.JPG | Blue | 4 - Candypop Bud | Connecting Pikmin | 58, 59, 60 | |
| #26 | Toady Bloyster | File:Cnp3.JPG | Promotional | N/A | All | 03 | |
| #27 | Cloaking Burrow-nit | File:R8.JPG | Red | 2 - Onion | Plucking Pikmin | 22, 23, 24 | |
| #28 | Ravenous Whiskerpillar |  |
|
Yellow | 1 - Pikmin | Marching Pikmin | 13, 14, 15 |
| #29 | Segmented Crawbster | File:B12.JPG | Blue | 3 - Pellet Posy | Connecting Pikmin | 34, 35, 36 | |
| #30 | Beady Long Legs |  |
|
Yellow | 2 - Onion | Marching Pikmin | 28, 29, 30 |
| #31 | Raging Long Legs |  |
|
Yellow | 4 - Candypop Bud | Marching Pikmin | 49, 50, 51 |
| #32 | Man-at-Legs | File:B10.JPG | Blue | 2 - Onion | Connecting Pikmin | 28, 29, 30 | |
| #33 | Mitite | File:R6.JPG | Red | 2 - Onion | Plucking Pikmin | 16, 17, 18 | |
| #34 | Hermit Crawmad | File:R7.JPG | Red | 2 - Onion | Plucking Pikmin | 19, 20, 21 | |
| #35 | Swooping Snitchbug | File:B9.JPG | Blue | 2 - Onion | Connecting Pikmin | 25, 26, 27 | |
| #36 | Bumbling Snitchbug | File:B15.JPG | Blue | 3 - Pellet Posy | Connecting Pikmin | 43, 44, 45 | |
| #37 | Careening Dirigibug |  |
|
Yellow | 3 - Pellet Posy | Marching Pikmin | 40, 41, 42 |
| #38 | Antenna Beetle |  |
|
Yellow | 1 - Pikmin | Marching Pikmin | 10, 11, 12 |
| #39 | Lesser Spotted Jellyfloat | File:B14.JPG | Blue | 3 - Pellet Posy | Connecting Pikmin | 40, 41, 42 | |
| #40 | Greater Spotted Jellyfloat | File:R14.JPG | Red | 3 - Pellet Posy | Plucking Pikmin | 40, 41, 42 | |
| #41 | Elemental Dweevils | File:Cnp6.JPG | Promotional | N/A | All | 03 | |
| #42 | Volatile Dweevil |  |
|
Yellow | 3 - Pellet Posy | Marching Pikmin | 37, 38, 39 |
| #43 | Titan Dweevil |  |
|
Yellow | 4 - Candypop Bud | Marching Pikmin | 58, 59, 60 |
| #44 | Female Sheargrub | File:B11.JPG | Blue | 3 - Pellet Posy | Connecting Pikmin | 31, 32, 33 | |
| #45 | Male Sheargrub |  |
|
Yellow | 3 - Pellet Posy | Marching Pikmin | 31, 32, 33 |
| #46 | Shearwig | File:R11.JPG | Red | 3 - Pellet Posy | Plucking Pikmin | 31, 32, 33 | |
| #47 | Yellow Wollywog | File:B4.JPG | Blue | 1 - Pikmin | Connecting Pikmin | 10, 11, 12 | |
| #48 | Wollywog | File:B5.JPG | Blue | 1 - Pikmin | Connecting Pikmin | 13, 14, 15 | |
| #49 | Queen Candypop Bud | File:Cnp4.JPG | Promotional | N/A | All | 01 | |
| #50 | Burrowing Snagret | File:B6.JPG | Blue | 2 - Onion | Connecting Pikmin | 16, 17, 18 | |
| #51 | Pileated Snagret | File:R12.JPG | Red | 3 - Pellet Posy | Plucking Pikmin | 34, 35, 36 | |
| #52 | Honeywisp |  |
|
Yellow | 4 - Candypop Bud | Marching Pikmin | 52, 53, 54 |
| #53 | Unmarked Spectralids | File:R18.JPG | Red | 4 - Candypop Bud | Plucking Pikmin | 52, 53, 54 | |
| #54 | Main Candypop Buds | File:Cnp1.JPG | Promotional | N/A | All | 01 | |
| #55 | Violet Candypop Bud |  |
Promotional | N/A | All | 01 | |
| #56 | Ivory Candypop Bud | File:Fam promo 2f.JPG | File:E+ back WhiteCandyPopBud.png | Promotional | N/A | All | 02 |
| #57* | Wogpole | File:Cnp5.JPG | Promotional | N/A | All | 02 | |
| #58 | Creeping Chrysanthemum | File:R10.JPG | Red | 2 - Onion | Plucking Pikmin | 28, 29, 30 | |
| #59 | Skitter Leaf | File:B7.JPG | Blue | 2 - Onion | Connecting Pikmin | 19, 20, 21 | |
| #60 | Breadbug |  |
|
Yellow | 4 - Candypop Bud | Marching Pikmin | 46, 47, 48 |
| #61 | Giant Breadbug | File:B16.JPG | Blue | 4 - Candypop Bud | Connecting Pikmin | 46, 47, 48 | |
| #62 | Mamuta |  |
|
Yellow | 2 - Onion | Marching Pikmin | 22, 23, 24 |
| #63 | Waterwraith | File:R16.JPG | Red | 4 - Candypop Bud | Plucking Pikmin | 46, 47, 48 | |
| #64 | Ujadani | File:B13.JPG | Blue | 3 - Pellet Posy | Connecting Pikmin | 37, 38, 39 | |
| #65 | Pellet Posy | File:Fam promo 3f.JPG | File:E+ back PelletPosy.png | Promotional | N/A | All | 03 |
| #66 | Decorated Cannon Beetle | File:R5.JPG | Red | 1 - Pikmin | Plucking Pikmin | 13, 14, 15 | |
* There is an error in card #57 in that it is actually labeled as card #46. This results in two #46 cards and no #57.
Pikmin Puzzle Card instruction pamphlet
An instruction pamphlet is located in every booster pack of the Pikmin Puzzle Cards, as well in every Japanese copy of Pikmin 2. The pamphlet unfolds to explain how to use the e+ cards, and shows images of the other booster packs one can collect.
Pamphlet 1
The first instruction pamphlet comes with Pikmin 2, as well as all Pikmin and Onion booster packs.
- Puzzlecard instruction 1 front.png
Front.
- Puzzlecard instruction 1 back.png
Back.
Pamphlet 2
The second instruction pamphlet is an updated version of the first, and is located in all Pellet Posy and Candypop Bud booster packs.
- Puzzlecard instruction 2 front.png
Front.
- Puzzlecard instruction 2 back.png
Back.
Gameplay videos
{{#ev:youtube|AEw1QOyPuGM|512}} {{#ev:youtube|u0oimNWsEyw|512}} {{#ev:youtube|f7f-5QEFrRQ|512}}
Animal Crossing Pikmin design card
The original Animal Crossing for the GameCube made maximum use of Game Boy Advance and e-reader connectivity. The game featured e-reader card support in both America and Japan. Among the e-reader cards are character cards, mini-game cards, and design cards. One of the design cards features a Pikmin pattern. After plugging a Game Boy with an e-reader attached to the GameCube, then navigating to the Mable Sisters' store on the GameCube game and selecting the e-reader option when speaking to Mable, the game will allow scanning the card and receive the design in-game. This design can be then be pasted on various objects, such as clothing, umbrellas, and as a wallpaper or flooring of the player's house. The design is a repeatable pattern of a Red, a Yellow, and a Blue Pikmin as well a Pikmin stem leaf.
- AnimalCrossing e-reader PikminPattern front.png
Front of the card.
- AnimalCrossing e-reader PikminPattern back.png
Back of the card.
Gallery
|
This article or section is in need of more images. |
- Pikmin2E-reader01sm.jpg
An example of a pack of Pikmin e-Reader cards.
A screenshot of the "Plucking Pikmin" game.
A screenshot of the "Marching Pikmin" game.
A screenshot of the "Connecting Pikmin" game.

A sprite of Captain Olimar plucking a Red Pikmin.

A sprite of a Yellow Pikmin.
- 320px-Pikmin2Ereader.png
The e-Reader bonus menu.

The mini-game selection screen in English.
- B1.JPG
Example of an e-card, the Blue Pikmin.


Trivia
- The sprites shown in these mini-games are the only official Pikmin sprites to be in a Pikmin game. All other sprites of the Pikmin series are included inside games from other franchises.