Pileated Snagret
| |||
|---|---|---|---|
| Appears in | Pikmin 2 | ||
| Scientific name | Shiropedes ambulatria | ||
| Family | Snavian | ||
| Areas | None | ||
| Caves | Snagret Hole, Hole of Heroes | ||
| Challenge Mode stages | Rumbling Grotto | ||
| 2-Player Battle stages | None | ||
| Attacks | Eat Pikmin | ||
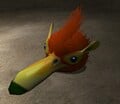
The Pileated Snagret (アカヘビガラス?, lit.: "Red Snake Crow") is an enemy found only in Pikmin 2. It is the most powerful known species of the snavian family. It heavily resembles the Burrowing Snagret, though it has a few key differences: It has a taller, green-scaled body, a larger head that is covered with red-orange feathers, and a more curved beak with a green tip at the end.
It is called "Pileated" because it has a crest of feathers on its head. Its eyes are also covered by some ear-like features. Compared to the Burrowing Snagret, this Snagret is definitely more powerful, has a lot more health, and is able to walk on the ground.
Stats[edit]
| Weight | Max. carriers |
Seeds | Value | Health | Regen. |
|---|---|---|---|---|---|
| 5 | 10 | 25[note 1] | 5000 | No |
- ^ This enemy cannot be delivered to Onions in-game. This information is obtained from the game files.
Behavior[edit]
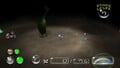
The Pileated Snagret shares a lot of behavior with the Burrowing Snagret. When idle, the Pileated Snagret will be underground, only emerging when Pikmin or a leader enters its territory. Once they've encroached on its territory, it will quickly emerge beak first before struggling to pull its body fully out of the ground, similar to Burrowing Snagrets. What splits them apart is that the Pileated Snagret fully leaves the ground, jumping up and landing on its singular foot. If its prey is far away, it will hop towards them at a generally swift speed, unlike the Burrowing Snagret, which will just watch. If its prey has managed to get far enough away, the Pileated Snagret will simply just dive back into the ground.
If it is being attacked during this sequence, it will very quickly dive back into the floor before emerging somewhere else, the sequence happening once again. If it isn't being attacked during this sequence, or not enough Pikmin are attacking it, it will attempt to eat Pikmin.
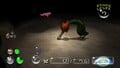
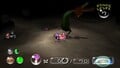
The Pileated Snagret is able to attack Pikmin by quickly pecking them with its beak. It has a deceptively large range of attack, and when Pikmin are caught in its beak, it will promptly swallow them. Snagrets prefer to grab multiple Pikmin at a time, so it will only swallow after pecking the floor a few times. If it misses its first peck, it will stop its attack. It is able to grab 3 Pikmin during 1 attack cycle; it will also stop attacking. When it is being attacked, it will rock its head back and forth. It does this four times in a row, followed by an attack if Pikmin are in pecking range.
During its death animation, the Snagret will violently scream into the sky before its torso quickly explodes (which is harmless). It explodes from the bottom up, ending at the head. The force from the explosion causes its head to briefly go airborne, doing a forward flip, before falling back to the floor as a collectable corpse. The explosion also causes small chunks of scales and feathers to fly out of its body before disappearing.
Locations[edit]
Caves[edit]
- Snagret Hole
- One can be seen on sublevel 7, holding the Justice Alloy.
- Hole of Heroes
- One can be seen on sublevel 4, holding the Lustrous Element.
Challenge Mode[edit]
- Rumbling Grotto
- One can be seen on sublevel 2, holding The Key.
Strategy[edit]
|
The following article or section contains guides. |
This Snagret's height makes it very hard to hurt it by throwing Pikmin onto it. The Pileated Snagret is also very sensitive to attacks, which means that it will burrow back into the ground before your Pikmin can do much damage. However, Purple Pikmin are the best choice, because it is still possible to throw them on the creature with good aim, but an ultra-spicy spray is strongly advised so that they can run fast enough to dodge the Snagret’s attacks. The reason Purple Pikmin are great here is that when the creature emerges from the ground, Purple Pikmin will make the Snavian 'bounce', like in most cases of enemies, and in the small seconds of those bounces. The Pikmin attached to the Snavian will deal damage, and then it will be more likely to return to the ground without eating any Pikmin. Rarely, it may even get stunned, making it extremely vulnerable. When this tactic is repeated, it should be easy to defeat the beast. As a side note, its cousin, the Burrowing Snagret, can't be stunned because it is attached to the ground.
Though less effective than Purple Pikmin but worthy nevertheless, one could use Yellow Pikmin. As said earlier, the Pileated Snargret is a tall enemy, making its head hard to reach. Thus, using Yellow Pikmin can eliminate this problem. Take a maneuverable group of Yellow Pikmin and spray them with ultra-spicy spray; when the enemy comes out, toss them at its head from behind. If done right, your Yellow Pikmin will land on its head, and it will be forced to go underground without eating anything. They won't cause as much damage at once compared to Purple Pikmin, so this will likely need to done three to five times. But, because your Pikmin are going to be hitting their mark more easily, this could prove to be a more useful strategy.
Another, safer, yet more time-consuming strategy, is to run around and wait for the Pileated Snagret to emerge. Every now and then, the Snagret will have trouble coming out of the ground (similar to the Burrowing Snagret). Toss the Pikmin on it during this time. When it fully emerges, it'll be too weak to attack, and burrow underground again. Repeat until the creature dies. Of course, the creature can always be petrified when the head is emerging, even when it is not having trouble getting out, making it possible to attack the head easily.
When it leaps quickly out of the ground, it is possible to throw Pikmin onto it safely while it's balancing itself. Note that you have to be precise with your aim. Alternatively, you could throw a Pikmin onto it from a distance, but be wary of the fact that it will follow you, so you will need to throw quickly. Also, if you only throw one or two Pikmin on it, it will still be able to attack you once before burrowing back into the ground.
A time-consuming and risky yet hilarious method is to bring a group of 100 Pikmin in, spray them with ultra-spicy spray, and wait for the Snagret to get stuck in the ground before throwing a few Pikmin at its head and dismissing the rest. The entire squad will rush it as it gets out of the ground, forcing it back underground almost immediately. The ultra-spicy spray will let the Pikmin react fast enough to catch the Snagret the next time it pops out of the ground and attack it even if it doesn't get stuck, forcing it back underground every time. This can be done up to three times before needing to re-buff your Pikmin with more spray. Though the inflicted damage is minimal, it will force the Snagret to constantly loop between popping out and diving back underground, which will almost always guarantee your squad survives assuming you have at least four or more ultra-spicy sprays.
Notes
Olimar's notes
Louie's notes
Pikmin 2 Nintendo Player's Guide[edit]
“You'll encounter the Pileated Snagret on the final floor of the Snagret Hole. It's nastier than the Burrowing Snagret, and it hops, too. Toss Pikmin at the creature's noggin, call them after they're thrown, and keep your troops away from the boss's beak.”
Glitches[edit]
|
To do: Document these in the glitches article. |
On occasion, this creature and the Burrowing Snagret may still remain alive with what appears to be little or no health. There are two major ways that this can take place: firstly, if the Snagret is brought to 0 health while still in either of its emerging animations, the creature will not proceed to die until it finishes the animation. Secondly, if the Snagret is brought to zero health while in the middle of its delving animation, the creature won't die and will successfully dive into the ground. Upon re-emerging, the Snagret will be left on 1 health.
If a Pikmin stands directly where the Pileated Snagret dives into the ground, the Pikmin may be shoved through the ground collision, and will die with the sound as if it were thrown off into an abyss. Sometimes the Pikmin will make the sound, but will not die. This is most likely because it was shoved into the ground, and then knocked back up by the Snagret's foot shortly afterwards, saving it.
On occasion, while fighting the Pileated Snagret with Purple Pikmin, the game may crash. This appears to take place when a Purple Pikmin stuns the Snagret as it grabs for the third time while attacking.
It is possible for the Pileated Snagret to get stuck in the ground and be unable to emerge in the Valley of Repose version of the Piklopedia. This happens randomly and rarely, and can be very hard to reproduce. It's also possible to get the Snagret to get stuck above-ground in the same area. This happens when one lures the Snagret off of the hill it starts on via well placed Pikpik carrots, and then proceeds to leave it alone. The Snagret may attempt to go back up on the hill to re-burrow, but will get caught on a sharp wall and infinitely jump towards it.
Technical information[edit]
| Pikmin 2 technical information (?) | |||
|---|---|---|---|
| Internal name | snakewhole
| ||
| Global properties (List) | |||
| ID | Japanese comment | Property | Value |
| s000 | friction(not used) | Friction | 0.5 |
| s001 | wallReflection | Unknown (wall bounce speed multiplier?) | 0.5 |
| s002 | faceDirAdjust | Unknown | 0.25 |
| s003 | accel | Acceleration | 0.05 |
| s004 | bounceFactor | Unknown (bounce when it hits the ground?) | 0.3 |
| fp00 | ライフ | HP | 5000 |
| fp01 | マップとの当り | Unknown (related to slopes) | 20 |
| fp02 | ダメージスケールXZ | Horizontal damage scale | 0.025 |
| fp03 | ダメージスケールY | Vertical damage scale | 0.025 |
| fp04 | ダメージフレーム | Damage scale duration | 0.4 |
| fp05 | 質量 | Unknown (weight?) | 0.0001 |
| fp06 | 速度 | Move speed | 1000 |
| fp08 | 回転速度率 | Rotation acceleration | 0.1 |
| fp09 | テリトリー | Territory radius | 380 |
| fp10 | ホーム範囲 | "Home" radius | 100 |
| fp11 | プライベート距離 | "Private" radius | 100 |
| fp12 | 視界距離 | Sight radius | 400 |
| fp13 | 視界角度 | FOV | 90 |
| fp14 | 探索距離 | Unknown (exploration radius?) | 0 |
| fp15 | 探索角度 | Unknown (exploration angle?) | 0 |
| fp16 | 振り払い率 | Successful shake rate | 1 |
| fp17 | 振り払い力 | Shake knockback | 200 |
| fp18 | 振り払いダメージ | Shake damage | 1 |
| fp19 | 振り払い範囲 | Shake range | 40 |
| fp20 | 攻撃可能範囲 | Unknown (shock attack max range?) | 0 |
| fp21 | 攻撃可能角度 | Unknown (shock attack max angle?) | 0 |
| fp22 | 攻撃ヒット範囲 | Unknown (attack hit range?) | 0 |
| fp23 | 攻撃ヒット角度 | Unknown (attack hit angle?) | 0 |
| fp24 | 攻撃力 | Attack damage | 10 |
| fp25 | 視界高 | Unknown (height visibility?) | 100 |
| fp26 | 探索高 | Unknown (exploration height?) | 0 |
| fp27 | ライフの高さ | HP wheel height | 50 |
| fp28 | 回転最大速度 | Rotation speed | 10 |
| fp29 | 警戒時間 | Unknown (warning time?) | 0 |
| fp30 | 警戒ライフ | Unknown | 0 |
| fp31 | ライフ回復率 | Regeneration rate | 0 |
| fp32 | LOD半径 | Off-camera radius | 225 |
| fp33 | マップとのあたりポリゴンの選定 | Collision processing radius | 130 |
| fp34 | ピクミンとのあたり | Pikmin damage radius | 5 |
| fp35 | 石化時間 | Petrification duration | 1 |
| fp36 | ヒップドロップダメージ | Purple Pikmin drop damage | 50 |
| fp37 | 地震気絶確立 | Purple Pikmin stun chance | 0.01 (1%) |
| fp38 | 地震気絶時間 | Purple Pikmin stun time | 5 |
| ip01 | 振り払い打撃A | Shake mode 1 – hit count | 15 |
| ip02 | 振り払い張付1 | Shake mode 1 – Pikmin requirement | 4 |
| ip03 | 振り払い打撃B | Shake mode 2 – hit count | 25 |
| ip04 | 振り払い張付2 | Shake mode 2 – Pikmin requirement | 8 |
| ip05 | 振り払い打撃C | Shake mode 3 – hit count | 30 |
| ip06 | 振り払い張付3 | Shake mode 3 – Pikmin requirement | 12 |
| ip07 | 振り払い打撃D | Shake mode 4 – hit count | 35 |
| Specific properties | |||
| ID | Japanese comment | Property | Value |
| fp01 | 通常出現率 | Regular unburrow chance (not stuck) | 0.6 (60%) |
| fp11 | 潜る迄の時間 | Time it spends idling above ground before burrowing | 0.5 |
| fp12 | 地中での時間 | Time it spends underground before reappearing | 2.5 |
| fp21 | 白ピクミン | White Pikmin poison damage | 400 |
Other information[edit]
- Size: Body length: approx. 400mm, as per the e-card
- Pikmin 2 Piklopedia number: #75
- Musical theme: Common boss battle
Naming[edit]
- See more: Snavian family#Naming.
- Common name: Pileated Snagret. "Pileated" means "crest", or the tuft of feathers on a bird's head in this case. It might be called this because, when compared to the Burrowing Snagret, its head feathers are of a strong red color, or the fact that it has a more prominent crest of feathers on its head.
- Japanese nickname: アカヘビガラス?, lit.: "Red Snake Crow". It is the same as the Burrowing Snagret's name, but with "red" before it.
- Japanese name: ヒデリガミガラス?, lit.: "Hiderigami Crow". Like a Hiderigami, the Pileated Snagret has only one foot, which it uses to quickly move around.
- Scientific name: Shiropedes ambulatria. Ambulatria is similar to ambulatura, Latin word for "walking". This is because this Snagret can walk on the ground by hopping, unlike to the Burrowing Snagret.
- Internal names: Internally, it is called
snakewhole, which is a change on the Burrowing Snagret's internal name in Pikmin 2,snakecrow. It is called "whole" because unlike the game's Burrowing Snagret, one can see its whole body. - Prerelease: None.
Names in other languages[edit]
| Language | Name | Meaning |
|---|---|---|
| アカヘビガラス? Aka Hebi Garasu |
Red Snake Crow | |
| Gekuifde sleiger | Crested snagret | |
| Snabrek monopède | Monopedal snavian | |
| Snabrek Monopède (GameCube and Wii) Snabrek monopède (Switch) |
Monopedal Snavian (GameCube and Wii) Monopedal snavian (Switch) | |
| Bauchiger Schnapper | Bulbous Snagret | |
| 빨강뱀까마귀 Ppalgang-Baem-Kkamagwi |
Red Snake Crow | |
| Tagarote encopetado | Tufted barbary |
Gallery[edit]
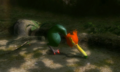
A Pileated Snagret in the Piklopedia.
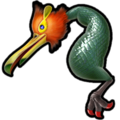
The Piklopedia icon of the Pileated Snagret in the Nintendo Switch version of Pikmin 2.
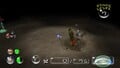
An idle Pileated Snagret after it emerges from the ground.
A Pileated Snagret emerging.
A Pileated Snagret burrowing back into the ground.
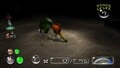
A Pileated Snagret attacking Louie.
A Pileated Snagret screeching as it dies.
The corpse of a Pileated Snagret.
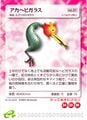
The Pileated Snagret's e-card, #51 (12th red card).


Trivia[edit]
- When the creature dies, its body shrinks while the head remains the same size. Unlike other enemies, this is much harder to see without camera hacks and requires precise positioning of the camera to see. This also happens with the Burrowing Snagret, Toady Bloyster, and Ranging Bloyster, but to a less drastic extent.
- In Pikmin 2, this enemy and the Burrowing Snagret shake the least when damaged, i.e. their model stretches the least amount of all enemies.
- In Pikmin 2, just like the Burrowing Snagret, its full eating animation can't ever be seen in the Piklopedia due to the carrots exploding and disappearing instantly upon being pecked.
The Pileated Snagret's body, shrunk down after defeat. To the right is its normal-sized head.
Ditto, a better view via camera hacks.
