Scornet Maestro: Difference between revisions
No edit summary |
BusterBeans (talk | contribs) m (Reverted the article to a previous state to avoid confusion.) |
||
| Line 12: | Line 12: | ||
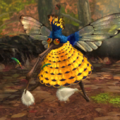
The '''Scornet Maestro''' ({{j|タテゴトハチスズメ|Tategoto Hachi Suzume|Harp Bee Sparrow}}) is a boss in {{p3}} and the fourth major boss encountered in [[Story Mode]], at the [[Twilight River]]. It quickly abducts [[Louie]] before the player can reach him. It resembles a queen bee of sorts, since it is able to command a swarm of [[Scornet]]s using its harp-like beak. This beak will even produce harp music when each attack is happening. | The '''Scornet Maestro''' ({{j|タテゴトハチスズメ|Tategoto Hachi Suzume|Harp Bee Sparrow}}) is a boss in {{p3}} and the fourth major boss encountered in [[Story Mode]], at the [[Twilight River]]. It quickly abducts [[Louie]] before the player can reach him. It resembles a queen bee of sorts, since it is able to command a swarm of [[Scornet]]s using its harp-like beak. This beak will even produce harp music when each attack is happening. | ||
The Scornet retinue is used to attack the [[leader]]s and their [[Pikmin family|Pikmin]]. The | The Scornet retinue is used to attack the [[leader]]s and their [[Pikmin family|Pikmin]]. The boss relies heavily on the Scornets, as it has no way of attacking. | ||
It cannot be attacked while its swarm is surrounding it, requiring the leaders to do so when the swarm becomes absent after one of its coordinated attacks. Once the creature is defeated, it will drop the [[Seed Hive]] and Louie, and all one hundred of the Scornets it commanded will instantly die. | It cannot be attacked while its swarm is surrounding it, requiring the leaders to do so when the swarm becomes absent after one of its coordinated attacks. Once the creature is defeated, it will drop the [[Seed Hive]] and Louie, and all one hundred of the Scornets it commanded will instantly die. | ||
| Line 38: | Line 38: | ||
==Defeat Bosses!== | ==Defeat Bosses!== | ||
In [[Defeat Bosses!]], the player can refight the Scornet Maestro. The time limit is | In [[Defeat Bosses!]], the player can refight the Scornet Maestro. The time limit is 10 minutes. The only exit of the arena is blocked off by a "keep out" sign. The player can use Alph (player 1's starting leader), Brittany (player 2's starting leader), and Charlie. Their order in ''Pikmin 3'' is Alph, Brittany, Charlie, and in ''Pikmin 3 Deluxe'' the [[action menu|order]] is Brittany, Charlie, Alph. 100 Pikmin are on the field in this mission, but only 50 start in the player's squad: 30 [[Winged Pikmin]] and 20 [[Red Pikmin]]. Around the edges of the arena are groups of buried Pikmin. There are two groups of 10 Winged Pikmin, two groups of 10 Red Pikmin, and one group of 10 [[Rock Pikmin]]. The Pikmin in the squad from the start all have the leaf [[maturity]], while the buried Pikmin have a mix of bud and flower maturities. If at any point during this fight all of the player's Winged Pikmin are lost, the game will display a message stating that it is impossible to damage the boss, and will ask if the player wants to give up or continue regardless. | ||
The following table lists what medal the player gets according to the time they take:<ref>The values in the Prima Guide are incorrect. These are the values used in the game's files, as per <code>content/CMCmn/system/mission_set/miset_misBoss4.szs/misBoss4.txt</code>: <pre># RuleData | The following table lists what medal the player gets according to the time they take:<ref>The values in the Prima Guide are incorrect. These are the values used in the game's files, as per <code>content/CMCmn/system/mission_set/miset_misBoss4.szs/misBoss4.txt</code>: <pre># RuleData | ||
| Line 67: | Line 67: | ||
The Scornet Maestro itself is harmless and has no direct way of damaging Pikmin. However, it commands the Scornets to attack for it with its harp-like mouth. All attacks by the Scornets have the same effect: the Pikmin caught in the attack will be held by the Scornets for a certain amount of time, and if not freed, will be killed. | The Scornet Maestro itself is harmless and has no direct way of damaging Pikmin. However, it commands the Scornets to attack for it with its harp-like mouth. All attacks by the Scornets have the same effect: the Pikmin caught in the attack will be held by the Scornets for a certain amount of time, and if not freed, will be killed. | ||
*The Maestro will order the Scornets to get into a cone formation and will aim at the active leader. Simply move around a lot to dodge. | *The Scornet Maestro will order the Scornets to get into a cone formation and will aim at the active leader. Simply move around a lot to dodge. | ||
*The Maestro will order the Scornets to get into lines, and each line will proceed to aim at the active leader. Walk around the outer edge of the arena to dodge. | *The Scornet Maestro will order the Scornets to get into lines, and each line will proceed to aim at the active leader. Walk around the outer edge of the arena to dodge. | ||
*The Maestro will order the Scornets to form a circle around the active leader. Have a few Pikmin kill some Scornets to escape the circle. | *The Scornet Maestro will order the Scornets to form a circle around the active leader. Have a few Pikmin kill some Scornets to escape the circle. | ||
If any Pikmin are captured, the Scornets will form a circle around the Maestro and will eat them after a few seconds. Throw Pikmin at the Scornets to save them. | If any Pikmin are captured, the Scornets will form a circle around the Scornet Maestro and will eat them after a few seconds. Throw Pikmin at the Scornets to save them. | ||
===Standard strategy=== | ===Standard strategy=== | ||
[[File:P3 Two Scornets Screenshot.png|thumb|left|129px|Two Scornets.]] | [[File:P3 Two Scornets Screenshot.png|thumb|left|129px|Two Scornets.]] | ||
The strategy is mainly to defend your Pikmin from the Scornets and then attack the Maestro. As the battle progresses, it will create different formations with its retinue in an attempt to destroy your swarm. Note that this boss completely relies on its own swarm to attack, possessing no offensive moves of its own besides shaking off Pikmin. | The strategy is mainly to defend your Pikmin from the Scornets and then attack the Scornet Maestro. As the battle progresses, it will create different formations with its retinue in an attempt to destroy your swarm. Note that this boss completely relies on its own swarm to attack, possessing no offensive moves of its own besides shaking off Pikmin. | ||
The first formation is a gigantic cone-like pattern and is the easiest to avoid. The attack is simple to dodge: just wait for the formation to strike and strafe around the swarm. If any Pikmin are captured by the swarm, it will move around the boss in a circle formation, holding the captured Pikmin. The swarm must be attacked swiftly to free the Pikmin. If the Pikmin aren't released, they will eventually die. | The first formation is a gigantic cone-like pattern and is the easiest to avoid. The attack is simple to dodge: just wait for the formation to strike and strafe around the swarm. If any Pikmin are captured by the swarm, it will move around the boss in a circle formation, holding the captured Pikmin. The swarm must be attacked swiftly to free the Pikmin. If the Pikmin aren't released, they will eventually die. | ||
| Line 84: | Line 84: | ||
The third formation has the swarm forming a circle surrounding you, slowly closing in. If any Pikmin are left behind inside the circle, they will be captured. You need to use your Pikmin to create gaps in the circle to allow your group to escape. To avoid leaving Pikmin behind, use an [[ultra-spicy spray]] to create a hole quickly and get out faster. | The third formation has the swarm forming a circle surrounding you, slowly closing in. If any Pikmin are left behind inside the circle, they will be captured. You need to use your Pikmin to create gaps in the circle to allow your group to escape. To avoid leaving Pikmin behind, use an [[ultra-spicy spray]] to create a hole quickly and get out faster. | ||
If all the Maestro's Scornets are killed, it will use a period during which it would normally create an attack formation to summon more onto the field from the trees in the background. | If all the Scornet Maestro's Scornets are killed, it will use a period during which it would normally create an attack formation to summon more onto the field from the trees in the background. | ||
Once any of the formations are complete, the swarm will temporarily leave | Once any of the formations are complete, the swarm will temporarily leave the boss, giving you a chance to attack it. To strike it, throw Pikmin at it, preferably Winged Pikmin. Once enough Pikmin are latched onto it, it will fall to the ground, allowing any ground-based Pikmin to swarm it as well. When it dies, it will drop a large fruit, alongside [[Louie]]. Its body, alongside the corpses of its swarm, can be taken back to the Onion. As with all bosses in the game, the Scornet Maestro's corpse produces 50 Pikmin. | ||
Due to the way the Scornets dive to attack, it is possible to avoid their primary attack, the cone formation, by simply being really close to the walls that surround the arena. When the Scornets dive in, they quickly turn back up to be able to exit the arena, and won't dive low enough to catch Pikmin. This is not fool-proof though, as the Scornets can still catch some Winged Pikmin that are flying a bit too far from the walls. | Due to the way the Scornets dive to attack, it is possible to avoid their primary attack, the cone formation, by simply being really close to the walls that surround the arena. When the Scornets dive in, they quickly turn back up to be able to exit the arena, and won't dive low enough to catch Pikmin. This is not fool-proof though, as the Scornets can still catch some Winged Pikmin that are flying a bit too far from the walls. | ||
===Expert strategy=== | ===Expert strategy=== | ||
The Maestro will only attempt to attack the leader that is currently active. This can be used to an advantage by having an unoccupied leader stand away from another leader who has all the Pikmin. When the Maestro begins an attack, it will lock on the current leader, and will not switch targets, meaning that at this point, you can swap from the defenseless leader to one with Pikmin, and attack it by swarming it with Winged Pikmin. Once it falls to the ground, pelt the creature with Rock Pikmin to rapidly diminish its health. The lonesome leader will receive damage from the Scornet attacks, but unless their [[health]] was low at the start of the battle, they will be able to endure the strikes without much of a problem. | The Scornet Maestro will only attempt to attack the leader that is currently active. This can be used to an advantage by having an unoccupied leader stand away from another leader who has all the Pikmin. When the Scornet Maestro begins an attack, it will lock on the current leader, and will not switch targets, meaning that at this point, you can swap from the defenseless leader to one with Pikmin, and attack it by swarming it with Winged Pikmin. Once it falls to the ground, pelt the creature with Rock Pikmin to rapidly diminish its health. The lonesome leader will receive damage from the Scornet attacks, but unless their [[health]] was low at the start of the battle, they will be able to endure the strikes without much of a problem. | ||
Due to the scripting of this boss battle, this process must be done at least four times to take down the boss. If the Scornets are attacked before charging and several are killed without any Pikmin being captured, the time between each attack is significantly reduced. This strategy will allow for a quick defeat in under three minutes. | Due to the scripting of this boss battle, this process must be done at least four times to take down the boss. If the Scornets are attacked before charging and several are killed without any Pikmin being captured, the time between each attack is significantly reduced. This strategy will allow for a quick defeat in under three minutes. | ||
In [[Mission Mode]] with two players, the boss will only ever target the first player's leader. It is not known how the boss targets players during | In [[Mission Mode]] with two players, the boss will only ever target the first player's leader. It is not known how the boss targets players during 2 player story mode in ''Deluxe''. | ||
==Badges== | ==Badges== | ||
In {{p3d}}, there is a [[badge (Pikmin 3 Deluxe)|badge]] the player can gain | In {{p3d}}, there is a [[badge (Pikmin 3 Deluxe)|badge]] the player can gain from the Scornet Maestro: | ||
*'''Decomposer''': Defeating the Scornet Maestro. | *'''Decomposer''': Defeating the Scornet Maestro. | ||
<gallery> | <gallery> | ||
Badge 13 maestro.png|Decomposer. The badge shows the | Badge 13 maestro.png|Decomposer. The badge shows the creature. | ||
</gallery> | </gallery> | ||
| Line 154: | Line 154: | ||
<gallery> | <gallery> | ||
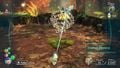
Scornet Maestro.jpg|The first encounter of the Scornet Maestro. | Scornet Maestro.jpg|The first encounter of the Scornet Maestro. | ||
ScornetMaestroAppear.png|The Maestro roaring as it first appears. | ScornetMaestroAppear.png|The Scornet Maestro roaring as it first appears. | ||
Scornet Maestro attack no.1.jpg|Cone formation. | Scornet Maestro attack no.1.jpg|Cone formation. | ||
Scornet Maestro attack no.2.jpg|Line formation. | Scornet Maestro attack no.2.jpg|Line formation. | ||
| Line 160: | Line 160: | ||
Bee Boss.jpg|Captured Pikmin. | Bee Boss.jpg|Captured Pikmin. | ||
Maestro attacked.jpg|The creature being weighed down by the Winged Pikmin. | Maestro attacked.jpg|The creature being weighed down by the Winged Pikmin. | ||
Scornet Maestro frontal view.jpg|Front view of the Maestro. | Scornet Maestro frontal view.jpg|Front view of the Scornet Maestro. | ||
ScornetMaestroDefeat.png|The Maestro defeated. | ScornetMaestroDefeat.png|The Scornet Maestro defeated. | ||
Beee.png|The deceased Maestro surrounded by the Seed Hive and Louie. | Beee.png|The deceased Scornet Maestro surrounded by the Seed Hive and Louie. | ||
Scornet Maestro dead.jpg|The corpses of the Maestro and its subordinates. | Scornet Maestro dead.jpg|The corpses of the Scornet Maestro and its subordinates. | ||
ScornetMaestroDataFile.jpg|The data file on the creature. | ScornetMaestroDataFile.jpg|The data file on the creature. | ||
Scornet Maestro DB icon.png|Defeat Bosses! icon. | Scornet Maestro DB icon.png|Defeat Bosses! icon. | ||
| Line 170: | Line 170: | ||
==Trivia == | ==Trivia == | ||
*The Scornet Maestro is the second airborne boss to appear in the series, the first being the [[Vehemoth Phosbat]]; both appear in the same game. | *The Scornet Maestro is the second airborne boss to appear in the series, the first being the [[Vehemoth Phosbat]]; both appear in the same game. | ||
*The Maestro is the smallest boss in the ''Pikmin'' series. | *The Scornet Maestro is the smallest boss in the ''Pikmin'' series. | ||
*The Maestro is similar to a boss in another Nintendo game, ''[[metroid:Metroid Prime 3: Corruption|Metroid Prime 3: Corruption]]'', [[metroid:Helios|Helios]]. Both Helios and the Maestro are smaller bosses (in comparison to other bosses) that use smaller minions to both protect themselves and attack the player. | *The Scornet Maestro is similar to a boss in another Nintendo game, ''[[metroid:Metroid Prime 3: Corruption|Metroid Prime 3: Corruption]]'', [[metroid:Helios|Helios]]. Both Helios and the Scornet Maestro are smaller bosses (in comparison to other bosses) that use smaller minions to both protect themselves and attack the player. | ||
*During its battle, even if the player [[Lock-on|locks-on]] the Scornets, it will lock-on to the Maestro instead. | *During its battle, even if the player [[Lock-on|locks-on]] the Scornets, it will lock-on to the Scornet Maestro instead. | ||
*Interestingly, when the Maestro is defeated, not only will the | *Interestingly, when the Scornet Maestro is defeated, not only will the Scornet Maestro's corpse fall, but all the Scornets as well, which can be brought back to the [[Onion]]. Normally, Scornets are not retrievable when defeated. | ||
*The Maestro can command up to one hundred Scornets at the same time, much like the player's leaders can control up to the [[Pikmin limit|same amount of Pikmin]]. | *The Scornet Maestro can command up to one hundred Scornets at the same time, much like the player's leaders can control up to the [[Pikmin limit|same amount of Pikmin]]. | ||
*If the boss loses all of its health while in mid-air, it will drop to the ground, even if no Pikmin are latched on to it. Only when it is on the ground can its death sequence start. | *If the boss loses all of its health while in mid-air, it will drop to the ground, even if no Pikmin are latched on to it. Only when it is on the ground can its death sequence start. | ||
*Although the Maestro is a queen – as stated in Olimar's reports, and in its name in certain languages – it has a {{w|hair-pencil}}, a furry appendage on the abdomen that releases pheromones used by ''male'' butterflies to attract mates. The Scornet Maestro instead uses those pheromones to control the Scornets, as queen bees do without hair-pencils. | *Although the Scornet Maestro is a queen – as stated in Olimar's reports, and in its name in certain languages – it has a {{w|hair-pencil}}, a furry appendage on the abdomen that releases pheromones used by ''male'' butterflies to attract mates. The Scornet Maestro instead uses those pheromones to control the Scornets, as queen bees do without hair-pencils. | ||
==See also== | ==See also== | ||
Revision as of 11:11, September 25, 2022
| |||
|---|---|---|---|

| |||
| Appears in | Pikmin 3 | ||
| Scientific name | Spourgitis advenus | ||
| Family | Huntinpeck | ||
| Areas | Twilight River | ||
| Mission Mode Collect Treasure! stages | None | ||
| Mission Mode Battle Enemies! stages | None | ||
| Side Story days | None | ||
| Bingo Battle stages | None | ||
| Attacks | Order Scornets at Pikmin | ||
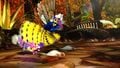
The Scornet Maestro (タテゴトハチスズメ?, lit.: "Harp Bee Sparrow") is a boss in Pikmin 3 and the fourth major boss encountered in Story Mode, at the Twilight River. It quickly abducts Louie before the player can reach him. It resembles a queen bee of sorts, since it is able to command a swarm of Scornets using its harp-like beak. This beak will even produce harp music when each attack is happening.
The Scornet retinue is used to attack the leaders and their Pikmin. The boss relies heavily on the Scornets, as it has no way of attacking.
It cannot be attacked while its swarm is surrounding it, requiring the leaders to do so when the swarm becomes absent after one of its coordinated attacks. Once the creature is defeated, it will drop the Seed Hive and Louie, and all one hundred of the Scornets it commanded will instantly die.
Stats
| Weight | Max. carriers |
Seeds | Value | Health |
|---|---|---|---|---|
| 10 | 20 (normally) | 50 | 5[note 1] | 8000 |
- ^ This enemy is not collectible in Mission Mode. This value is obtained from the game files.
Notes
Alph's comments
“Structural flaw: weak hide
Weight: 10
Brittany's comments
Charlie's comments
Louie's comments
Olimar's comments
“Scornet Maestro
Spourgitis advenus
Huntinpeck family
Pikmin 3 Prima Guide
“The Scornet Maestro is located in the Twilight River. As its name implies, this creature attacks by controlling a swarm of Scornets.
The Scornet Maestro is well defended by its minions. Avoid attacking while the Scornets are in the area. Each time the Scornets move into a tight formation, avoid their attack and allow them to fly out of the area. When it's safe, use your Winged Pikmin to bring the vulnerable Scornet Maestro to the ground, then have the rest of your squad charge in to attack. When the Scornets return to the area, gather your Pikmin and repeat the process.
Each time a Scornet manages to impale one of your Pikmin, defeat the enemy before your Pikmin succumbs to its injuries.”Defeat Bosses!
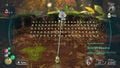
In Defeat Bosses!, the player can refight the Scornet Maestro. The time limit is 10 minutes. The only exit of the arena is blocked off by a "keep out" sign. The player can use Alph (player 1's starting leader), Brittany (player 2's starting leader), and Charlie. Their order in Pikmin 3 is Alph, Brittany, Charlie, and in Pikmin 3 Deluxe the order is Brittany, Charlie, Alph. 100 Pikmin are on the field in this mission, but only 50 start in the player's squad: 30 Winged Pikmin and 20 Red Pikmin. Around the edges of the arena are groups of buried Pikmin. There are two groups of 10 Winged Pikmin, two groups of 10 Red Pikmin, and one group of 10 Rock Pikmin. The Pikmin in the squad from the start all have the leaf maturity, while the buried Pikmin have a mix of bud and flower maturities. If at any point during this fight all of the player's Winged Pikmin are lost, the game will display a message stating that it is impossible to damage the boss, and will ask if the player wants to give up or continue regardless.
The following table lists what medal the player gets according to the time they take:[1]
| Bronze | Silver | Gold | Platinum |
|---|---|---|---|
| 8:00 - 6:01 | 6:00 - 4:01 | 4:00 - 3:01 | 3:00 - 0:00 |
In Pikmin 3, these are the world records for the challenge, as obtained from the in-game global rankings feature. The following scores were retrieved on December 9th, 2015. Since the in-game leaderboards have been compromised, it is impossible to obtain more up-to-date legitimate records from the game, though players may have obtained higher scores since.
- Solo: 1:06
- Co-op: 1:33
In Pikmin 3 Deluxe, these are the world records for the challenge, as obtained from the in-game global rankings feature. The following scores were retrieved on June 27th, 2022.
- Solo: 0:40
- Co-op: 0:46
Strategy
|
The following article or section contains guides. |
Attacks
The Scornet Maestro itself is harmless and has no direct way of damaging Pikmin. However, it commands the Scornets to attack for it with its harp-like mouth. All attacks by the Scornets have the same effect: the Pikmin caught in the attack will be held by the Scornets for a certain amount of time, and if not freed, will be killed.
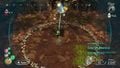
- The Scornet Maestro will order the Scornets to get into a cone formation and will aim at the active leader. Simply move around a lot to dodge.
- The Scornet Maestro will order the Scornets to get into lines, and each line will proceed to aim at the active leader. Walk around the outer edge of the arena to dodge.
- The Scornet Maestro will order the Scornets to form a circle around the active leader. Have a few Pikmin kill some Scornets to escape the circle.
If any Pikmin are captured, the Scornets will form a circle around the Scornet Maestro and will eat them after a few seconds. Throw Pikmin at the Scornets to save them.
Standard strategy

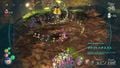
The strategy is mainly to defend your Pikmin from the Scornets and then attack the Scornet Maestro. As the battle progresses, it will create different formations with its retinue in an attempt to destroy your swarm. Note that this boss completely relies on its own swarm to attack, possessing no offensive moves of its own besides shaking off Pikmin.
The first formation is a gigantic cone-like pattern and is the easiest to avoid. The attack is simple to dodge: just wait for the formation to strike and strafe around the swarm. If any Pikmin are captured by the swarm, it will move around the boss in a circle formation, holding the captured Pikmin. The swarm must be attacked swiftly to free the Pikmin. If the Pikmin aren't released, they will eventually die.
The second formation is an array. It will release one line after another to attack your Pikmin. This formation can be tricky to avoid, as the lines of Scornets adjust their flight if you try to run around them. However, as the Scornets are gathering in the array, they are extremely vulnerable to Pikmin attacks. Rock Pikmin seem to do well at picking off Scornets in this formation.
The third formation has the swarm forming a circle surrounding you, slowly closing in. If any Pikmin are left behind inside the circle, they will be captured. You need to use your Pikmin to create gaps in the circle to allow your group to escape. To avoid leaving Pikmin behind, use an ultra-spicy spray to create a hole quickly and get out faster.
If all the Scornet Maestro's Scornets are killed, it will use a period during which it would normally create an attack formation to summon more onto the field from the trees in the background.
Once any of the formations are complete, the swarm will temporarily leave the boss, giving you a chance to attack it. To strike it, throw Pikmin at it, preferably Winged Pikmin. Once enough Pikmin are latched onto it, it will fall to the ground, allowing any ground-based Pikmin to swarm it as well. When it dies, it will drop a large fruit, alongside Louie. Its body, alongside the corpses of its swarm, can be taken back to the Onion. As with all bosses in the game, the Scornet Maestro's corpse produces 50 Pikmin.
Due to the way the Scornets dive to attack, it is possible to avoid their primary attack, the cone formation, by simply being really close to the walls that surround the arena. When the Scornets dive in, they quickly turn back up to be able to exit the arena, and won't dive low enough to catch Pikmin. This is not fool-proof though, as the Scornets can still catch some Winged Pikmin that are flying a bit too far from the walls.
Expert strategy
The Scornet Maestro will only attempt to attack the leader that is currently active. This can be used to an advantage by having an unoccupied leader stand away from another leader who has all the Pikmin. When the Scornet Maestro begins an attack, it will lock on the current leader, and will not switch targets, meaning that at this point, you can swap from the defenseless leader to one with Pikmin, and attack it by swarming it with Winged Pikmin. Once it falls to the ground, pelt the creature with Rock Pikmin to rapidly diminish its health. The lonesome leader will receive damage from the Scornet attacks, but unless their health was low at the start of the battle, they will be able to endure the strikes without much of a problem.
Due to the scripting of this boss battle, this process must be done at least four times to take down the boss. If the Scornets are attacked before charging and several are killed without any Pikmin being captured, the time between each attack is significantly reduced. This strategy will allow for a quick defeat in under three minutes.
In Mission Mode with two players, the boss will only ever target the first player's leader. It is not known how the boss targets players during 2 player story mode in Deluxe.
Badges
In Pikmin 3 Deluxe, there is a badge the player can gain from the Scornet Maestro:
- Decomposer: Defeating the Scornet Maestro.

Decomposer. The badge shows the creature.

Technical information
| Pikmin 3 technical information (?) | |
|---|---|
| Internal name | mureboss
|
| HP | 8000 |
| Rock Pikmin throw hits to kill | 200 |
| White Pikmin ingestions to kill | 0 |
| Bomb rock explosions to kill | 20 |
| Bomb rock ingestions to kill | 0 |
| Number of direct hits on top to kill | 0 |
| Damage to leaders | 10 |
| Territory radius | 300 |
| Mission Mode value | 5 |
Other information
- Musical theme: Boss battle
Naming
- See more: Scornet#Naming.
- Common name: Scornet Maestro. The name is the same as a Scornet's, but with "maestro"; a maestro is the person that conducts the music in an orchestra.
- Japanese nickname: タテゴトハチスズメ? (lit.: "Harp Bee Sparrow"). This name is also the same as the Scornet's, but starts with the word "Harp".
- Japanese name: ワタリハチスズメ?, lit.: "Migratory Bee Sparrow". It is shared with the regular Scornet.
- Scientific name: Spourgitis advenus. It is also shared with the regular Scornet, confirming they are the same species.
- Internal names: Finally, it shares the internal name with the Scornet, except with
bossappended to the name, making itmureboss, the boss of the swarm. - Prerelease: None.
Names in other languages
| Language | Name | Meaning |
|---|---|---|
| タテゴトハチスズメ? Tategoto Hachi Suzume |
Harp Bee Sparrow | |
(traditional) |
豎琴蜂雀 | |
| Maestro apidar | Portmanteau from Latin apis (bee) and French dard (sting), and Maestro. | |
| Dornissenkönigin | Scornet Queen | |
| Passerape regina | Queen Scornet | |
| 하프벌참새 | ||
| Abejardo jefe | Boss Scornet | |
| Abejardo jefe | Boss Scornet |
Gallery

The first encounter of the Scornet Maestro.

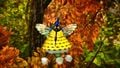
The Scornet Maestro roaring as it first appears.
Cone formation.
Line formation.
Circle formation.
Captured Pikmin.
The creature being weighed down by the Winged Pikmin.
Front view of the Scornet Maestro.

The Scornet Maestro defeated.
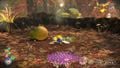
The deceased Scornet Maestro surrounded by the Seed Hive and Louie.
The corpses of the Scornet Maestro and its subordinates.
The data file on the creature.
Defeat Bosses! icon.


Trivia
- The Scornet Maestro is the second airborne boss to appear in the series, the first being the Vehemoth Phosbat; both appear in the same game.
- The Scornet Maestro is the smallest boss in the Pikmin series.
- The Scornet Maestro is similar to a boss in another Nintendo game, Metroid Prime 3: Corruption, Helios. Both Helios and the Scornet Maestro are smaller bosses (in comparison to other bosses) that use smaller minions to both protect themselves and attack the player.
- During its battle, even if the player locks-on the Scornets, it will lock-on to the Scornet Maestro instead.
- Interestingly, when the Scornet Maestro is defeated, not only will the Scornet Maestro's corpse fall, but all the Scornets as well, which can be brought back to the Onion. Normally, Scornets are not retrievable when defeated.
- The Scornet Maestro can command up to one hundred Scornets at the same time, much like the player's leaders can control up to the same amount of Pikmin.
- If the boss loses all of its health while in mid-air, it will drop to the ground, even if no Pikmin are latched on to it. Only when it is on the ground can its death sequence start.
- Although the Scornet Maestro is a queen – as stated in Olimar's reports, and in its name in certain languages – it has a hair-pencil, a furry appendage on the abdomen that releases pheromones used by male butterflies to attract mates. The Scornet Maestro instead uses those pheromones to control the Scornets, as queen bees do without hair-pencils.
See also
References
- ^ The values in the Prima Guide are incorrect. These are the values used in the game's files, as per
content/CMCmn/system/mission_set/miset_misBoss4.szs/misBoss4.txt:# RuleData { # BeatBossMission version 20130126 # CID 33554502 # GradeTime 3 1 # プラチナ 4 1 # 金 6 1 # 銀 8 1 # 銅 }
| Bosses | |
|---|---|
| Pikmin | |
| Pikmin 2 | |
| Pikmin 3 | |
| Pikmin 4 | |
| Hey! Pikmin | |
| Pikmin 3 enemies |
|---|