Scornet Maestro: Difference between revisions
Los Plagas (talk | contribs) (Image) |
(organizing structure, adding images, finishing infobox) |
||
| Line 1: | Line 1: | ||
{{Infobox enemy | {{Infobox enemy | ||
|pikmin3 = y | |pikmin3 = y | ||
|image | |image = Scornet Maestro.png | ||
|size | |size = 250 px | ||
|areas = Twilight River | |areas = Twilight River | ||
|weight = 10 | |||
|max_pikmin = 20 | |||
|seeds = 50 | |||
|attacks = Commands Scornets | |attacks = Commands Scornets | ||
}} | }} | ||
{{spoiler}} | {{spoiler}} | ||
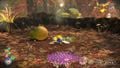
The '''Scornet Maestro''' is the boss of the [[Twilight River]] and the fourth boss overall of ''[[Pikmin 3]]''. It appears to be a combination of a bee and a bird, with harp-like strings connecting its mandibles. It is accompanied by a swarm of [[Scornet]]s, and the Scornet Maestro uses its "harp" to control the Scornets. Upon the player's arrival to the top of the tree stump, it abducts [[Louie]] | The '''Scornet Maestro''' is the boss of the [[Twilight River]] and the fourth boss overall of ''[[Pikmin 3]]''. It appears to be a combination of a bee and a bird, with harp-like strings connecting its mandibles. It is accompanied by a swarm of [[Scornet]]s, and the Scornet Maestro uses its "harp" to control the Scornets. Upon the player's arrival to the top of the tree stump, it abducts [[Louie]]. | ||
==Attacks== | |||
The Scornet Maestro isn't as much of a threat as the Scornets it commands: the Scornets will fly in and attack the player's squad, but the Scornets will attack in three formations. The first formation involves the Scornets organizing themselves into a conical shape, which will shoot Scornets at the Pikmin. The Maestro repeats this attack until its [[health]] is lowered to 50%, after which it utilizes another formation. The Scornet Maestro makes the Scornets line up into a five-row deep rectangular formation, which the Scornet Maestro will send at the Pikmin, one row at a time. It will repeat this until its health is further lowered to 25%, to which it will use its most dangerous attack yet. The final attack involves the Scornets circling around the leader's squad of Pikmin, slowly closing in. | |||
== | ==Strategy to defeat== | ||
The Scornet Maestro is defenseless without its Scornets. After each attack, the Maestro is vulnerable; the player should use Winged Pikmin to attack, as it is airborne. However, each new attack is increasingly harder to avoid. When the Scornets use their second attack, the player should move their squad to the side to avoid their Pikmin being snatched up. In the event of Pikmin being snatched up, the Scornets with Pikmin will circle around the Maestro; the player needs to use Winged Pikmin to free them. When the Scornets circle around the squad, the player should make a gap in the circle with Winged Pikmin. After its defeat, the Scornet Maestro drops Louie, along with the Seed Hive, a papaya, worth 2 1/2 bottles of juice. | |||
==Gallery== | |||
<gallery> | |||
File:Scornet Maestro cone.jpg|The Scornets attacking in their conical formation. | |||
File:Scornet Maestro row.jpg|The Scornets attacking in their row formation. | |||
File:Scornet Maestro circle.jpg|The Scornets attacking in their circular formation. | |||
File:Scornet Maestro dead.jpg|The bodies of the Scornet Maestro and the Scornets, along with the freed Louie and Seed Hive. | |||
</gallery> | |||
==Trivia== | |||
*The Scornet Maestro and its Scornets draw interesting parallels to the captains and their Pikmin. Both the captains and the Maestro command massive armies made up of small organisms that would be weak by themselves. However, without this army, both leaders are effectively defenseless. | *The Scornet Maestro and its Scornets draw interesting parallels to the captains and their Pikmin. Both the captains and the Maestro command massive armies made up of small organisms that would be weak by themselves. However, without this army, both leaders are effectively defenseless. | ||
{{Enemies}} | {{Enemies}} | ||
[[Category:Bosses]] | [[Category:Bosses]] | ||
[[Category:Airborne enemies]] | [[Category:Airborne enemies]] | ||
Revision as of 07:16, January 4, 2014
| Scornet Maestro | |
|---|---|
| File:Scornet Maestro.png | |
| Appears in | Pikmin 3 |
| Scientific name | Unknown |
| Family | Unknown |
| Areas | Twilight River |
| Mission Mode Collect Treasure! stages | None |
| Mission Mode Battle Enemies! stages | None |
| Side Story days | None |
| Bingo Battle stages | None |
| Attacks | Commands Scornets |
The Scornet Maestro is the boss of the Twilight River and the fourth boss overall of Pikmin 3. It appears to be a combination of a bee and a bird, with harp-like strings connecting its mandibles. It is accompanied by a swarm of Scornets, and the Scornet Maestro uses its "harp" to control the Scornets. Upon the player's arrival to the top of the tree stump, it abducts Louie.
Attacks
The Scornet Maestro isn't as much of a threat as the Scornets it commands: the Scornets will fly in and attack the player's squad, but the Scornets will attack in three formations. The first formation involves the Scornets organizing themselves into a conical shape, which will shoot Scornets at the Pikmin. The Maestro repeats this attack until its health is lowered to 50%, after which it utilizes another formation. The Scornet Maestro makes the Scornets line up into a five-row deep rectangular formation, which the Scornet Maestro will send at the Pikmin, one row at a time. It will repeat this until its health is further lowered to 25%, to which it will use its most dangerous attack yet. The final attack involves the Scornets circling around the leader's squad of Pikmin, slowly closing in.
Strategy to defeat
The Scornet Maestro is defenseless without its Scornets. After each attack, the Maestro is vulnerable; the player should use Winged Pikmin to attack, as it is airborne. However, each new attack is increasingly harder to avoid. When the Scornets use their second attack, the player should move their squad to the side to avoid their Pikmin being snatched up. In the event of Pikmin being snatched up, the Scornets with Pikmin will circle around the Maestro; the player needs to use Winged Pikmin to free them. When the Scornets circle around the squad, the player should make a gap in the circle with Winged Pikmin. After its defeat, the Scornet Maestro drops Louie, along with the Seed Hive, a papaya, worth 2 1/2 bottles of juice.
Gallery
- Scornet Maestro cone.jpg
The Scornets attacking in their conical formation.
- Scornet Maestro row.jpg
The Scornets attacking in their row formation.
- Scornet Maestro circle.jpg
The Scornets attacking in their circular formation.
The bodies of the Scornet Maestro and the Scornets, along with the freed Louie and Seed Hive.

Trivia
- The Scornet Maestro and its Scornets draw interesting parallels to the captains and their Pikmin. Both the captains and the Maestro command massive armies made up of small organisms that would be weak by themselves. However, without this army, both leaders are effectively defenseless.