Yellow Wollyhop: Difference between revisions
Prezintenden (talk | contribs) No edit summary |
Jimbo Jambo (talk | contribs) (Rewriting) |
||
| Line 14: | Line 14: | ||
|attacks=Crushes Pikmin}} | |attacks=Crushes Pikmin}} | ||
'''Yellow | The '''Yellow Wollywog''' is probably the first thing that comes to mind when one hears the term 'amphituber' or 'wollywog.' These frog-like creatures can usually be found in or around large, open-air bodies of water. They are known to leap into the air with the intent of landing on and crushing small [[Pikmin Family|Pikmin]] below, and behavior which is most readily explained as an attempt to drive predators away from developing eggs. | ||
{{notes|enemy}} | {{notes|enemy}} | ||
== | ==Strategies== | ||
===Pikmin 1=== | ===Pikmin 1=== | ||
These dangerous enemies must be dealt with carefully, as one false step could mean the loss of dozens of Pikmin with a single attack. Swarm with as many Pikmin as are on-hand and they should be able to weigh the Wollywog down to the point where it cannot jump; as their health dwindles, Wollywogs can often summon the energy to make a last-ditch leap into the air, so be prepared to call your Pikmin back when its HP meter enters the red zone. Any Pikmin hanging onto the Wollywog when it lands will be thrown off and possibly deflowered from the force of the impact, sometimes spelling doom for non-[[Blue Pikmin|blue]] Pikmin if they are knocked into a nearby pool. | |||
===Pikmin 2=== | ===Pikmin 2=== | ||
Wollywogs are much harder to ground in [[Pikmin 2]], even if numerous Pikmin are thrown onto its back, but swarming can still be an effective strategy, as the radius within which the Wollywog can crush a Pikmin is substantially smaller than in the [[Pikmin (game)|first game]]. [[Purple Pikmin]] will also work exceedingly well when thrown at this beast in large numbers, as each one carries the chance of stunning it, preventing it from fighting back. Even so, often the safety strategy is simply to punch it with your [[captain]], especially if the [[Rocket Fist]] upgrade is available. | |||
[[ | |||
{{Enemies}} | {{Enemies}} | ||
Revision as of 13:52, March 4, 2008
| Yellow Wollyhop | |
|---|---|

| |
| Appears in | N/A |
| Scientific name | Amphicaris frodendum |
| Family | Amphituber |
| Areas | The Distant Spring, Awakening Wood, Perplexing Pool, Wistful Wild |
| Attacks | Crushes Pikmin |
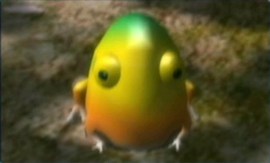
The Yellow Wollywog is probably the first thing that comes to mind when one hears the term 'amphituber' or 'wollywog.' These frog-like creatures can usually be found in or around large, open-air bodies of water. They are known to leap into the air with the intent of landing on and crushing small Pikmin below, and behavior which is most readily explained as an attempt to drive predators away from developing eggs.
“{{notes:enemy/{{{2}}}|block=y}}”
Strategies
Pikmin 1
These dangerous enemies must be dealt with carefully, as one false step could mean the loss of dozens of Pikmin with a single attack. Swarm with as many Pikmin as are on-hand and they should be able to weigh the Wollywog down to the point where it cannot jump; as their health dwindles, Wollywogs can often summon the energy to make a last-ditch leap into the air, so be prepared to call your Pikmin back when its HP meter enters the red zone. Any Pikmin hanging onto the Wollywog when it lands will be thrown off and possibly deflowered from the force of the impact, sometimes spelling doom for non-blue Pikmin if they are knocked into a nearby pool.
Pikmin 2
Wollywogs are much harder to ground in Pikmin 2, even if numerous Pikmin are thrown onto its back, but swarming can still be an effective strategy, as the radius within which the Wollywog can crush a Pikmin is substantially smaller than in the first game. Purple Pikmin will also work exceedingly well when thrown at this beast in large numbers, as each one carries the chance of stunning it, preventing it from fighting back. Even so, often the safety strategy is simply to punch it with your captain, especially if the Rocket Fist upgrade is available.